1. Ethical Statement and Safety
- This procedure involves the use of cell culture products derived from humans or animals. All derived tissues must be approved before use by the appropriate Institutional Review Board(s) and/or the Institutional Animal Care and Use Committee(s).
- All bio-hazardous waste must be disposed of according to safety regulations decided upon by the respective institution. Know and follow all of the apposite safety and disposal guidelines throughout this procedure.
2. Preparation of Equipment, Supplies, Reagents, and Observations
- Preparation
- Obtain a glass Petri dish, 8.5 cm filter paper circles and double-edge prep blades.
- Place a piece of filter paper in the Petri dish and transfer several unsheathed blades onto the filter paper in the Petri dish.
- Repeatedly layer filter paper and blades until the Petri dish is roughly 75% full, cover with Petri dish lid and autoclave. Store in a sterile or enclosed environment to preserve sterility.
- Autoclave 18 cm forceps and an autoclavable nut-driver in a sterilization pouch. For cGMP production, autoclave several stainless steel shim discs in sterilization pouches. For more information regarding the shim disc, see step 3.5.
- Sanitize the bio-safety cabinet (BSC) with 70% isopropyl alcohol (IPA).
- All procedures must be performed in a BSC to maintain sterility. Aseptically transfer the following into the BSC:
- McIlwain Tissue Chopper (chopper). Wipe down all surfaces with 70% IPA, especially the chopper arm (Figure 1B). The entire chopper can be decontaminated using ethylene oxide if necessary.
- One autoclaved nut-driver or nut-wrench (included with the chopper, Figure 1I), one 18 cm forceps, one set of standard size micropipettors (20 µl-1,000 µl), one pipetaid and tube racks.
- Sterile disposable serological pipettes, barrier pipet tips, 15 ml conical tubes, 60 mm Petri dishes, double-edge prep blades and appropriately sized T flasks. CAUTION: Only handle the sharp blades with a forceps.
- Reagents
- Expand hNPCs in Maintenance Media (MM) consisting of Neural Stem Cell Expansion Medium, EGF at 100 ng/ml and Leukemia Inhibitory Factor (LIF) at 10 ng/ml. Transfer the reagents and filtration device(s) required to prepare media into the BSC.
- Re-suspend the lyophilized EGF using Neural Stem Cell Expansion Medium and prepare aliquots at 100 µg/ml to store at -80 °C for up to 1 year. LIF is stored as purchased at 4 °C for up to 6 months or the expiration date given by the manufacturer.
- Transfer MM reagents into the BSC. Combine all reagents in an appropriately sized filtration device and filter using a vacuum apparatus. Store at 4 °C for up to 3 weeks.
- hNPC Observations
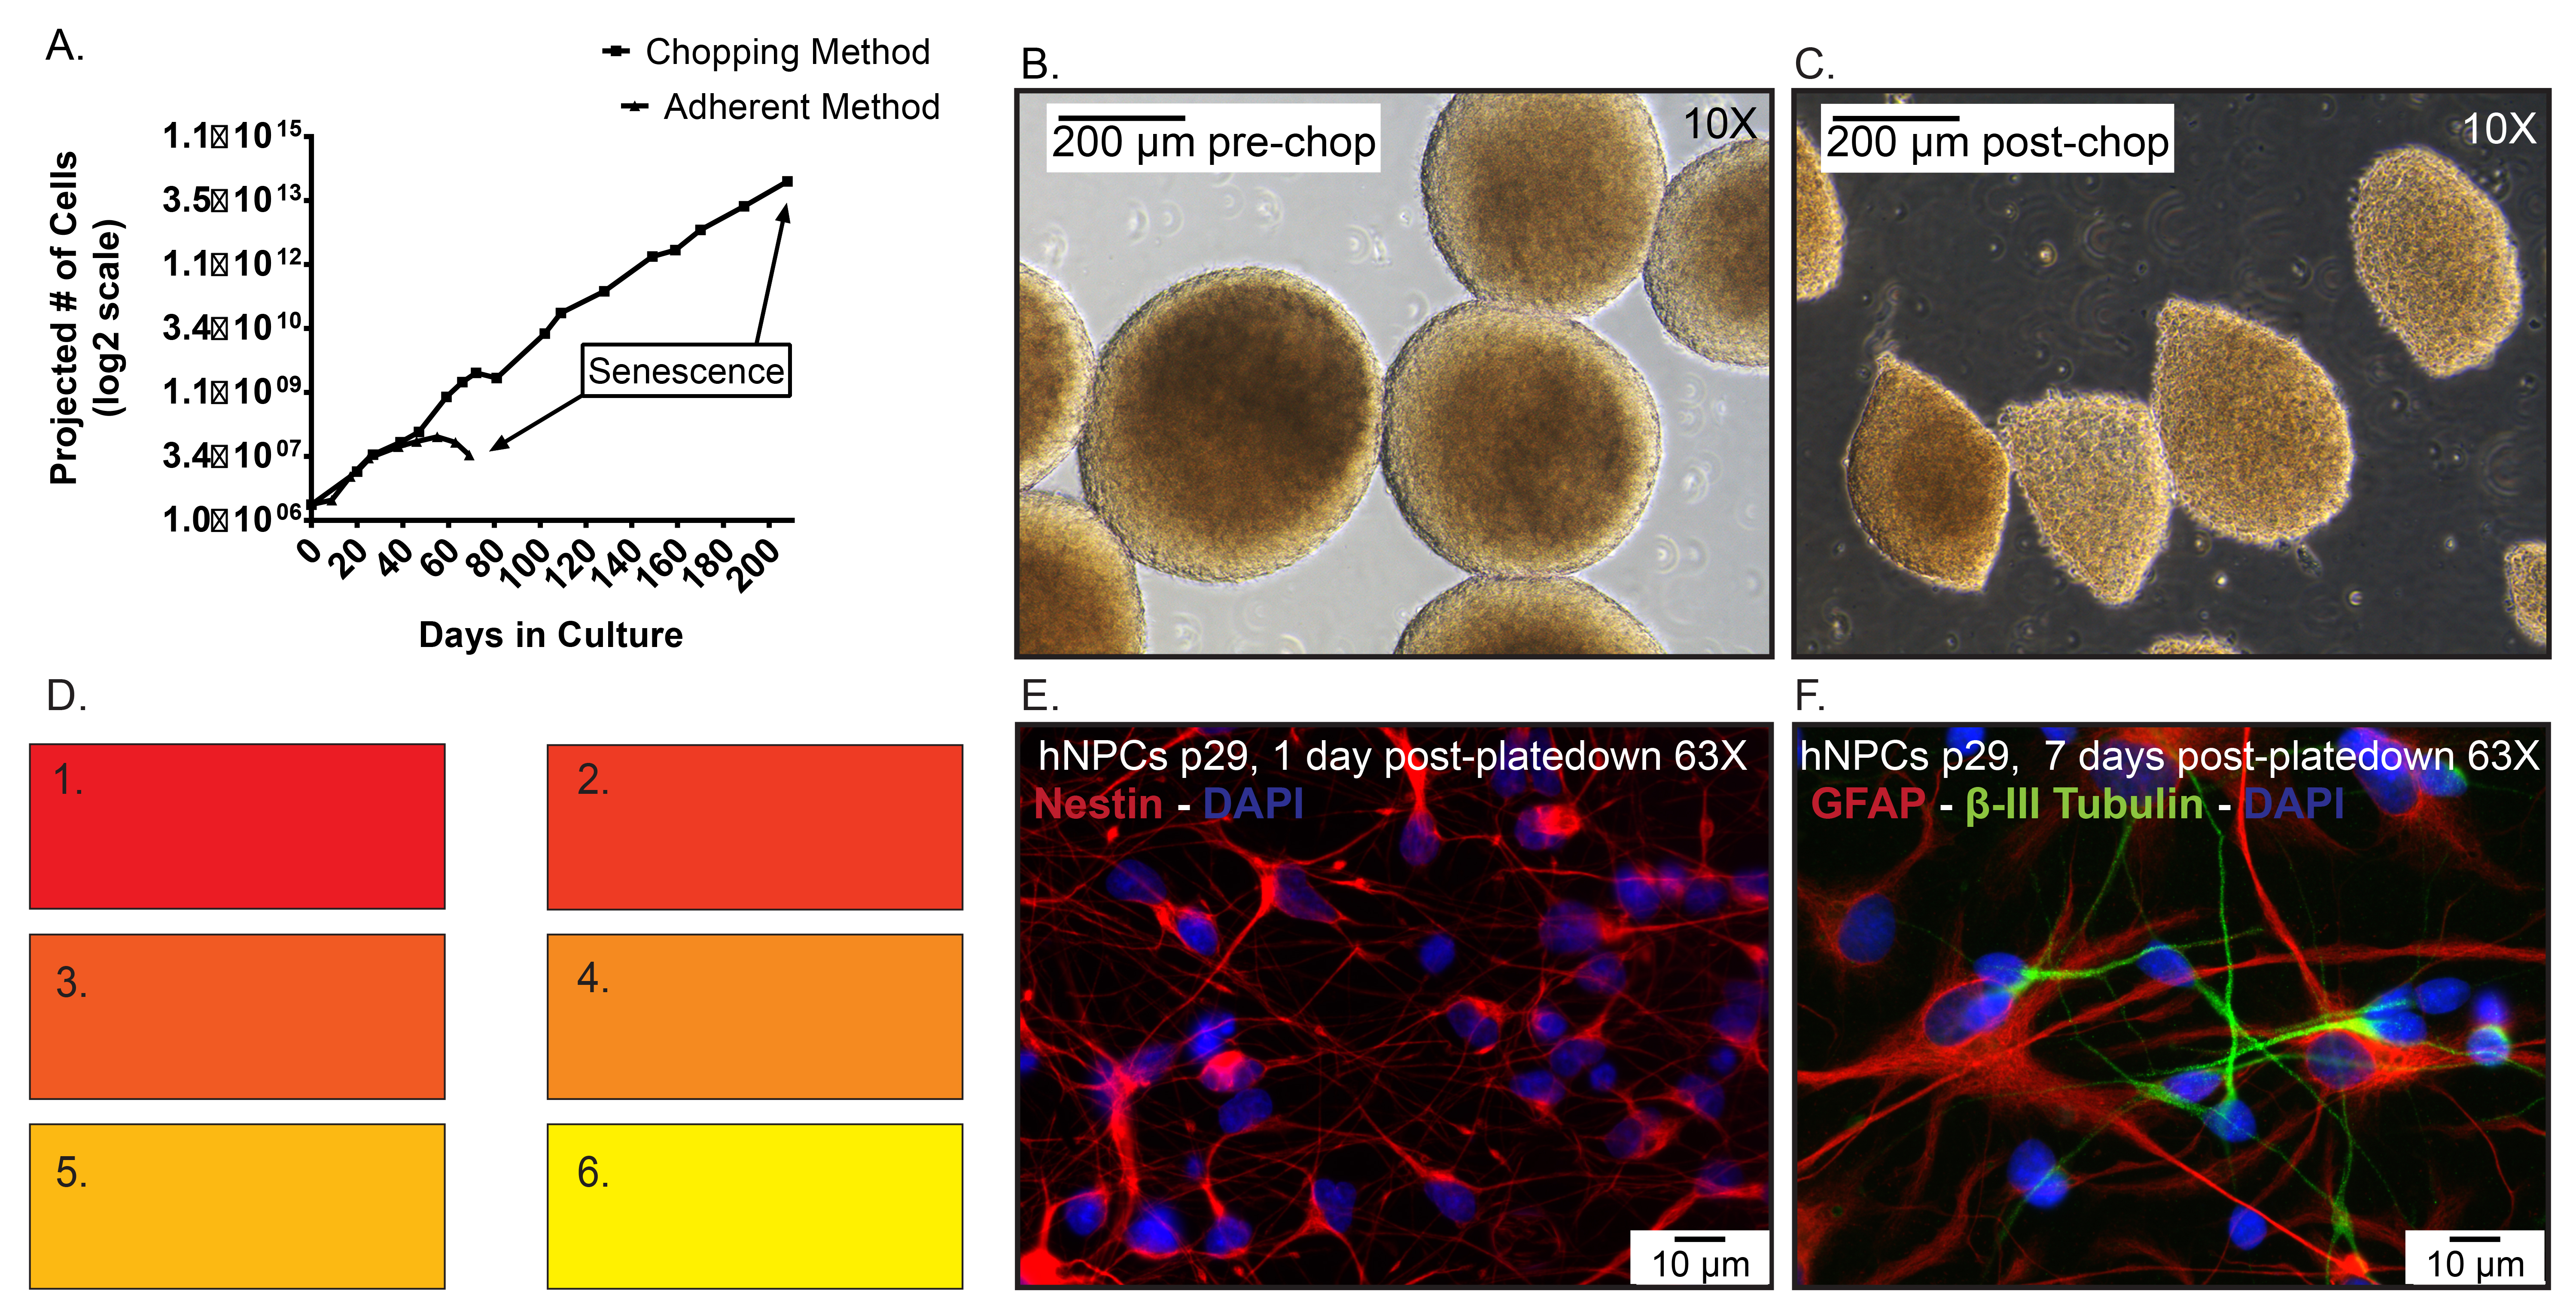
- The two most important factors to address before chopping is sphere diameter and media conditioning or color. Conditioned media (CM) is defined as medium that has been metabolized by the hNPCs in culture under incubator conditions (37 °C, 5% CO2, 95% humidity). As the cells metabolize the media the phenol red component will shift from a pink to yellow color signifying a more acidic environment (Figure 5D).
- Hold the flask(s) of hNPCs up to the light to address the media color (see discussion for details).
- Scan through the flask with a microscope to observe the cells. Use a reticle to examine sphere size. If many spheres have a diameter of 300 µm or greater, proceed with the chopping process. Chop the cells every 7-10 days.
- If a chop is not warranted, exchange 25-75% of the CM with fresh media every 3-4 days depending on how quickly the cells are metabolizing the media. Continue to exchange media until the spheres are the large enough to passage.
- hNPCs are typically chopped at a ratio of 1:2, from smaller flasks to larger flasks. Use Table 1 as a reference guide for flask size and volume recommendations.
| Flask | Volume of total media | Pre-Chop | → | Post-Chop |
| 1 T12.5 | 5 ml | 1 T12.5 | → | 1 T25 |
| 1 T25 | 10 ml | 1 T25 | → | 1 T75 |
| 1 T75 | 20 ml | 1 T75 | → | 1 T175 |
| 1 T175 | 40 ml | 1 T175 | → | 2 T175s |
| 2 T175s | 80 ml | 2 T175s * | → | 4 T175s |
| * 2 T175s is the maximum number of flasks that can be chopped at a time. Chop in sets of 2 T175s and refer to step 7. |
Table 1. hNPC expansion paradigm. Description of a typical expansion scheme for hNPCs. It is standard to expand two-fold volumetrically every 7-10 days.
3. Chopper Setup

Figure 1. McIlwain Tissue Chopper. A) Chop thickness adjustment micrometer, B) Chopper arm base and attached arm, C) Hook on plate holder for Petri dish, D) Table release knob and tray, E) Blade force control knob, F) Reset switch, G) Plate holder, H) Bolt attachment for blade, clasp and nut, I) Nut wrench included with chopper, J) Blade/clasp nut, K) Blade clasp, L) Automated chopping speed control knob, M) Manual chopping arm operating knob, N) Power switch.
- Plug the chopper into an outlet in the BSC and turn on the power switch (Figure 1N). Set the chopping distance to 200 µm (Figure 1A). Set the blade force to 270° or 9:00 if the knob was a clock (Figure 1E). Confirm that the automatic speed knob is rotated as far counterclockwise as possible. (Figure 1L).
- Move the table release all of the way to the right confirm the plate holder is stable (Figure 1D).
- Rotate the manual arm manipulator clockwise to raise the arm to its maximum level (Figure 1M). The manual arm manipulator must only be rotated clockwise.
- Aseptically transfer a sterile, double-edged chopping blade onto the chopper arm bolt using a pair of forceps (Figure 1H).
- Complete this step only for cGMP passaging, as the Petri dish alone is sufficient for research-grade processing. As noted in step 2.1.4, shim discs placed inside of the Petri dish base are required for cGMP. The shim disc prevents plastic shards from incorporating into the spheres during the chopping procedure. For each planned chop, transfer one shim disc into the base of each Petri dish and cover.
- Aseptically place the clasp (Figure 1K) over the blade using the forceps. The curved portion of the clasp must be over the top edge of the arm. The clasp will not stay on the arm until the nut has been securely fashioned. Use the forceps to hold the clasp onto the arm and secure the nut (Figure 1J) onto the bolt with the sterile nut-driver. Leave the nut a ¼ turn loose.
4. Pre-chop Procedure
- Transfer the suggested volume of MM into the new flask(s) as per Table 2, Column C.
- Aseptically transfer the cells from the incubator into the BSC. Lean the flask(s) on a tube rack (Figure 2A) and allow the spheres to settle in the flask(s).
- Once settled, aspirate up to 12 ml of supernatant with a 5 ml or 10 ml serological pipette and rinse all loosely adherent spheres from the surface of the flask(s). Repeat as necessary and settle the spheres between rinses.
- Transfer the suggested volume of CM into the new flask(s) according to Table 2, Column D. If passaging two or more T175 flasks, see step 7.1.
- Transfer all remaining CM and spheres into a new 15 ml conical tube. Allow the spheres to settle and discard the used flask(s).
- Critical Step: Slowly transfer the spheres from the 15 ml conical tube onto the 60 mm Petri dish or shim disc in the lowest feasible volume; 0.1-0.5 ml is recommended (Figure 2B). Keep the remaining volume of CM as it will be used to rinse the cells from the dish post-chop. Try to minimize the surface area covered by the media and spheres on the dish (Figure 2C).

Figure 2. Sphere preparation for chopping. A) Lean the flask(s) against a tube rack or similar item to settle the spheres in the corner of the flask. B) Transfer the spheres as densely as possible from the conical tube to the Petri dish. C) Pool the spheres from the conical tube in the middle of the Petri dish. D) Remove as much supernatant as possible from the top of the pooled spheres. E) Spread the spheres out using the side of a plastic micropipettor tip. F) Gently move the spheres to one side of the pool. G) Example of spheres that have been moved to one side of the pool to facilitate media removal. H) Condensed spheres spread out on the Petri dish, ready for chopping. Click here to view larger image.
- Next, the spheres need to be condensed by removing the supernatant transferred over in step 4.6. Transfer the supernatant back into the 15 ml conical tube with an aerosol barrier-tipped micropipettor (Figure 2D), avoid the removal of spheres. Start by removing as much media as possible from the top of the media/cell pool. When it is not possible to remove media without spheres, proceed to the following step.
| Column A | | Column B | Column C | Column D | Column E | Column F |
| Pre-Chop Flask Size | → | Post-Chop Flask(s) Size | Suggested volume of MM to transfer to new flask(s) pre-chop | Suggested volume of CM to transfer to new flask(s) pre-chop | Suggested volume of spheres/media to transfer into new flask(s) post-chop | Final Volume Seeded/Flask |
| T12.5 | → | T25 | 5 ml | 0 ml | 5 ml | 10 ml |
| T25 | → | T75 | 10 ml | 0 ml | 10 ml | 20 ml |
| T75 | → | T175 | 20 ml | 10 ml | 10 ml | 40 ml |
| 1 T175 | → | 2 T175s | 20 ml per flask | 15 ml per flask | 5 ml per flask | 40 ml |
| 2 T75s | → | 4 T175s | 20 ml per flask | 17.5 ml per flask | 2.5 ml per flask | 40 ml |
Table 2. Media transfer guide pre/post-chop. Suggested volumes to use during the chopping process.
- Spread the pool out using the side of the pipet tip to increase surface area (Figure 2E).
- Critical Step: Tip the Petri dish slightly towards you and use the side of the pipet tip to gently slide all of the spheres to one side of the pool (Figure 2F,G).
- Critical Step: When all cells have been relocated, slowly tip the Petri dish the opposite direction. During the process, the media alone will flow away from the spheres. Transfer the media back into the 15 ml conical tube. Minimal sphere removal is acceptable.
- Use the side of the pipet tip to gently slide all of the spheres back to the center of the Petri dish so the pool has a diameter of 0.5-2.4 cm (Figure 2H). It is important to keep the depth of the sphere pool shallow. If the pool is too deep, the spheres will simply be pushed aside during chopping. NOTE: The diameter of sphere pool cannot be greater than 2.5 cm or the blade will contact the edges of the Petri dish, missing the cells.
5. Chop Procedure
- Transfer the Petri dish onto the plate holder (Figure 1G) and ensure the dish is secured under the plate holder hooks (Figure 1C).
- The table release knob has notches where it will fit into gear. Use the table release knob to slide the plate holder to the left so the blade is clear of the spheres and locked into gear (Figure 1D).
- Critical Step: Lower the chopper arm by rotating the manual manipulator knob (Figure 1M) clockwise until the blade snaps down flat onto the Petri dish. Use one hand to press down on the arm mount (Figure 1B) while tightening the nut with the nutdriver.
- Push the reset button once (Figure 1F). Steady the Petri dish with one hand while turning the automatic arm manipulator knob (Figure 1L) clockwise to the 90° position or 12:00 if the knob was a clock. CAUTION: Keep fingers away from the moving blade at all times.
- Pass the blade fully through the pool of spheres. Rotate the plate holder 90°.
- Loosen the bolt and repeat step 5.3-5.5.
- Aseptically transfer the Petri dish from the plate holder onto a working space in the BSC.
6. Post-chop Procedure
- Prime a 10 ml serological pipette with the CM in the conical tube from step 4.6 and then transfer 1 ml onto the chopped spheres. Gently re-suspend and transfer into a new 15 ml conical tube. Avoid bubbles and repeat as many times as necessary to collect the chopped spheres.
TIP: Minimize scraping the dish as plastic fragments may lift off. This is not a concern if using the stainless steel shim discs. Beware of cells attaching to the inside of the plastic serological pipette. If this occurs, aspirate bubbles intermittently through media in the pipette to detach the cells.
- Measure the volume of CM and chopped spheres. Add the appropriate volume of MM to achieve the volume listed in Table 2, Column E.
- Triturate the spheres 2-3x to break up any loosely fused spheres.
- Critical Step: Aliquot the sphere suspension into each new flask. Only transfer the sphere suspension into one flask at a time, and re-suspend the spheres between transfers. Aliquoting multiple flasks at a time results in a disproportionate number of spheres in each flask. The final volume in each flask should equal the volumes in Table 2, Column F. See step 7.2 when seeding greater than two T175 flasks.
- Remove the nut with the nut-driver and then the clasp with the sterile forceps. Decontaminate appropriately with 70% IPA or equivalent. CAUTION: Remove the used chopping blade only with a forceps and discard in a bio-hazard sharps container.
- Decontaminate all surfaces of the chopper with 70% IPA.
7. Process Variations – Multiple Flasks
There are several differences when passaging more than two T175s. The steps below are alterations of the referenced step.
- References to step 4.4:
- When passaging two T175s, combine all of the media and spheres into one T175 flasks. Allow the spheres to settle and then aliquot the appropriate volume of CM into each of the new flasks as stated in Table 2, Column D. Proceed to the step 4.5.
- When passaging greater than two T175s, obtain a new T175 flask and label as the CM flask. Complete step 7.1.1 but transfer the CM into the CM flask. Store the flask on the side of the BSC to be used to collect the CM from all flasks until all flasks have been chopped. Then the CM will be equally aliquoted into each of the new flasks.
- Reference step 6.4 – When chopping the same cell line multiple times, transfer the chopped sphere suspension into a new T75 flask labeled spheres post-chop and record the volume transferred. Continue to combine the cells in this flask after every chop and store the flask in the incubator at 37 °C, 5% CO2, 95% humidity. After all chops have been completed, aliquot the sphere suspension in volume into each new flask. Proceed to step 6.5.
8. Cryopreservation
The following protocol is for cryogenically preserving hNPCs.
- Thaw cell freezing medium in a clean water bath at 37 °C and then store on ice. Cell freezing medium can be aliquoted and stored at -80 ˚C for up to 6 months.
- Fire polish glass Pasteur pipets by rotating the opening of the pipet in a flame. Prepare at least two large and two small bore fire-polished pipets (Figure 3). The spheres will be dissociated by moving from large to small bore pipets.
- Place TrypLE Select in the water bath at 37 °C for 5 min. Remove and keep at room temperature until ready for use.

Figure 3. Fire-polishing glass Pasteur pipets. A) Hold the pipet in the top part of the flame and spin in order to evenly round the edges of the glass pipet. B) Example of a large-bore fire-polished glass pipet. C) Example of a small-bore fire-polished glass pipet.
- Aseptically transfer the neurospheres into the BSC. Allow the spheres to settle by leaning the flask(s) against a tube rack and rinse the bottom of the flask to remove any loosely adherent spheres. Allow the spheres to re-settle.
- Transfer all but 5-10 ml of CM into a sterile bottle and measure the total volume. Place the remaining spheres and media into a conical tube.
- After all cells have settled, transfer all but a small meniscus of CM into the bottle and summate the volume.
- Aseptically transfer 5-10 ml of warmed TrypLE Select into the conical tube and re-suspend the cell pellet. Transfer the conical tube into the 37 °C water bath for 15-20 min. After 7.5-10 min, gently shake the conical tube to mix.
- Use the measured CM volume from step 8.5 and prepare an equal volume of MM. Combine and filter the 50% CM and 50% MM solution (CM/MM solution).
- Aseptically transfer a 40 µm strainer into a 50 ml conical tube.
- When the incubation is complete, spin the 15 ml conical tubes for 15 sec at 100 x g.
- Carefully aspirate and discard the TrypLE Select and any stringy substrate. Leave a small meniscus. Gently add 2 – 4 ml of CM/MM to dilute the remaining TrypLE Select while not disturbing the pellet. Let any dislodged cells re-settle before discarding the wash.
- Add 2-5 ml CM/MM solution to the tube spheres. Dissociate the spheres with a 5 ml pipette by triturating a maximum of 10x. Let the undissociated spheres settle for 1-2 min. Transfer the dissociated cell suspension onto the 40 µm strainer to remove fully undissociated clusters.
- Repeat step 8.12 with a fire-polished large-bore glass pipet and then a small-bore glass pipet.
- Rinse the strainer with 2-5 ml of CM/MM solution.
- Mix the cell suspension and remove samples for viability analysis.
- Dilute the samples with trypan blue at an appropriate dilution factor and count. Use the standard equation below to calculate the average viable cell concentration and calculate the total viable cells.

- Calculate the total volume of cell freezing media required to re-suspend the cells at 5.0 x 10⁶ cells/ml. 1 ml of cells will be seeded into each cryovial. Transfer the cryovials into the BSC.
- Centrifuge the cell suspension at 200 x g for 5 min at 4 °C in 15 ml conical tubes for best yield. If 50 ml conical tubes are used for a large scale freeze down, increase rate and time to 400 x g for 10 min.
- Re-suspend the cell pellet using the cell freezing medium at 5.0 x 10⁶ cells/ml. Aliquot 1 ml of cell suspension into each cryovial. For an even distribution, aspirate 6 ml of suspension and aliquot 5 cryovials x 1 ml. Transfer the remaining 1 ml of suspension back into the pool of cells. Repeat until all vials have been filled.
- Aseptically seal all seeded cryovials and transfer them onto ice for 5-10 min.
- Use one of the following for cryopreservation strategies to preserve the hNPCs:Isopropyl Alcohol Chamber
- Fill the required number of chamber(s) with 100% IPA at room temperature.
- Transfer the seeded cryovials from ice into the chamber(s) and transfer the chamber(s) into a -80 °C freezer overnight. The cells are stable for up to one week at -80 °C, however it is suggested to transfer the vials to long-term liquid nitrogen storage the following day.
Controlled Rate Freezer
- Upload an appropriate freezing program to the controlled rate freezer’s software. An example program is listed in Table 3. Figure 4 demonstrates a typical freezing curve for hNPCs. However, the exact program will vary for each freezer model. The standard overall sample rate should be close to -1 °C/min until reaching -40 °C, where the rate of freezing can be substantially increased to at least -80 °C.
| Step | Rate (°C) | End Temperature (°C) | Hold (min sec) | Trigger |
| 1 | -- | -- | 5 min 0 sec | Chamber |
| 2 | - 1.3 | - 5 | -- | Sample |
| 3 | -- | -- | 1 min 0 sec | Chamber |
| 4 | - 45 | - 58 | -- | Chamber |
| 5 | + 10 | - 26 | -- | Chamber |
| 6 | + 3 | - 23 | -- | Chamber |
| 7 | - 0.8 | - 40 | -- | Sample |
| 8 | - 10 | - 100 | -- | Chamber |
| 9 | - 35 | - 160 | -- | Chamber |
Table 3. Steps for freezing hNPCs in a controlled rate freezer. Suggested program for hNPC cryopreservation on a controlled rate freezer.

Figure 4. Sample freezing curve. Typical freezing curve for hNPCs on a controlled rate freezer.
- Transfer the cryovials from ice into the baskets associated with the control rate freezer. Be sure to load one cryovial with only cell freezing media to use for the sample temperature probe. Transfer the baskets into the freezing chamber and place the sample probe into the probe vial. Start the program.
- When the protocol has completed, transfer the vials into long-term liquid nitrogen storage.
9. Thawing Procedure
The following protocol is for thawing cryogenically preserved hNPCs.
- Transfer the cryovials from liquid nitrogen storage immediately onto dry ice. CAUTION: Vials can have cracks or loose lids allowing liquid nitrogen to enter the vial. When removed from deep freeze conditions, the liquid can boil, immediately exploding the vial. Use proper PPE when removing the vials.
- Prepare all of the reagents and supplies below ahead of time. Once the thawing process has begun, it is critical to follow through efficiently.
- Transfer Neural Stem Cell Expansion Medium, MM, a 15 ml conical tube, one 2 ml and one 10 ml serological pipette for each cryovial into the BSC.
- A minimum of 9 ml of Neural Stem Cell Expansion Medium and 5 ml of MM is required for each vial. Prepare more of each media if necessary.
- Only thaw one vial of hNPCs at a time. Transfer the frozen cells from dry ice into a clean 37 °C water bath and stir the vial in the water bath continuously. Monitor the volume of ice that has melted. When there is a piece of ice about 0.5 cm left in the vial, spray and wipe with 70% isopropyl alcohol and transfer into the BSC.
- Transfer the contents of the cryovial to a 15 ml conical tube with a 2 ml serological pipette. Add 1 ml of Neural Stem Cell Expansion Medium to the empty cryovial and then transfer 8 ml of Neural Stem Cell Expansion Medium onto the thawed cells in a slow, drop wise manner while gently shaking the tube. This is done to lessen the risk of osmotic shock.
- Transfer the rinse from the cryovial to the 9 ml of cell suspension. Transfer the conical tube onto ice and repeat steps 9.4-9.5 for all remaining vials.
- Centrifuge the conical tubes at 200 x g for 5 min at 4 °C. During the centrifugation, prepare the appropriate number of flasks for seeding based on Table 4.
| # of vials | Total Seeding Volume (ml) | Flask |
| 1 | 5 | T12.5 |
| 2 | 10 | T25 |
| 3 | 15 | T75 |
| 4 | 20 | T75 |
| 5 | 25 | T75 |
| 6 | 30 | T175 |
| 7 | 35 | T175 |
| 8 | 40 | T175 |
| 8 + | -- | Combination of Flasks |
Table 4. Flask sizes based on the number of cryovials thawed. Suggested volume and flask size to seed hNPCs post-thaw.
- Re-suspend and combine all tubes in the appropriate volume of MM based on Table 4. Mix well and remove a sample for viability counting. See steps 8.15-8.16 for counting details. The standard seeding range is between 160,000-320,000 cells/cm2.
- Mix the cells well and aliquot the cells into flasks. Transfer the flasks to a 5% CO2/37 °C/95% humidity incubator. Mix the flask by gently shaking back and forth to evenly distribute the cells.
- The cells will form spheres within 24-48 hr. Occasionally the cells will adhere to the plastic surface and form a honeycomb-like colony distribution. If this occurs, leave the cells for 3 days before rinsing the cells loose, aiding in sphere formation. Rinse every 1-3 days until there are no adherent cells. If necessary transfer the cells to a new flask.
- Exchange 25-75% of the media with MM every 3-4 days until the cells are ready to chop, usually 7-14 days post-thaw.