Here, a TIRF microscopy-based in vitro reconstitution assay is presented to simultaneously quantify and compare the dynamics of two microtubule populations. A method is described to simultaneously view the collective activity of multiple microtubule-associated proteins on crosslinked microtubule bundles and single microtubules.
A subscription to JoVE is required to view this content. Sign in or start your free trial.
Method Article
Simultaneous Visualization of the Dynamics of Crosslinked and Single Microtubules In Vitro by TIRF Microscopy
* These authors contributed equally
In This Article
Summary
Abstract
Microtubules are polymers of αβ-tubulin heterodimers that organize into distinct structures in cells. Microtubule-based architectures and networks often contain subsets of microtubule arrays that differ in their dynamic properties. For example, in dividing cells, stable bundles of crosslinked microtubules coexist in close proximity to dynamic non-crosslinked microtubules. TIRF-microscopy-based in vitro reconstitution studies enable the simultaneous visualization of the dynamics of these different microtubule arrays. In this assay, an imaging chamber is assembled with surface-immobilized microtubules, which are either present as single filaments or organized into crosslinked bundles. Introduction of tubulin, nucleotides, and protein regulators allows direct visualization of associated proteins and of dynamic properties of single and crosslinked microtubules. Furthermore, changes that occur as dynamic single microtubules organize into bundles can be monitored in real-time. The method described here allows for a systematic evaluation of the activity and localization of individual proteins, as well as synergistic effects of protein regulators on two different microtubule subsets under identical experimental conditions, thereby providing mechanistic insights that are inaccessible by other methods.
Introduction
Microtubules are biopolymers that form structural scaffolds essential for multiple cellular processes, ranging from intracellular transport and organelle positioning to cell division and elongation. To execute these diverse functions, individual microtubules are organized into micron-sized arrays, such as mitotic spindles, ciliary axonemes, neuronal bundles, interphase arrays, and plant cortical arrays. A ubiquitous architectural motif found in these structures is a bundle of microtubules crosslinked along their lengths1. An intriguing feature of several microtubule-based structures is the coexistence of bundled microtubules and non-crosslinked single microtubules in close spatial proximity. These microtubule subpopulations can display starkly different polymerization dynamics from each other, as needed for their proper function2,3,4,5. For instance, within the mitotic spindle, stable crosslinked bundles and dynamic single microtubules are present within a micron-scale region at the cell center6. Studying how the dynamic properties of coexisting microtubule populations are specified is, therefore, central to understanding the assembly and function of microtubule-based structures.
Microtubules are dynamic polymers that cycle between phases of polymerization and depolymerization, switching between the two phases in events known as catastrophe and rescue7. The dynamics of cellular microtubules are regulated by myriad Microtubule Associated Proteins (MAPs) that modulate the rates of microtubule polymerization and depolymerization and the frequencies of catastrophe and rescue events. It is challenging to investigate the activity of MAPs on spatially proximal arrays in cells, owing to the limitations of spatial resolution in light microscopy, especially in regions of high microtubule density. Moreover, the presence of multiple MAPs in the same cellular region hinders interpretations of cell biological studies. In vitro reconstitution assays, performed in conjunction with Total Internal Reflection Fluorescence (TIRF) microscopy, circumvent the challenges of examining mechanisms by which specific subsets of MAPs regulate the dynamics of proximal cellular microtubule arrays. Here, the dynamics of microtubules assembled in vitro are examined in the presence of one or more recombinant MAPs under controlled conditions8,9,10. However, conventional reconstitution assays are typically performed on single microtubules or on one type of array, precluding the visualization of coexisting populations.
Here, we present in vitro reconstitution assays that enable the simultaneous visualization of two microtubule populations under the same solution conditions11. We describe a method to simultaneously view the collective activity of multiple MAPs on single microtubules and on microtubule bundles crosslinked by the mitotic spindle-associated protein PRC1. The protein PRC1 preferentially binds at the overlap between anti-parallel microtubules, crosslinking them9. Briefly, this protocol consists of the following steps: (i) preparation of stock solutions and reagents, (ii) cleaning and surface treatment of coverslips used to create the imaging chamber for microscopy experiments, (iii) preparation of stable microtubule "seeds" from which polymerization is initiated during the experiment, (iv) specification of TIRF microscope settings to visualize microtubule dynamics, (v) immobilization of microtubule seeds and generation of crosslinked microtubule bundles in the imaging chamber, and (vi) visualization of microtubule dynamics in the imaging chamber through TIRF microscopy, upon addition of soluble tubulin, MAPs, and nucleotides. These assays enable the qualitative evaluation and quantitative examination of MAP localization and their effect on the dynamics of two microtubule populations. Additionally, they facilitate the evaluation of synergistic effects of multiple MAPs on these microtubule populations, across a wide range of experimental conditions.
Access restricted. Please log in or start a trial to view this content.
Protocol
1. Prepare reagents
- Prepare buffers and reagents as outlined in Table 1 and Table 2. During the experiment, keep all solutions on ice, unless otherwise noted.
| Solution | Components | Recommended Storage Duration | Notes | ||
| 5X BRB80 | 400 mM K-PIPES, 5 mM MgCl2, 5 mM EGTA, pH 6.8 with KOH, filter sterilize | up to 2 years | Store at 4 °C | ||
| 1X BRB80 | 80 mM K-PIPES, 1 mM MgCl2, 1 mM EGTA, pH 6.8 | up to 2 years | Store at 4 °C | ||
| BRB80-DTT | 1X BRB80, 1 mM DTT | up to 2 days | |||
| Assay Buffer | 80 mM K-PIPES, 3 mM MgCl2, 1 mM EGTA, pH 6.8, 5% sucrose (OR 1X BRB80, 5% sucrose, 2 mM MgCl2) | up to 1 year | Store at 4 °C | ||
| Master Buffer (MB) | Assay Buffer, 5mM TCEP | 1 week | Prepare on the day of experiment; Separate into two tubes: MB-warm at room temperature and MB-cold on ice; include 1 mM DTT if using fluorescent dyes | ||
| Master Buffer with MethylCellulose (MBMC) | 1X BRB80, 0.8% methylcellulose, 5 mM TCEP, 5 mM MgCl2 | 1 week | Prepare on the day of experiment; include 1 mM DTT if using fluorescent dyes | ||
| Protein Dilution Buffer (DB) | MB, 1 mg/mL Bovine Serum Albumin (BSA), 1 µM ATP | 1 day, on ice | Prepare on the day of experiment; include 1 mM DTT if using fluorescent dyes | ||
| Oxygen Scavenging Mix (OSM) | MB, 389 µg/mL catalase, 4.44 mg/mL glucose oxidase, 15.9 mM 2-mercaptoethanol (BME) | 1 day, on ice | Prepare on the day of experiment | ||
| Oxygen Scavenging Final (OSF) | MB, 350 µg/mL catalase, 4mg/mL glucose oxidase, 14.3 mM BME, 15 mg/mL glucose | use within 30 min | Prepare immediately before use by adding 1 µL of glucose to 9 µL of OSM | ||
Table 1: List of buffers used in this protocol and their components. See the "Recommended Storage Duration" column for guidance on how far in advance each buffer can be prepared.
| Reagent | Storage Concentration | Storage Solvent | Storage Temperature | Working Concentration | Final Concentration | Recommended Storage Duration | Notes | |||||||||
| Neutravidin (NA) | 5 mg/mL | 1X BRB80 | -80°C | 0.2 mg/mL | 0.2 mg/mL | up to 1 year | Used to immobilize microtubules via a biotin-neutravidin-biotin linkage; store in small aliquots | |||||||||
| Kappa-casein (KC) | 5 mg/mL | 1X BRB80 | -80°C | 0.5 mg/mL | 0.5 mg/mL | up to 2 years | Used to block the imaging chamber surface; Store in small aliquots; On day of experiment, set a small volume aside at room temperature | |||||||||
| Bovine Serum Albumin (BSA) | 50 mg/mL | 1X BRB80 | -20°C | 1 mg/mL (in DB) | N/A | up to 2 years | store in small aliquots | |||||||||
| Catalase | 3.5 mg/mL | 1X BRB80 | -80°C | 350 µg/mL (in OSF) | 35 µg/mL | up to 2 years | component of oxygen scavenging mix; store in small aliquots | |||||||||
| Glucose oxidase | 40 mg/mL | 1X BRB80 | -80°C | 4 mg/mL (in OSF) | 0.4 mg/mL | up to 2 years | component of oxygen scavenging mix; store in small aliquots | |||||||||
| Tubulin | Lyophilized | N/A | 4°C | 10 mg/mL | 2.12 mg/mL (in tubulin mix) | up to 1 year | Once tubulin is in solution, keep it cold to avoid polymerization. | |||||||||
| Adenosine Triphosphate (ATP) | 100 mM | ultrapure water | -20°C | 10 mM | 1 mM | 6 months | Prepare solution in filter-sterilized water, adjust pH to ~7.0, and freeze in small aliquots. | |||||||||
| Guanosine Triphosphate (GTP) | 100 mM | ultrapure water | -20°C | 10 mM | 1.29 mM (in tubulin mix) | 6 months | Prepare solution in filter-sterilized water, adjust pH to ~7.0, and freeze in small aliquots. | |||||||||
| Guanosine-5'-[(α,β)-methyleno] triphosphate (GMPCPP) | 10 mM | ultrapure water | -20°C | 10 µM | 0.5 µM | 6 months | ||||||||||
| Dithiothreitol (DTT) | 1 M | sterile water | -20°C | 1 mM | N/A | up to 2 years | ||||||||||
| Tris(2-carboxyethyl) phosphine (TCEP) | 0.5 M | filter-sterilized water | Room temperature | 5 mM | N/A | up to 2 years | ||||||||||
| Methylcellulose | 1% | sterile water | Room temperature | 0.8% (in MBMC) | 0.21% (in tubulin mix) | up to 1 year | Dissolve methylcellulose by slowly adding it to near-boiling water. Allow to cool while stirring continuously. | |||||||||
| Beta-mercaptoethanol (BME) | 143 mM | sterile water | Room temperature | 14.3 mM (in OSF) | 1.43 mM | up to 5 years | 143 mM is a 1:100 dilution of stock BME | |||||||||
| Glucose | 150 mg/mL | 1X BRB80 | -80°C | 15 mg/mL (in OSF) | 1.5 mg/mL | up to 2 years | Add to OSM immediately before use | |||||||||
| (±)-6-Hydroxy-2,5,7,8-tetramethyl chromane-2-carboxylic acid (Trolox) | 10mM | 1X BRB80 | -80°C | 10 mM | 1 mM | up to 1 year | Does not fully dissolve. Add some NaOH, stir for ~4 hours, and filter sterilize before use | |||||||||
| mPEG-Succinimidyl Valerate, MW 5,000 | powder | N/A | -20°C | 333 mg/mL (in 0.1 M sodium bicarbonate) | 324 mg/mL (in 0.1 M sodium bicarbonate) | 6 months | Prepare ~34 mg aliquots, marking each tube with an exact weight of powder. Pass nitrogen gas over the solid, seal tubes with parafilm, and store at -20°C in a container with desiccant. | |||||||||
| Biotin-PEG-SVA, MW 5,000 | powder | N/A | -20°C | 111 mg/mL (in 0.1 M sodium bicarbonate) | 3.24 mg/mL (in 0.1 M sodium bicarbonate) | 6 months | Prepare ~3 mg aliquots, marking each tube with an exact weight of powder. Pass nitrogen gas over the solid, seal tubes with parafilm, and store at -20°C in a container with desiccant. | |||||||||
Table 2: List of reagents used in this protocol. Included are the recommended storage conditions and concentrations, working concentrations of stock solutions used during the experiment, and final concentration in the imaging chamber. Additional notes are given in the far-right column.
2. Prepare Biotin-PEG slides
NOTE: Prepare imaging chambers as close to the start of an experiment as possible, and not more than 2 weeks in advance.
- Clean coverslips
- Position an equal number of 24 x 60 mm and 18 x 18 mm #1.5 coverslips (Figure 1F) in slide-staining jars and slide-washing racks, respectively (Figure 1A,B). Place the slide-washing racks containing 18 x 18 mm coverslips in a 100 mL beaker.
- Rinse all coverslips 5-6 times in ultrapure water (18.2 MΩ-cm resistivity) and remove excess liquid after each rinse with a pipette tip attached to a vacuum tube (Figure 1C).
- Fill beakers and slide-staining jars containing the coverslips with ultrapure water, seal with parafilm, and sonicate for 10 min.
- Fill two 150 mL beakers with 200-proof ethanol. Using tweezers, dip each coverslip into one beaker filled with ethanol, and then the other.
- Using tweezers, transfer coverslips to the slide-drying rack (Figure 1D), dry them under nitrogen gas stream and incubate at 37 °C until completely dry (~15 min).
- Place the dried coverslips in a single layer inside the plasma cleaner. Form vacuum seal, and then set the Radio Frequency (RF) level of the plasma cleaner to ~8 MHz.
- Once the plasma is generated, leave coverslips in plasma cleaner for 5 min. Switch off the plasma cleaner and release the vacuum slowly.
- Once the vacuum seal is released, flip the coverslips over and repeat the plasma cleaning for 5 min for the other side of the coverslips.
- Alternative to plasma cleaning: In place of steps 2.1.2-2.1.3, sonicate coverslips in a warm solution of 2% detergent (in ultrapure water) for 10 min. Then, thoroughly wash coverslips with ultrapure water and sonicate in ultrapure water 2-3 times (10 min each). Next, wash in ethanol and dry as in steps 2.1.4-2.1.5. Skip steps 2.1.6-2.1.8.
- Biotin-PEG treatment
- Immediately before use, dissolve 400 µL of 3-Aminopropyltriethoxysilane in 40 mL of acetone. Using tweezers, move plasma-cleaned coverslips into the slide-washing rack and slide-staining jars. Submerge coverslips in 3-Aminopropyltriethoxysilane solution and incubate for 5 min12,13.
- Wash all coverslips 5-6 times with ultrapure water.
- Transfer coverslips to the slide-drying rack, dry them under a nitrogen gas stream and incubate at 37 °C until completely dry (~20 min).
- Lay the dried coverslips on delicate task wipes and label each coverslip on one corner, e.g., 'p' on each 18 x 18 mm coverslip and 'b' on each 24 x 60 mm coverslip (see Figure 2).
- On the day of the experiment, prepare a fresh 0.1 M sodium bicarbonate solution by dissolving 0.84 mg of NaHCO3 in 10 mL of ultrapure water.
- Bring aliquots of mPEG-Succinimidyl Valerate (PEG-SVA) and Biotin-PEG-SVA to room temperature, immediately before use. See notes on Polyethylene Glycol (PEG) aliquot preparation in Table 2.
NOTE: Work quickly because the hydrolysis half-life of the Succinimidyl Valerate (SVA) moiety is ~30 min. - Add 102 µL of 0.1 M NaHCO3 to 34 mg of PEG-SVA, spin in a benchtop microcentrifuge at 2,656 x g for 20 s, and then mix by pipetting up and down. Dissolve 3 mg of Biotin-PEG-SVA in 27 µL of 0.1 M NaHCO3 by pipetting up and down. Adjust dilution volumes according to the exact weight of PEG noted on the tubes (see Table 2).
- Prepare 100:1 w/w PEG:biotin-PEG mixture by combining 75 µL of PEG-SVA solution and 2.25 µL of Biotin-PEG-SVA solution for 20 coverslips, 100 µL and 3 µL for 30 coverslips, or 125 µL and 3.75 µL for 40 coverslips.
- Construct a hydration chamber by placing wet paper towels beneath the tip rack in the bottom of an empty 10 µL tip box (Figure 1E). This will prevent evaporation of the PEG solutions.
- Pipette 6 µL of 100:1 PEG-SVA:biotin-PEG mixture onto the center of one 24 x 60 mm coverslip on the labeled side. Place another 24 x 60 mm coverslip on top of the first coverslip such that the pair forms an X-shape, with the sides labeled 'b' facing each other. Place the pair on an empty tip rack in the hydration chamber and repeat for the remaining 24 x 60 mm coverslips.
- Pipette 6 µL of PEG-SVA onto the center of one 18 x 18 mm coverslip on the labeled side. Place another 18 x 18 mm coverslip on top of the first coverslip, with the sides labeled 'p' facing each other. Place the pair on an empty tip rack in the hydration chamber and repeat for the remaining 18 x 18 mm coverslips.
- Close the hydration chamber and incubate for 3 h or overnight.
- Separate the pairs of coverslips and rinse in ultrapure water.
- Dry coverslips with a nitrogen stream and place them in a 37 °C incubator to fully dry.
- To construct the imaging chamber, stick three strips of double-sided tape on a 24 x 60 mm coverslip on the side labeled 'b'. To the other side of tape strips, attach an 18 x 18 mm coverslip with its side labeled 'p' facing the larger coverslip. This forms two flow chambers for microscopy experiments, with treated surfaces facing each other (Figure 2 and Figure 1G).
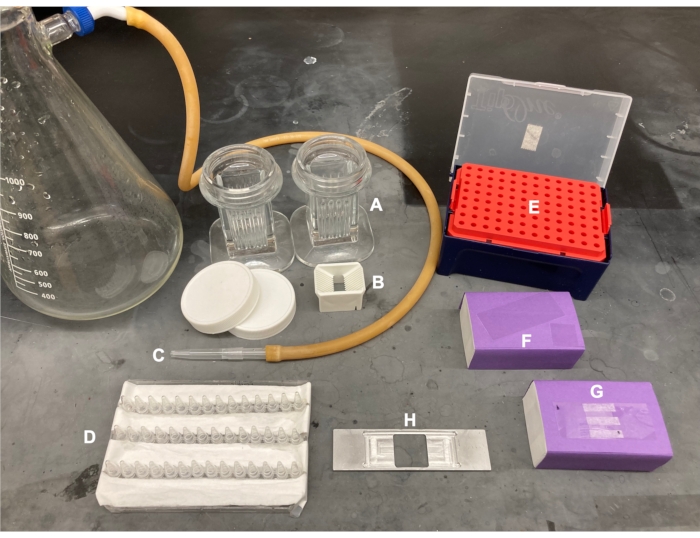
Figure 1: Equipment for coverslip treatment and imaging chamber preparation. (A) slide-staining jars for 24 x 60 mm coverslips, (B) slide-washing racks for 18 x 18 mm coverslips, (C) vacuum set-up, (D) slide-drying rack, (E) hydration chamber, (F) coverslips, (G) imaging chamber, (H) slide holder. Please click here to view a larger version of this figure.
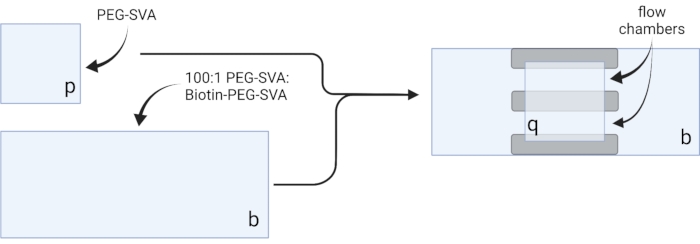
Figure 2: Schematic for preparation of imaging chambers using double-sided tape (gray) and PEG/Biotin-PEG treated coverslips. Created with BioRender.com. Please click here to view a larger version of this figure.
3. Polymerize microtubules
- Prepare GMPCPP seeds
NOTE: Prepare GMPCPP seeds in a cold room, keeping all reagents, tips, and tubes at 4 °C. GMPCPP seeds can be prepared in advance and stored at -80 °C for up to 1 year. Place fixed-angle ultracentrifuge rotor, containing 1 mL centrifuge tubes, in ultracentrifuge and set the temperature to 4 °C.- Resuspend lyophilized tubulin (Table 2) to ~10 mg/mL in 1X BRB80, immediately before use.
- Mix components of GMPCPP seeds as described in Table 3.
NOTE: Keep all tubulin components on ice as much as possible to minimize the polymerization of soluble tubulin. - Clarify mix in a fixed-angle ultracentrifuge rotor at 352,700 x g for 5 min at 4 °C.
- Separate the supernatant into 5 µL aliquots, snap freeze them in liquid nitrogen, and store them at -80 °C.
- Polymerize seeds on the day of the experiment
- Warm 1-2 mL of BRB80-DTT (Table 1) to 37 °C.
- Place 5 µL aliquot of GMPCPP seeds (-80 °C) from step 3.1.4 on ice and immediately dissolve in 20 µL of warm BRB80-DTT. Spin at 2,000 x g for 5 s at room temperature and tap to mix.
NOTE: Initial dilution volume may vary between 13 µL and 21 µL and is empirically determined for each batch of seeds. If seeds fail to polymerize, troubleshoot by supplementing initial dilution buffer (step 3.2.2) with 0.5 µM GMPCPP. - Protect from light and incubate at 37 °C for 30-45 min.
NOTE: The length of the microtubules depends on the duration of incubation. For short microtubules, the incubation time can be as short as 15 min. For long microtubules, the incubation time can be as long as 2 h. Biotinylated microtubules tend to require longer incubation times than non-biotinylated microtubules. - Place fixed-angle ultracentrifuge rotor, containing 500 µL centrifuge tubes, in ultracentrifuge and pre-warm to 30 °C.
- After incubation, add 50 µL of warm BRB80-DTT (step 3.2.1) to the polymerized GMPCPP seeds and transfer the mixture to a 500 µL centrifuge tube. Wash the empty tube that contained the GMPCPP seeds with another 50 µL of warm BRB80-DTT, pipette up and down, and add this buffer to the 500 µL centrifuge tube containing the mixture.
- Before spinning, mark the rim of the centrifuge tube to indicate where the pellet will be (the pellet will be too small to see). Spin for 10 min at 244,900 x g at 30 °C12.
- Carefully pipette out the supernatant and discard. Resuspend the pellet in 100 µL of warm BRB80-DTT. Tap to mix.
- Spin for 10 min at 244,900 x g at 30 °C, aligning the marking with the rotor to pellet in the same place.
- Remove the supernatant and resuspend the pellet in 16 µL of warm BRB80-DTT. Transfer the microtubule solution to a clean 0.6 mL microcentrifuge tube. Protect from light and keep at or above room temperature.
NOTE: After polymerization, keep microtubules at or above room temperature. If they get cold, they will depolymerize. Incubate at 28 °C for added stability.
- Check microtubules via TIRF microscopy
- Pipette a mixture of 4.5 µL of BRB80-DTT and 1 µL of microtubule solution (step 3.2.9) onto a microscope slide. Cover with an 18 x 18 mm coverslip and seal the edges with either clear nail polish or a 1:1:1 mixture of petrolatum, lanolin, and paraffin (valap sealant), which is solid at room temperature and liquid at 95 °C.
- Position the TIRF objective beneath the coverslip (see step 4 for recommended microscope settings) and visualize the newly polymerized microtubules at wavelength appropriate for the fluorescently labeled tubulin in the Bright mix (Table 3), to determine what dilution of microtubules to use in the upcoming experiments.
| Reagent | Bright mix (µL) | Order of addition | Bright mix + biotin (µL) | Order of addition |
| Fluorescent tubulin, 10 mg/mL | 2 | 6 | 2 | 7 |
| Biotin-tubulin, 10 mg/mL | 0 | N/A | 2 | 6 |
| Unlabeled tubulin, 10 mg/mL | 20 | 5 | 18 | 5 |
| GMPCPP, 10 mM | 30 | 4 | 30 | 4 |
| DTT, 0.2 M | 0.7 | 3 | 0.7 | 3 |
| 5X BRB80 | 26.4 | 2 | 26.4 | 2 |
| sterile water | 52.9 | 1 | 52.9 | 1 |
| Total Volume (µL) | 132 | 132 |
Table 3: GMPCPP seed mix. Components of GMPCPP microtubule seeds, including volume and order of addition. Prepare 5 µL aliquots and store for up to 1 year at -80 °C.
4. Microscope settings
- Temperature: Set the microscope temperature to 28 °C to view dynamic microtubules.
- Filters: Use the best combination of filter cubes and emission filters, depending on the fluorescent channels to be imaged. To visualize 488 nm, 560 nm, and 647 nm wavelengths in the same experiment, use a 405/488/560/647 nm Laser Quad Band Set, coupled with emission filters for the designated wavelengths.
- Align Lasers: Ensure that the Laser beams used in the experiment are aligned. Determine the Laser intensity for the experiment empirically, such that all fluorescent proteins can be imaged with the highest possible signal-to-noise ratio, but do not undergo significant photobleaching over the time course of the experiment.
- Objective: Use lens paper to clean a 100x objective with 70% ethanol. Prior to imaging, add a drop of microscope immersion oil to the objective.
- Set up an imaging sequence
- For an experiment with 647 nm fluorophore-labeled biotinylated microtubules, 560 nm fluorophore-labeled non-biotinylated microtubules and soluble tubulin, and GFP-labeled protein of interest, image for 20 min. Image the 560 nm and 488 nm channels every 10 s, and the 647 nm channel every 30 s.
- To capture a reference image of bundles before the addition of soluble tubulin and MAPs, set up a sequence with one image each in 560 nm and 647 nm wavelengths.
5. Generate surface-immobilized microtubule bundles
NOTE: For the following steps, flow all solutions into a flow chamber by pipetting into one open side, while placing a filter paper against the other side. Protect the imaging chamber from light to reduce photobleaching of fluorescently labeled proteins. Tape the prepared imaging chamber to a slide holder (Figure 1G,H). Follow the steps in Table 4, which correspond to protocol steps 5.2-6.4.
- Prepare soluble tubulin mix according to Table 5 and keep it on ice.
NOTE: Soluble tubulin must always be placed on ice to prevent polymerization. Prepare a fresh soluble tubulin mix approximately every 2 h, or when microtubules are no longer polymerizing. - To immobilize microtubules via a biotin-neutravidin-biotin linkage, first flow in Neutravidin (NA) solution until the chamber is filled (~7.5 µL) and incubate for 5 min.
- Wash with 10 µL of MB-cold.
- Flow in 7.5 µL of the blocking protein κ-casein (KC) and incubate for 2 min.
- Wash with 10 µL of MB-warm to prepare the chamber for the introduction of microtubules.
- Dilute the stock of biotinylated microtubules (according to observations in step 3.3.2) in 1X BRB80-DTT and add 1 µL of this dilution to 9 µL of MB-warm. Flow the mixture into the chamber and incubate for 10 min. Use a higher concentration of microtubules for more bundles.
- Wash away non-immobilized microtubules with 10 µL of MB-warm.
- Flow 7.5 µL of warm KC into the chamber and incubate for 2 min.
- During the incubation, prepare a 2 nM solution of the crosslinker protein PRC1 in warm KC. Flow 10 µL of this solution into the flow chamber and incubate for 5 min.
NOTE: Recombinant PRC1 is expressed and purified from bacterial cells as previously described13. - To make bundles, flow 10 µL of non-biotinylated microtubules into the chamber and incubate for 10 min. PRC1 will crosslink the non-biotinylated and immobilized biotinylated microtubules15,16 (Figure 3).
NOTE: See step 6.1 for preparing the assay mix during the incubation time. - Wash the chamber twice with 10 µL of MB-warm. The attached microtubules are stable for around 20 min from this point.
| Step | Reagent | Volume (µL) | Incubation time (minutes) |
| 1 | Neutravidin | 7.5 | 5 |
| 2 | MB-cold | 10 | - |
| 3 | κ-casein | 7.5 | 2 |
| 4 | MB-warm | 10 | - |
| 5 | Biotinylated microtubule (diluted in MB-warm) | 10 | 10 |
| 6 | MB-warm | 10 | - |
| 7 | Warm κ-casein | 7.5 | 2 |
| 8 | 2 nM PRC1 diluted in κ-casein | 10 | 5 |
| 9 | Non-Biotinylated Microtubule | 10 | 10 |
| 10 | MB-warm x 2 | 10 | - |
| 11 | Assay mix | 10 | - |
| Attached seeds are stable for around 20 minutes at this point | |||
Table 4: Assay steps. List of reagents added to the imaging chamber, with indication of wash (-) or incubation time.
| Reagent | Volume (µL) |
| Recycled tubulin, 10 mg/mL | 10 |
| MB-Cold | 10.3 |
| MBMC | 13.7 |
| BRB80-DTT | 3.4 |
| GTP, 10 mM | 6.7 |
| ATP, 10 mM (If using kinesins) | 6.7 |
| Fluorescently labeled tubulin, 10 mg/mL | 1 (Resuspend lyophilized labeled tubulin in cold BRB80-DTT) |
Table 5: Soluble tubulin mix components. Mix at the start of the experiment and keep on ice.
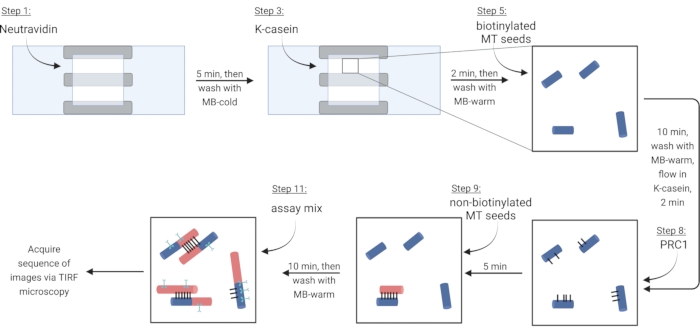
Figure 3: Schematic of addition of assay components to make and image fluorescently labeled bundles and single microtubules. Biotinylated seeds are shown in blue, non-biotinylated seeds and soluble tubulin in red, PRC1 in black, and protein of interest in cyan. Step numbers in figure correspond to those in Table 4. Panel corresponding to step 9 shows a pre-formed bundle (lower left); step 11 shows a newly formed bundle (upper left). Created with BioRender.com. Please click here to view a larger version of this figure.
6. Image microtubule dynamics
- During the 10 min incubation time in step 5.10, prepare 10 µL of assay mix containing proteins of interest, soluble tubulin, nucleotides, oxygen scavengers14, and antioxidants according to Table 6. Keep the mix on ice.
- Load the prepared imaging chamber, taped to slide holder, on the 100x TIRF objective. Use the 560 nm and 647 nm channels to find a field of view that contains an optimum number and density of single microtubules and bundles.
NOTE: If both biotinylated and non-biotinylated microtubules are labeled with the same fluorophore, line-scan analyses of fluorescence intensities can distinguish between single microtubules and bundles. - Once a field of view is identified, take a reference image.
- Carefully flow in the assay mix without disturbing the imaging chamber.
- Seal the open ends of the chamber with valap sealant.
- Start the imaging sequence as described in step 4.5.1.
| Reagent | Volume (µL) |
| Soluble tubulin mix | 4 |
| OSF | 1 |
| Trolox (if using microtubules labeled with a readily-photobleaching fluorophore) | 1 |
| ATP, 10 mM (If using kinesins) | 1 |
| PRC1 (or crosslinker of choice) | 1 |
| Proteins of interest | X |
| MB-cold | 2-X |
Table 6: Assay mix components. Mix, flow into imaging chamber, and image microtubule dynamics, within 30 min.
Access restricted. Please log in or start a trial to view this content.
Results
The experiment described above was performed using 647 nm fluorophore-labeled biotinylated microtubules, 560 nm fluorophore-labeled non-biotinylated microtubules, and 560 nm fluorophore-labeled soluble tubulin mix. Microtubules were crosslinked by the crosslinker protein PRC1 (GFP-labeled). After surface-immobilized bundles and single microtubules were generated (step 5.11), the imaging chamber was mounted on a TIRF 100X 1.49 NA oil objective and viewed in the 560 nm and 647 nm fluorescence channels. Single microtubules ...
Access restricted. Please log in or start a trial to view this content.
Discussion
The experiment described here significantly expands the scope and complexity of conventional microtubule reconstitution assays, which are traditionally performed on single microtubules or on one type of array. The current assay provides a method to simultaneously quantify and compare the regulatory MAP activity on two populations, namely, single microtubules and crosslinked bundles. Further, this assay allows for the examination of two types of bundles: those that are pre-formed from stable seeds before the initiation of...
Access restricted. Please log in or start a trial to view this content.
Disclosures
The authors declare no competing interests.
Acknowledgements
This work was supported by a grant from the NIH (no. 1DP2GM126894-01), and by funds from the Pew Charitable Trusts and the Smith Family Foundation to R.S. The authors thank Dr. Shuo Jiang for his contribution toward development and optimization of the protocols.
Access restricted. Please log in or start a trial to view this content.
Materials
| Name | Company | Catalog Number | Comments |
|---|---|---|---|
| (±)-6-Hydroxy-2,5,7,8-tetramethylchromane-2-carboxylic acid (Trolox) | Sigma Aldrich | 238813 | |
| 1,4-piperazinediethanesulfonic acid (PIPES) | Sigma Aldrich | P6757 | |
| 18x18 mm #1.5 coverslips | Electron Microscopy Sciences | 63787 | |
| 2-Mercaptoethanol (BME) | Sigma Aldrich | M-6250 | |
| 24x60 mm #1.5 coverslips | Electron Microscopy Sciences | 63793 | |
| 405/488/560/647 nm Laser Quad Band | Chroma | TRF89901-NK | |
| Acetone | Sigma Aldrich | 320110 | |
| Adenosine 5'-triphosphate disodium salt hydrate (ATP) | Sigma Aldrich | A7699-5G | |
| Avidin, NeutrAvidin® Biotin-binding Protein (Molecular Probes®) | Thermo Fischer Scientific | A2666 | |
| Bath sonicator: Branson 2800 Cleaner | Branson | CPX2800H | |
| Beckman Coulter Polycarbonate Thickwall Tubes, 11 x 34 mm | Beckman-Coulter | 343778 | |
| Beckman Coulter Polycarbonate Thickwall Tubes, 8 x 34 mm | Beckman-Coulter | 343776 | |
| Biotin-PEG-SVA, MW 5,000 | Laysan Bio | #Biotin-PEG-SVA-5000 | |
| Bovine Serum Albumin (BSA) | Sigma Aldrich | 2905 | |
| Catalase | Sigma Aldrich | C40 | |
| Corning LSE Mini Microcentrifuge, AC100-240V | Corning | 6670 | |
| Delicate Task Wipes | Kimtech | 34120 | |
| Dithiothreitol (DTT) | GoldBio | DTT10 | |
| Emission filter | Chroma | ET610/75m | |
| Ethanol (200-proof) | Decon Labs | 2705 | |
| Ethylene glycol tetraacetic acid (EGTA) | Sigma Aldrich | 3777 | |
| Glucose Oxidase | Sigma Aldrich | G2133 | |
| GMPCPP | Jena Bioscience | NU-405 | |
| Guanosine 5'-triphosphate sodium salt hydrate (GTP) | Sigma Aldrich | G8877 | |
| Hellmanex III detergent | Sigma Aldrich | Z805939 | |
| Immersion oil, Type A | Fisher Scientific | 77010 | |
| Kappa-casein | Sigma Aldrich | C0406 | |
| Lanolin | Fisher Scientific | S25376 | |
| Lens Cleaning Tissue | ThorLabs | MC-5 | |
| Magnesium Chloride (MgCl2) | Sigma Aldrich | M9272 | |
| Methylcellulose | Sigma Aldrich | M0512 | |
| Microfuge 16 Benchtop Centrifuge | Beckman-Coulter | A46474 | |
| Microscope Slides, Diamond White Glass, 25 x 75mm, 90° Ground Edges, WHITE Frosted | Globe Scientific | 1380-50W | |
| mPEG-Succinimidyl Valerate, MW 5,000 | Laysan Bio | #NH2-PEG-VA-5K | |
| Optima™ Max-XP Tabletop Ultracentrifuge | Beckman-Coulter | 393315 | |
| Paraffin | Fisher Scientific | P31-500 | |
| PELCO Reverse (self-closing), Fine Tweezers | Ted Pella | 5377-NM | |
| Petrolatum, White | Fisher Scientific | 18-605-050 | |
| Plasma Cleaner, 115V | Harrick Plasma | PDC-001 | |
| Potassium Hydroxide (KOH) | Sigma Aldrich | 221473 | |
| Sodium bicarbonate | Sigma Aldrich | S6014 | |
| Sucrose | Sigma Aldrich | S7903 | |
| Thermal-Lok 1-Position Dry Heat Bath | USA Scientific | 2510-1101 | |
| Thermal-Lok Block for 1.5 and 2.0 mL Tubes | USA Scientific | 2520-0000 | |
| Thermo Scientific™ Pierce™ Bond-Breaker™ TCEP Solution, Neutral pH; 500mM | Thermo Fischer Scientific | PI-77720 | |
| TIRF 100X NA 1.49 Oil Objective | Nikon | CFI Apochromat TIRF 100XC Oil | |
| TIRF microscope | Nikon | Eclipse Ti | |
| TLA 120.1 rotor | Beckman-Coulter | 362224 | |
| TLA 120.2 rotor | Beckman-Coulter | 357656 | |
| Tubulin protein (>99% pure): porcine brain | Cytoskeleton | T240 | |
| Tubulin Protein (Biotin): Porcine Brain | Cytoskeleton | T333P | |
| Tubulin protein (fluorescent HiLyte 647): porcine brain | Cytoskeleton | TL670M | |
| Tubulin protein (X-rhodamine): bovine brain | Cytoskeleton | TL620M | |
| VECTABOND® Reagent, Tissue Section Adhesion | Vector Biolabs | SP-1800-7 | |
| VWR® Personal-Sized Incubator, 120V, 50/60Hz, 0.6A | VWR | 97025-630 |
References
- Subramanian, R., Kapoor, T. M. Building complexity: insights into self-organized assembly of microtubule-based architectures. Developmental Cell. 23 (5), 874-885 (2012).
- Baas, P. W., Rao, A. N., Matamoros, A. J., Leo, L. Stability properties of neuronal microtubules. Cytoskeleton (Hoboken). 73 (9), 442-460 (2016).
- Bitan, A., Rosenbaum, I., Abdu, U. Stable and dynamic microtubules coordinately determine and maintain Drosophila bristle shape. Development. 139 (11), 1987-1996 (2012).
- Foe, V. E., von Dassow, G. Stable and dynamic microtubules coordinately shape the myosin activation zone during cytokinetic furrow formation. The Journal of Cell Biology. 183 (3), 457-470 (2008).
- Pous, C., et al. Functional specialization of stable and dynamic microtubules in protein traffic in WIF-B cells. The Journal of Cell Biology. 142 (1), 153-165 (1998).
- Uehara, R., Goshima, G. Functional central spindle assembly requires de novo microtubule generation in the interchromosomal region during anaphase. The Journal of Cell Biology. 191 (2), 259-267 (2010).
- Mitchison, T., Kirschner, M. Dynamic instability of microtubule growth. Nature. 312 (5991), 237-242 (1984).
- Bieling, P., et al. Reconstitution of a microtubule plus-end tracking system in vitro. Nature. 450 (7172), 1100-1105 (2007).
- Bieling, P., Telley, I. A., Surrey, T. A minimal midzone protein module controls formation and length of antiparallel microtubule overlaps. Cell. 142 (3), 420-432 (2010).
- Shimamoto, Y., Forth, S., Kapoor, T. M. Measuring pushing and braking forces generated by ensembles of Kinesin-5 crosslinking two microtubules. Developmental Cell. 34 (6), 669-681 (2015).
- Mani, N., Jiang, S., Neary, A. E., Wijeratne, S. S., Subramanian, R. Differential regulation of single microtubules and bundles by a three-protein module. Nature Chemical Biology. 17 (9), 964-974 (2021).
- Hyman, A. A., Salser, S., Drechsel, D., Unwin, N., Mitchison, T. J. Role of GTP hydrolysis in microtubule dynamics: information from a slowly hydrolyzable analogue, GMPCPP. Molecular Biology of the Cell. 3 (10), 1155-1167 (1992).
- Subramanian, R., et al. Insights into antiparallel microtubule crosslinking by PRC1, a conserved nonmotor microtubule binding protein. Cell. 142 (3), 433-443 (2010).
- Rasnik, I., McKinney, S. A., Ha, T. Nonblinking and long-lasting single-molecule fluorescence imaging. Nature Methods. 3 (11), 891-893 (2006).
- Wijeratne, S., Subramanian, R. Geometry of antiparallel microtubule bundles regulates relative sliding and stalling by PRC1 and Kif4A. eLife. 7, 32595(2018).
- Mani, N., Wijeratne, S. S., Subramanian, R. Micron-scale geometrical features of microtubules as regulators of microtubule organization. eLife. 10, 63880(2021).
- Freal, A., et al. Feedback-driven assembly of the axon initial segment. Neuron. 104 (2), 305-321 (2019).
- Ledbetter, M., Porter, K. A "microtubule" in plant cell fine structure. The Journal of Cell Biology. 19 (1), 239-250 (1963).
- Wijeratne, S. S., Marchan, M. F., Tresback, J. S., Subramanian, R. Atomic force microscopy reveals distinct protofilament-scale structural dynamics in depolymerizing microtubule arrays. Proceedings of the National Academy of Sciences of the United States of America. , 119(2022).
Access restricted. Please log in or start a trial to view this content.
Reprints and Permissions
