腹部考试 i: 检查和听诊
English
Share
Overview
资料来源: 亚历山大 · 戈德法布,MD,助理医学教授,贝斯以色列女执事医疗中心,马
胃肠道疾病每年占了数百万的门诊和住院治疗。腹部体检是在胃肠道; 疾病诊断中的重要工具此外,它可以帮助确定病理过程中心血管、 泌尿、 和其他系统。一般情况下,作为体检腹部地区的考试是重要的建立医患接触,达到初步的诊断和选择随后实验室和影像检查,确定治疗的紧迫性。
与其他部分一样的体格检查,目测和听诊腹部都以系统的方式,没有潜在的结果错过了。应特别注意潜在的问题,已经确定的病人的历史。在这里,我们假定病人已经确定,并已有采取的历史,讨论了,症状和潜在关注领域。在这个视频中,我们不会检查病人的历史;相反,我们会直接去体检。
我们到达考试之前,让我们简要回顾一下腹部、 腹部解剖及地形的表面地标。这里是一个列表的有用的地标: 肋边距、 剑突、 腹直肌、 linea alba、 脐、 髂嵴,腹股沟韧带和耻骨联合。腹部的考试面积下来从 xiphoid 和肋边距优至耻骨相接。
用于诊断和描述性,腹部被细分成四个象限: 右上象限 (通常指定为 RUQ),离开上象限 (呵呵)、 右下象限 (RLQ) 和左的下腹 (时延) (图 1)。腹部的更详细的地形划分为 9 区: 左、 右的忧郁症患者、 左、 右腰、 右和左髂骨,和上腹部,脐,和下腹部区域 (图 2) 中的。
记得哪个器官通常项目进每个腹部区域(图 3)。有必要知道该区域的解剖学和地形好充分记录和解释病人的投诉和症状,以及物理结果在考试期间。
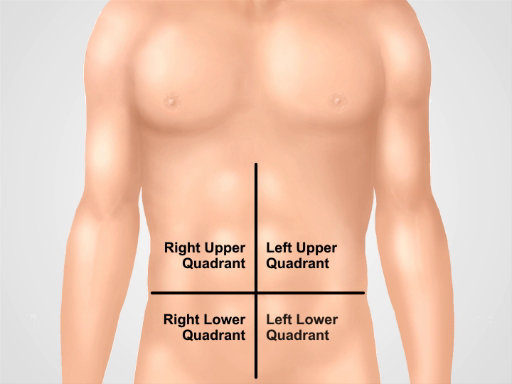
图 1。四个腹部象限。腹部可以分为四个区域,由两个假想线相交,脐: 右上象限 (通常指定为 RUQ),离开上象限 (呵呵)、 右下象限 (RLQ) 和左下腹 (时延) 显示。
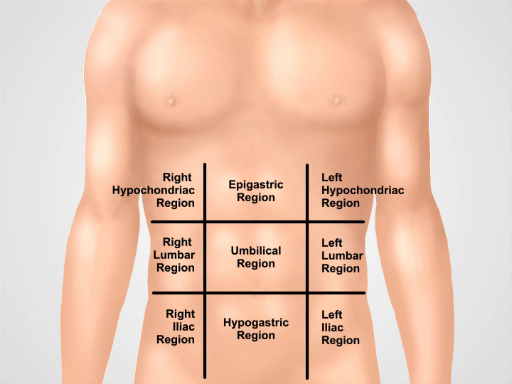
图 2。九的腹部地区。锁骨线和肋和结节间面分成九个区域的腹部: 上腹部的区域、 右胁、 左胁区域、 脐区、 腰椎右侧区域、 左的腰部,下腹、 右腹股沟和左腹股沟区。上腹部,脐,和腹下术语和耻骨上区最常用在临床实践中。
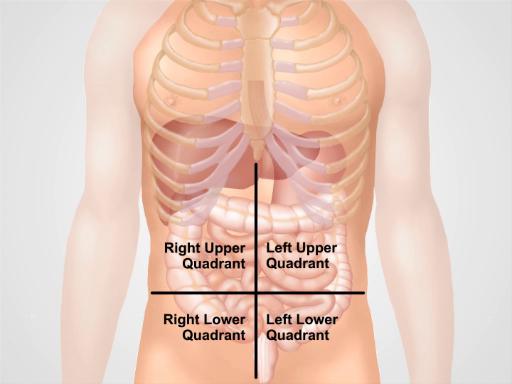
图 3。不同器官中的四个腹部区域的位置。在腹腔内和它们的位置在四个象限,腹部器官。
Procedure
Applications and Summary
In this video we reviewed the anatomy of the abdomen and learned how to perform the first two steps of the abdominal examination: inspection and auscultation. Before starting the exam, make sure that the patient is comfortable, well positioned, and adequately draped. Never examine a patient through a gown. Make sure that your hands are washed and warm. Always ask a patient for permission to perform the examination and explain every step of the procedure. Start with a visual inspection of the abdomen. Make note of abdominal contour and symmetry, skin rashes, scars from previous surgeries and injuries, distended veins, and visible peristalses and pulsations. If the presence of ascites, hernias, or masses are suspected, confirm these findings via additional maneuvers that are addressed later on in this video collection.
Omitting visual inspection and/or auscultation steps are common mistakes during an abdominal examination, and can negatively affect a physician’s ability to reach a correct diagnosis. Careful inspection of the abdominal area is especially important. Often times an experienced physician can make a preliminary diagnosis based on a patient’s history and inspection alone. A combination of different pathological signs is of particular diagnostic value. For example, jaundice, ascites, spider angiomas, and caput medusae (distended veins surrounding the umbilicus) can be simultaneously present in a patient with liver cirrhosis.
Once visual inspection is completed, auscultation follows. Auscultate separately for bowel sounds and for bruits. Always perform auscultation before abdominal percussion and palpation. Abdominal auscultation is of clinical significance, especially in a symptomatic patient. The findings should be interpreted in the context of the patient’s history: for example, the absence of bowel sounds in a patient with abdominal pain suggests an abdominal catastrophe (such as peritonitis or the later stages of an intestinal obstruction), but is normal in postoperative patients for a few days following abdominal surgery.
Transcript
Gastrointestinal disease accounts for millions of office visits and hospital admissions annually, which makes the abdominal physical exam one of the most commonly performed assessments. A thorough physical examination not only helps in diagnosing diseases of the gastrointestinal tract, but also aids in identification of pathological processes in cardiovascular, urinary, and other systems. As with the other parts of a physical examination, the assessment of the abdomen also proceeds in a systematic fashion.
This video will begin with a review of the surface landmarks of the abdomen. It will then go on to demonstrate correct patient positioning followed by proper inspection of the abdomen, and precise auscultation techniques. We will also discuss the possible symptoms and their clinical significance.
Before we get to the examination let’s briefly review the surface landmarks of the abdominal region, abdominal anatomy, and topography necessary for interpreting the findings of this exam. The illustration shown here highlights the costal margins, xiphoid process, rectus abdominal muscle, linea alba, umbilicus, ileac crest, inguinal ligament, and symphysis pubis. The abdominal exam covers the area from the xiphoid and costal margins superiorly to the symphysis pubis inferiorly.
For diagnostic and descriptive purposes, the abdomen is subdivided into four quadrants: right and left upper quadrants, and right and left lower quadrants.
The more detailed topography of the abdomen divides it into nine regions: right and left hypochondriac, right and left lumbar, right and left iliac, with epigastric, umbilical, and hypogastric regions in the middle. One should remember which organs typically project into each abdominal region. It is essential to know the region’s anatomy and topography well to adequately document and interpret a patient’s complaints and symptoms, as well as physical findings during the examination.
After taking the history, discussing the symptoms and identifying the potential areas of concern, one can start preparing for the abdominal exam. First step is to ensure that the patient is comfortable and has emptied his or her bladder. Request the patient to lie down supine at about 30-45° angle with the knees slightly flexed. The patient’s arms should be at their side and not folded behind their head, as this tenses the abdominal wall.
Ask the patient for permission to expose their abdominal area… Drape the patient in a way that maintains modesty on one hand, but doesn’t compromise the exam on the other. The abdomen is exposed from above the xiphoid to the suprapubic region. Make sure there is enough light and that noise is minimized. Before approaching the patient wash your hands thoroughly. Then warm your hands and the stethoscope. As with other parts of a physical examination, take a position on the patient’s right side, and explain each step of the exam to them as it progresses.
Start with a visual inspection of the abdomen. Before starting the examination explain to the patient that their abdomen is going to be inspected… Visually inspect the skin looking for rashes, ecchymoses, jaundice, dilated veins, striae, lesions, bruises, and scars. If scars are present, ask the patient about them and document them in the patient’s history.
Examine the shape of the abdomen. Is it flat, protuberant, or scaphoid? Scaphoid abdomen can be seen in cachectic patients, whereas global abdominal protuberance can result from gas, fluid, or fat. Check whether the abdomen looks symmetric or not. Asymmetry is a warning sign and can suggest masses or organomegaly. On the other hand, overall bulging may be sign of fluid accumulation-a condition called ascites. Check for visible hernias and abdominal masses. Pay attention to the presence of visible pulsation or peristalsis, which usually represent a serious problem, for example, abdominal aortic aneurysm. Sometimes visible peristalsis can be seen in intestinal obstruction. Lastly, presence of purplish skin discoloration around the umbilical area indicates a subcutaneous intraperitoneal bleed and is associated with acute hemorrhagic pancreatitis.
Auscultation for abdominal sounds is performed in two or three cycles, each time listening for a particular sound, rather than trying to listen for all the sounds at once.
To begin auscultation, explain the procedure to the patient… After pre-warming the stethoscope, use the diaphragm of the stethoscope to listen for bowel sounds over each of the four abdominal quadrants for 30-40 seconds. Note their frequency and character. Gurgling sounds occurring at a frequency of 5-34 per minute should be heard.
The absence of bowel sounds in an asymptomatic patient shout prompt the physician to listen for longer duration-at least three full minutes-before confirming that the sounds are in fact absent. On the contrary, the absence of bowel sounds in a patient with abdominal pain is a warning sign and might indicate paralytic ileus. Hyperactive, or increased and high-pitched sounds are also abnormal and may be associated with initial stages of bowel obstruction.
Next, listen to different vascular structures at seven different locations, including above the right renal artery, the aorta, the left renal artery, the common iliac arteries, and the femoral arteries for at least five seconds each. While auscultating these arteries, one should listen for bruits, which are the audible vascular “swishing” sounds caused by turbulent flow in large arteries. Their presence can indicate stenosis in renal, iliac and femoral arteries, or suggest abdominal aortic aneurism. Finally, listen for friction rubs over the liver and spleen. This is a rare finding that suggests inflammation of the peritoneal surface of the organ from infection, tumor, or infarct.
You’ve just watched JoVE’s presentation on the first two parts of the physical abdominal examination. Now you should have a good understanding of the surface landmarks of the abdomen and know how to conduct the inspection and auscultation steps of this exam. The following two videos will discuss: abdominal percussion, and light and deep palpation steps of abdominal assessment. As always, thanks for watching!