IV の腹部の試験: 急性腹痛評価
English
Share
Overview
ソース:ヨセフ Donroe、MD、内科と小児科、エール大学院医学系、ニューヘブン、CT
腹痛はある緊急の部門およびオフィスの設定で頻繁に提示心配です。急性の腹痛は、急性腹症手術 intervenable プロセスを示唆する特徴と激しい腹痛の突然の発症を参照しますが、7 日以内を持続的な痛みとして定義されます。急性の腹痛の鑑別診断は広範です;したがって、臨床医は、腹部の外の病理学には腹部の痛み、肺や心臓、直腸、生殖器疾患を含むことがあります覚えて、問診によって導かれて試験の体系的なメソッドが必要です。
腹痛の場所を記述するための用語では、右と左の上下分割と心窩部や臍、下腹の領域 (図 1 2) も含まれています。徹底的な検査には、意図的に実行される各演習と解剖学の明確な精神的な表現、検査、聴診、触診、パーカッションを含む組織的なアプローチが必要です。腹部全体ランダムに触診のではなく、優しさ、入札領域に向かって体系的に各ポジションの指の下にあるものを考えてのサイトからリモートで触診を開始します。役に立つテクニック 6:00 (図 3) で 12:00 と恥骨で剣状突起と時計の顔を想像することです。8:00 で触診、皮膚、筋肉、盲腸、付録、および尿管があります。この方法で試験を行う臨床推論で支援し、不足している病理学のチャンスを最小限に抑えられます。
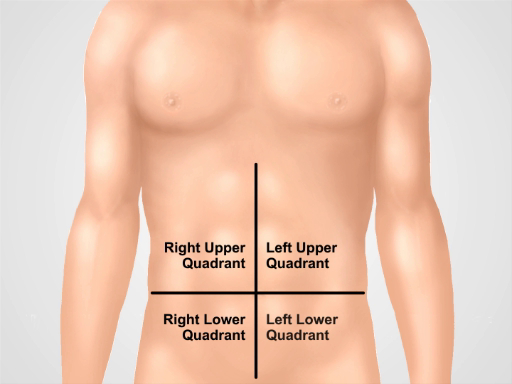
図 1。腹部の 4 つの象限。腹部は臍で交差している 2 つの架空の線によって 4 つの地域に分けることができます。(少なからず RUQ) 右上腹部、左上腹部 (LUQ) 右下腹部 (摘除) と左下腹部 (下図) が表示されます。
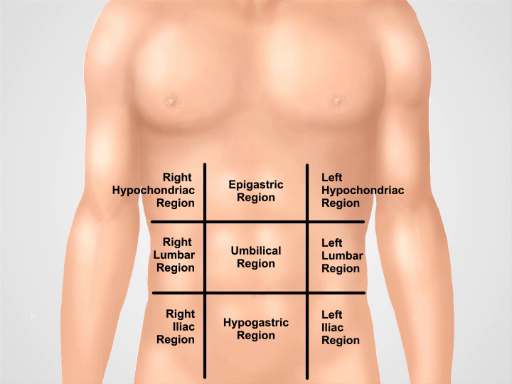
図 2。9 つの腹部の地域。鎖骨中央線、弓下と intertubercular 面は 9 つの地域に腹部を分ける: 心窩部地域、右季肋領域、左季肋部、臍地域、右腰部、左腰部、下腹地域、右鼠径部および左鼠径部。
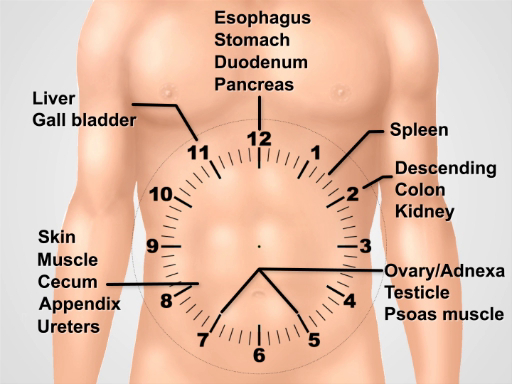
図 3。試験の実行中の基礎となる解剖学を考える上で腹部の上に時計の文字盤を可視化。
Procedure
Applications and Summary
A systematic approach to examining a patient with acute abdominal pain includes inspection, auscultation, percussion, and palpation. Special maneuvers to detect abdominal wall pain, appendicitis, cholecystitis, and hernias should be performed if there is suspicion for these processes.
The exam findings that are most useful for increasing the probability of disease include rigidity and percussion tenderness for general peritonitis; McBurney’s point tenderness, positive Rovsing’s sign, and positive psoas sign for appendicitis; positive Murphy’s sign and right upper quadrant tenderness for cholecystitis; visible peristalsis, abdominal distension, and high pitched-hyperactive bowel sounds for small bowel obstruction.
Findings that decrease the probability of disease are a positive Carnett’s sign and negative pain with cough for general peritonitis; absence of right lower quadrant tenderness for appendicitis; absent right upper quadrant tenderness for cholecystitis; normal bowel sounds and absence of abdominal distension for small bowel obstruction.
The yield of the abdominal exam is much better if the clinician elicits an effective history, performs careful inspection, and considers the relevant regional anatomy when percussing and palpating. The physician’s relationship with their patient benefits from having a gentle approach to one who is already in pain and avoiding unnecessary maneuvers that may increase patient discomfort without providing new information, such as the traditional test for rebound tenderness, where the physician palpates deeply over the area of pain then briskly removes the palpating hand, asking if tenderness was worse with palpation or release. An effective history and physical exam allow for cost-effective utilization of diagnostic imaging and enhance clinical interpretation of imaging results, as well as enabling the triage of patients who may need urgent surgery.
Transcript
Abdominal pain is a frequent presenting concern for physicians in both the emergency department and the office setting.
Acute abdominal pain is defined as the pain lasting for less than seven days. It should not be confused with acute abdomen, which refers to the abrupt onset of severe pain with features suggesting a surgically intervenable process. The differential diagnosis of acute abdominal pain is broad, thus clinicians must follow a systematic method when examining patients presenting this condition.
This video will begin with a review of the key anatomical locations and terminology needed to understand the physical findings of this exam. It will then go on to demonstrate how to conduct the general assessment in patients experiencing acute abdominal pain, followed by special maneuvers that one should perform if a specific pathology is suspected.
Before we get to the examination, let’s briefly review some of the key anatomical locations that will help you interpret the findings during the exam. Terminology for describing the location of abdominal tenderness includes the right upper and lower quadrants, left upper and lower quadrants, and the epigastric, periumbilical, and hypogastric regions
A thorough examination requires an organized approach involving inspection, auscultation, percussion, and palpation, with each maneuver performed purposefully and with a clear mental representation of the anatomy. A helpful technique is to imagine a clock face with the xiphoid process at 12:00 and the pubic symphysis at 6:00. When palpating at 8:00, there is skin, muscle, cecum, appendix, and ureters. Performing the exam in this fashion assists in clinical reasoning and minimizes the chance of missing a pathology.
With this background information, let’s start reviewing the steps of the physical exam to be performed when a patient complains of acute abdominal pain. The first step is to acquire a complete patient history, which will guide the whole procedure and the interpretation of its findings. Remind yourself that conditions outside of the abdomen such as pulmonary, cardiac, rectal, and genital disorders, can just as easily lead to abdominal pain as conditions inside the abdomen.
After taking the history, request the patient to put on a gown. While the patient is changing, wash your hands thoroughly. Upon re-entering the room, review the patient’s chart to check their vital signs. To start the exam, request the patient to lie down. Observe the position the patient occupies, as patients with peritonitis may prefer to lie still with flexed hips and knees.
Once the patient is comfortable, place a drape over the patient’s lower body to cover the area below the pubic symphysis, and raise the gown to just below the breasts. Begin with inspection; note abdominal distension, skin color, bulges, scars, peristalsis or signs of poor perfusion such as mottling and visible pulsation.
After this initial visual inspection, ask the patient to point to the painful area. Then, instruct him or her to cough on purpose… If the patient is unable to do so, gently bump the examination table. Both these maneuvers help to localize the pain of peritonitis.
Next, auscultate the left lower quadrant, while applying light pressure. Absence of bowel sounds indicates an ileus, while high pitch sounds may suggest impending mechanical obstruction. For particularly anxious patients, palpating the four quadrants with graduated pressure using the diaphragm of the stethoscope can be a useful technique. Take note of the patient’s face for signs of discomfort and at the same time feel the abdominal wall for rigidity.
Following auscultation, lightly percuss over the four quadrants. This can localize peritoneal pain and distinguish it from visceral pain. Continue with a moderate percussion stroke in the four quadrants, assessing for abnormal tympany suggesting free air or gas-filled bowel, or dullness suggesting fluid or mass. For patient with true peritoneal pain, this would not be performed because it is too painful.
Following percussion, begin with palpation. Place the open right hand gently on the abdomen with fingers slightly spread. Initially, use a light rocking motion as the patient breathes, feeling for abdominal wall rigidity. Feel each quadrant in this way, beginning farthest from the site of pain. Distracting the patient with conversation can serve to minimize voluntary guarding. Palpate again using moderate pressure with the finger pads, in a clockwise fashion. At the end, palpate the aorta, which is at the middle of the clock face. During the exam, you may be able to identify abnormal bulges due to abdominal wall hernia. If present, auscultate over the bulge and try to reduce it using your finger pads.
In selected patients, particularly those with lower quadrant pain or suspicion of gastrointestinal bleed, perform a rectal examination. In addition, if a male patient complains of lower abdominal pain, perform a testicular exam, and for female patients perform a pelvic exam.
After these general steps, in some cases, you might have to perform some special maneuvers if a specific pathology is suspected. If the patient is experiencing pain in the right upper quadrant, you should test for Murphy’s sign-a maneuver used to detect presence of acute cholecystitis. Palpate the patient in the right mid-clavicular line, just below the liver edge. Ask the patient to take a deep breath, while applying deep pressure. Pain accompanied by cessation of inspiration suggests acute cholecystitis.
For right lower quadrant pain, assess for Rovsing’s sign. Deeply palpate the left lower quadrant. While doing so, if the patient refers to pain in right lower quadrant, then one can suspect acute appendicitis. Another maneuver for the right lower quadrant pain is called the obturator sign. To perform this, passively flex the patient’s right hip and knee to a 90° angle and internally rotate the hip. Pain in the right lower quadrant upon this movement may suggest acute appendicitis or a pelvic abscess.
Next, perform the test for psoas sign. Request the patient to flex their right thigh while you provide resistance. If this elicits lower abdominal pain, then one can suspect retrocecal appendicitis or psoas abscess. Alternatively, you can instruct the patient to occupy left lateral decubitus position, and while standing behind the patient, extend their thigh to unmask lower abdominal pain.
In order to diagnose abdominal wall pain, perform the Carnett test. While in supine position, ask the patient to identify the point of maximum pain, and palpate there with moderate pressure to elicit tenderness. Then, ask the patient to raise their shoulders off the bed as if they were doing a sit-up. This action contracts the abdominal wall muscles. Increased patient pain suggests abdominal wall pathology, while attenuated pain suggests intraperitoneal pathology.
Also, assess for splenomegaly in patients with left upper quadrant pain or signs of portal hypertension. And assess for ascites in patients with a suggestive history. These maneuvers are covered in detail in another video focusing on abdominal percussion. Lastly, if the patient is complaining of the lower abdominal or groin pain, you should assess for groin hernias. Symptomatic hernias can present with pain, an irreducible bulge, and signs of intestinal obstruction such as abdominal distension and vomiting.
To assess the groin hernia, it is best to request the patient to stand up. If the patient is unable to stand you may conduct the following steps while the patient is in the supine position. However, keep in mind, easily reducible hernias may be missed in supine position. Put gloves on and ask the patient to lift the front of their gown. Start by inspecting the areas of the inguinal and femoral canals. Before proceeding identify certain landmarks of this region…”Doctor’s dialogue explaining the different landmarks”
After those surface landmarks are identified, ask the patient to turn his or her head to the side and cough. Observe for new bulging or increased size of an existing bulge. Next, using the finger pads of the right hand to examine the right side, palpate over the femoral canal and ask the patient to cough or bear down again to assess for femoral hernias. Once complete, palpate over the right inguinal canal. Again, ask the patient to cough or simply bear down as you feel for bulges. An expanding bulge felt toward the midpoint of the inguinal ligament is likely an indirect hernia, while a bulge felt near the pubic tubercle is more likely a direct hernia. In addition, auscultate over any bulges, noting if there are any bowel sounds.
Next, palpate the right external inguinal ring and distal inguinal canal. To do this, place your right index fingerpad onto the scrotum, just above the right testicle. Apply pressure and investigate the scrotum by following the spermatic cord superiorly and in the direction of the inguinal canal until the fingertip is just past the external inguinal ring. Then ask the patient to cough or bear down. A bulge felt at the fingertip may represent an indirect hernia, while a bulge felt on the side of the finger may represent a direct hernia. When the right side is complete, repeat the process on the left side, using your left hand. If a hernia is identified, attempt to gently reduce it, while the patient is in the supine or Trendelenburg position. Please avoid forceful reduction. At the end of the exam, discuss your findings with the patient.
You have just watched a JoVE video documenting the physical examination of a patient suffering from acute abdominal pain. You should now understand the systematic sequence of steps that a physician should follow in order to deduce the differential diagnosis of this type of pain. As always, thanks for watching!