鼻、副鼻腔、口腔、咽頭の検査
English
Share
Overview
ソース: リチャード Glickman サイモン、MD、アシスタント教授、公衆衛生およびコミュニティ薬の部門のタフツ大学医学部、マサチューセッツ州
このビデオでは、副鼻腔、鼻および喉の検査の概要を説明します。地域の解剖学の概要とデモを開始します。鼻の上から 3 番目は、骨、軟骨下部 3 分の 2 です。鼻孔内側に通過鼻の玄関や狭い通路に鼻中隔の間に入ると骨の甲を横方向に空気します。各カーブの下鼻甲介の溝、あるいは道です。鼻涙管とほとんど空気で満たされた副鼻腔の下にドレインし、中間の meatuses、それぞれ。副鼻腔の 3 つのセットの上顎と正面だけ容易に調査できます。連続的な非常に血管の粘膜は行全体鼻腔や副鼻腔です。
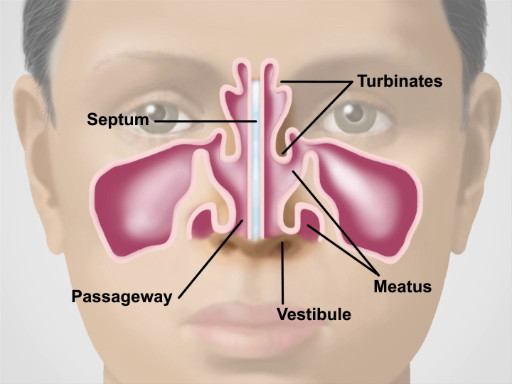
図 1。鼻の解剖学.
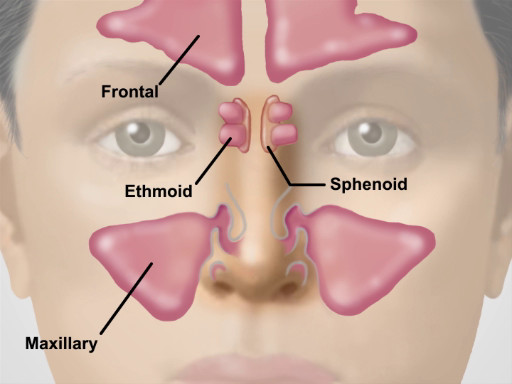
図 2。主要な副鼻腔の場所です。
唇の筋肉のひだは、口腔内への入り口をマークします。ピンクの歯肉や歯茎、歯と歯を埋め込むに隣接した骨にしっかりと接続します。頬粘膜ライン Stensen ダクトが小さな乳頭に耳下腺を排水、内側の頬近く上の第二大臼歯です。小さな、赤い乳頭は、さまざまな厚さの白っぽいコートと一緒に舌の背側表面をカバーします。正中舌小帯は、舌の下面をウォートン ダクトがどちらかの側の乳頭に顎下腺を排水口の床に接続します。舌の上のアーチは、軟口蓋と口蓋垂の正中線の前部と後部の柱です。存在する場合、この扁桃腺は両側の柱の間に突出見ることができます。骨の硬口蓋は、軟口蓋の上前方上昇します。咽頭は、軟口蓋と舌の後ろに後方に位置します。
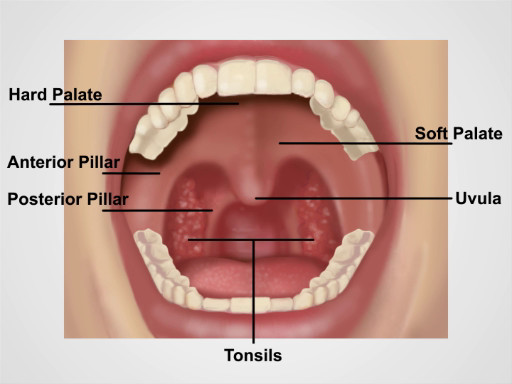
図 3。口腔内の解剖学.
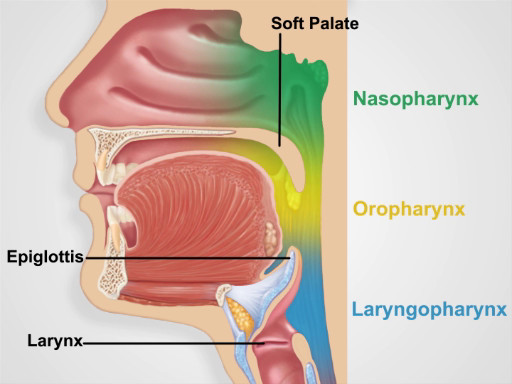
図 4。咽頭領域。
Procedure
Applications and Summary
Because of their constant exposure to the environment, the nose, sinuses, oral cavity, and pharynx often suffer from infections and other inflammatory conditions. Viral and allergic rhinitis are by far the most common nasal disorders. Both can produce copious watery discharge, but viral infections tend to produce a deep red mucosa, while allergies produce a pale, bluish one. Other common conditions found on nasal examination include epistaxis, septal deviation, and nasal polyps. Tenderness over the paranasal sinuses suggests acute sinusitis, particularly if accompanied by face pain, fever, and purulent nasal discharge. In such cases, transilluminating the sinuses may be helpful. To avoid missing a lurking carcinoma, it is important to thoroughly inspect the oral mucosa, particularly on the sides and base of the tongue where oral carcinomas are most likely to occur. Other common disorders to look for include gingivitis, gum recession, teeth erosion, aphthous ulcers, exudative tonsillitis, viral pharyngitis, candidiasis, and leukoplakia.
Transcript
Nose, sinuses, oral cavity and pharynx are interconnected structures and their functions play an integral role in maintenance of the respiratory and digestive systems. Because of their constant exposure to the environment, these regions often suffer from infections and other inflammatory conditions. Therefore, understanding how to examine them is an essential skill that physicians must possess. In this video, we will sequentially review the anatomy and the steps involved in physical examination of these structures.
Let’s begin by reviewing the anatomy of the nose and sinuses. Functionally, the nose is involved in the sense of smell, and it warms, moistens and filters the air we inspire. The upper third of the nose is bony, and the bottom two-thirds is cartilaginous. Air entering the naris passes through the nasal vestibules and into the narrow passageway between the nasal septum medially and the bony turbinates laterally. And beneath each curving turbinate is a groove or meatus.
Neighboring the nasal cavity are the four pairs of paranasal sinuses. And based on the surrounding facial bones, they are named as maxillary, frontal, sphenoidal and ethmoidal. Their functions include reducing the relative weight of the skull and adding resonance to the voice. Of these, only the maxillary and frontal can be readily assessed during a physical exam.
Now that you are familiar with the anatomy of the nose and sinuses, let’s go over the sequence of inspection and palpation steps for a thorough evaluation of this region. Upon entering the room, introduce yourself to the patient and briefly explain the specific exam you will perform. Before starting the exam, sanitize your hands thoroughly while in the view of the patient.
Inspect the nose for skin changes, nodules, and deformities. Slight deviation of the septum is common and benign if it does not cause airflow obstruction. Press gently on the tip of the nose to widen the nares, and with the aid of a penlight, inspect the vestibule.
Next, obtain an otoscope to conduct the nose cavity exam. Attach the largest ear speculum available. Tilt the patient’s head back slightly and gently place the speculum in the nasal vestibule, while holding the handle perpendicular and away from the patient’s chin. Gradually move the speculum posteriorly and angle it upward to glimpse the inferior and middle turbinates, the nasal septum, and the narrow intervening passage. Note the color of the mucosa, which is normally pinkish due to abundant vascular supply. Viral infections tend to produce a deep red mucosa, while allergies produce a pale bluish one. Check for the presence of any swelling, polyps, ulcerations, bleeding, discharge, blockages, deviations, or perforations.
Next, palpate the frontal and maxillary sinuses for tenderness. Bilaterally position your first and second fingers on top of the patient’s forehead while firmly pressing your thumbs upward under the bony brows. Avoid placing any pressure on the eyes. Keeping your fingers in place, move your thumbs down and press firmly on the cheeks, just medial and inferior to the zygomatic bone. Tenderness over the sinuses suggests acute sinusitis, particularly if accompanied by facial pain, fever, and purulent nasal discharge.
If tenderness is present, consider performing an illumination test. For that, darken the room and direct the brightest light of the otoscope upward beneath each brow, close to the nose. Look for a red glow illuminating the air-filled frontal sinuses. Similarly for the maxillary sinuses, have the patient tilt their head back with their mouth wide open. Place the light source directly over each air-filled maxillary sinus and look for a red glow illuminating the hard palate on each side. Failure to see the red glow suggests mucosal thickening or secretions in the corresponding frontal or maxillary sinus.
Now let’s review the anatomy of the oral cavity and pharynx. The muscular folds of the lips mark the entrance to the oral cavity. The pinkish gingiva, or gums, attach firmly to the teeth and adjacent bone into which the teeth embed. The buccal mucosa lines the inner cheeks. Small, red papillae cover the dorsal surface of the tongue along with a whitish coat of varying thickness. On the ventral side, the midline lingual frenulum connects the undersurface of the tongue to the floor of the mouth, where the Wharton ducts drain the submandibular glands into papillae on either side. Arching over the tongue are the anterior and posterior pillars of the soft palate and midline uvula. If present, the tonsils can be seen protruding bilaterally between the pillars. The bony hard palate rises anteriorly above the soft palate.
Behind the soft palate and tongue lies the pharynx, which is divided into three parts: the oropharynx that extends from the edge of the soft palate inferiorly to the epiglottis and is ready visible on inspection; the nasopharynx-which is positioned superior to the edge of the soft palate and is not directly visible on inspection; and similarly, the laryngopharynx-which is positioned inferior to the epiglottis and posterior to the larynx-is also not readily visible on inspection.
Lastly, let’s review the procedural steps of the oral cavity and pharyngeal exam. First, observe the lips for color, moisture, ulcers, or cracking. With a fresh tongue depressor and bright light in hand, ask the patient to open their mouth wide. Inspect the gums for bleeding, ulcers, or swelling, and check to see if any teeth are missing, discolored, misshapen, or loose.
Next, inspect the tongue. Since oral cancers most commonly develop either on the sides or at base of the tongue, ask the patient to protrude their tongue and move it from side to side while carefully inspecting for ulcerations, plaques, masses, or discoloration. Check the tongue for symmetry and note the color and texture of its dorsal surface. Then, ask the patient to touch their tongue to the hard palate, and carefully inspect its undersurface and the floor of the mouth.
Lastly, inspect the pharynx. Request the patient to open their mouth wide and say “ah”… Watch the soft palate rise and inspect the uvula, anterior and posterior pillars, tonsils, and pharynx. Check for symmetry, discoloration, ulcerations, swelling, masses, or tonsillar exudate. If the pharynx cannot be clearly seen, have the patient repeat this maneuver while firmly pressing down on the tongue with the tongue depressor. Take care not to gag the patient! This concludes the examination. At the end, thank the patient for their cooperation.
You’ve just watched JoVE’s video on the, nose, sinuses and throat exam. You should now have a solid understanding of the anatomy of these regions, as well as how and what to look for during inspection and palpation of these areas. As always, thanks for watching!