Nose, sinuses, oral cavity and pharynx are interconnected structures and their functions play an integral role in maintenance of the respiratory and digestive systems. Because of their constant exposure to the environment, these regions often suffer from infections and other inflammatory conditions. Therefore, understanding how to examine them is an essential skill that physicians must possess. In this video, we will sequentially review the anatomy and the steps involved in physical examination of these structures.
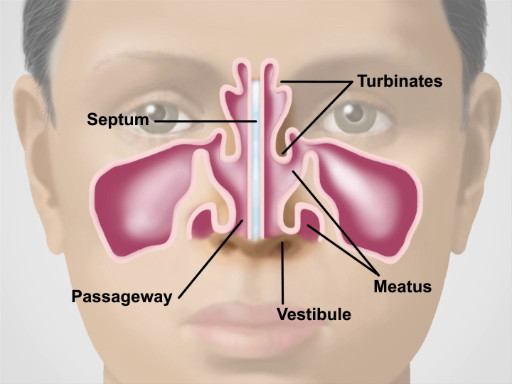
Let’s begin by reviewing the anatomy of the nose and sinuses. Functionally, the nose is involved in the sense of smell, and it warms, moistens and filters the air we inspire. The upper third of the nose is bony, and the bottom two-thirds is cartilaginous. Air entering the naris passes through the nasal vestibules and into the narrow passageway between the nasal septum medially and the bony turbinates laterally. And beneath each curving turbinate is a groove or meatus.
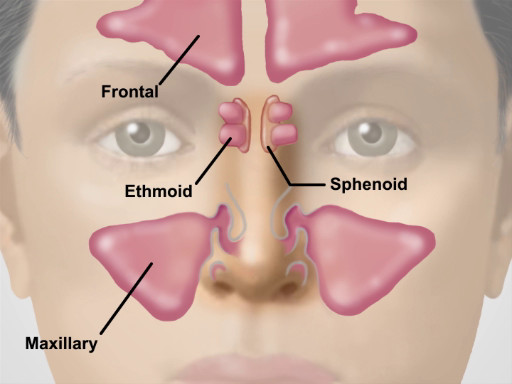
Neighboring the nasal cavity are the four pairs of paranasal sinuses. And based on the surrounding facial bones, they are named as maxillary, frontal, sphenoidal and ethmoidal. Their functions include reducing the relative weight of the skull and adding resonance to the voice. Of these, only the maxillary and frontal can be readily assessed during a physical exam.
Now that you are familiar with the anatomy of the nose and sinuses, let’s go over the sequence of inspection and palpation steps for a thorough evaluation of this region. Upon entering the room, introduce yourself to the patient and briefly explain the specific exam you will perform. Before starting the exam, sanitize your hands thoroughly while in the view of the patient.
Inspect the nose for skin changes, nodules, and deformities. Slight deviation of the septum is common and benign if it does not cause airflow obstruction. Press gently on the tip of the nose to widen the nares, and with the aid of a penlight, inspect the vestibule.
Next, obtain an otoscope to conduct the nose cavity exam. Attach the largest ear speculum available. Tilt the patient’s head back slightly and gently place the speculum in the nasal vestibule, while holding the handle perpendicular and away from the patient’s chin. Gradually move the speculum posteriorly and angle it upward to glimpse the inferior and middle turbinates, the nasal septum, and the narrow intervening passage. Note the color of the mucosa, which is normally pinkish due to abundant vascular supply. Viral infections tend to produce a deep red mucosa, while allergies produce a pale bluish one. Check for the presence of any swelling, polyps, ulcerations, bleeding, discharge, blockages, deviations, or perforations.
Next, palpate the frontal and maxillary sinuses for tenderness. Bilaterally position your first and second fingers on top of the patient’s forehead while firmly pressing your thumbs upward under the bony brows. Avoid placing any pressure on the eyes. Keeping your fingers in place, move your thumbs down and press firmly on the cheeks, just medial and inferior to the zygomatic bone. Tenderness over the sinuses suggests acute sinusitis, particularly if accompanied by facial pain, fever, and purulent nasal discharge.
If tenderness is present, consider performing an illumination test. For that, darken the room and direct the brightest light of the otoscope upward beneath each brow, close to the nose. Look for a red glow illuminating the air-filled frontal sinuses. Similarly for the maxillary sinuses, have the patient tilt their head back with their mouth wide open. Place the light source directly over each air-filled maxillary sinus and look for a red glow illuminating the hard palate on each side. Failure to see the red glow suggests mucosal thickening or secretions in the corresponding frontal or maxillary sinus.
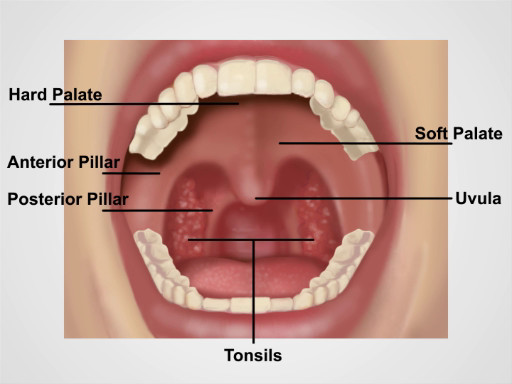
Now let’s review the anatomy of the oral cavity and pharynx. The muscular folds of the lips mark the entrance to the oral cavity. The pinkish gingiva, or gums, attach firmly to the teeth and adjacent bone into which the teeth embed. The buccal mucosa lines the inner cheeks. Small, red papillae cover the dorsal surface of the tongue along with a whitish coat of varying thickness. On the ventral side, the midline lingual frenulum connects the undersurface of the tongue to the floor of the mouth, where the Wharton ducts drain the submandibular glands into papillae on either side. Arching over the tongue are the anterior and posterior pillars of the soft palate and midline uvula. If present, the tonsils can be seen protruding bilaterally between the pillars. The bony hard palate rises anteriorly above the soft palate.
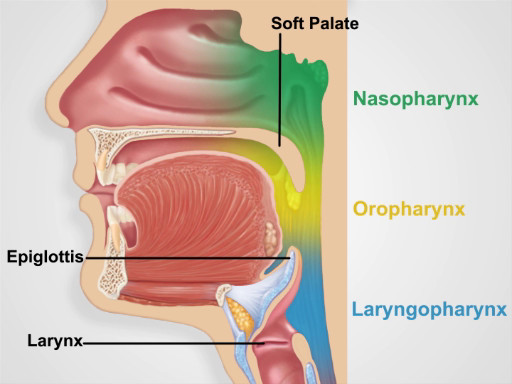
Behind the soft palate and tongue lies the pharynx, which is divided into three parts: the oropharynx that extends from the edge of the soft palate inferiorly to the epiglottis and is ready visible on inspection; the nasopharynx-which is positioned superior to the edge of the soft palate and is not directly visible on inspection; and similarly, the laryngopharynx-which is positioned inferior to the epiglottis and posterior to the larynx-is also not readily visible on inspection.
Lastly, let’s review the procedural steps of the oral cavity and pharyngeal exam. First, observe the lips for color, moisture, ulcers, or cracking. With a fresh tongue depressor and bright light in hand, ask the patient to open their mouth wide. Inspect the gums for bleeding, ulcers, or swelling, and check to see if any teeth are missing, discolored, misshapen, or loose.
Next, inspect the tongue. Since oral cancers most commonly develop either on the sides or at base of the tongue, ask the patient to protrude their tongue and move it from side to side while carefully inspecting for ulcerations, plaques, masses, or discoloration. Check the tongue for symmetry and note the color and texture of its dorsal surface. Then, ask the patient to touch their tongue to the hard palate, and carefully inspect its undersurface and the floor of the mouth.
Lastly, inspect the pharynx. Request the patient to open their mouth wide and say “ah”… Watch the soft palate rise and inspect the uvula, anterior and posterior pillars, tonsils, and pharynx. Check for symmetry, discoloration, ulcerations, swelling, masses, or tonsillar exudate. If the pharynx cannot be clearly seen, have the patient repeat this maneuver while firmly pressing down on the tongue with the tongue depressor. Take care not to gag the patient! This concludes the examination. At the end, thank the patient for their cooperation.
You’ve just watched JoVE’s video on the, nose, sinuses and throat exam. You should now have a solid understanding of the anatomy of these regions, as well as how and what to look for during inspection and palpation of these areas. As always, thanks for watching!