検眼鏡検査
English
Share
Overview
ソース: リチャード Glickman サイモン、MD、アシスタント教授、公衆衛生およびコミュニティ薬の部門のタフツ大学医学部、マサチューセッツ州
最も簡単な ophthalmoscopes は、目を通すに絞り、視度インジケーター、およびレンズを選択するためのディスクで構成されます。検眼は、眼底や脈絡膜、網膜、黄斑、黄斑、視神経乳頭、網膜血管(図 1から成っている後の眼の内側の壁をみるために主に)。球形の眼球を収集し、麻痺、網膜細胞の光を焦点を当てています。順番に、レンズと角膜、硝子体を通過する際、光が屈折します。
眼底検査の時に観測された最初のランドマークは視神経は視神経と網膜血管が目 (図 2) の後ろを入力します。ディスクには通常、血管を入力; 中央の白っぽい生理カップが含まれていますこれは通常、ディスク全体の半分以下の径を占めています。ちょうど外側とやや劣るが中心窩、暗い円形領域中心視のポイントを設定します。これは黄斑です。ブラインド スポット約 15 ° の視線の行に時間は視神経乳頭に光受容細胞の欠如に起因します。

図 1。目の解剖学します。標識構造物と人間の目の矢状ビューを示す図。
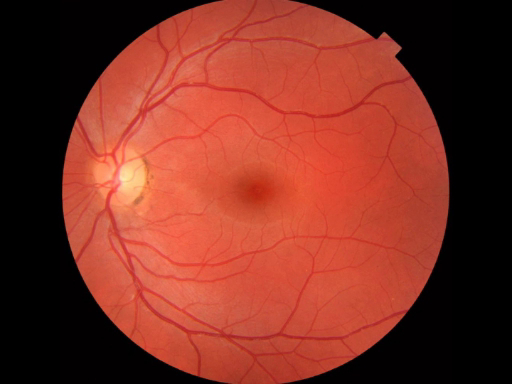
図 2: 正常な網膜。正常な網膜に眼科ビューを表示写真。
Procedure
Applications and Summary
The ophthalmologic exam is probably the most challenging for students to master. With time, however, it becomes routine. It is also one of the most productive parts of the physical exam, as it not only offers a window into the condition of the eye, but also provides evidence of disease elsewhere in the body. Elevated intracranial pressure from a variety of causes may lead to swelling of the optic nerve, which appears as papilledema on a funduscopic exam. In papilledema, the optic disc is swollen, its margins are blurred, the central cup is lost, and venous pulsations are absent. Papilledema signals a serious, life-threatening condition. Death of optic nerve fibers, which can occur in disorders such as optic neuritis, multiple sclerosis, and temporal arteritis, causes the disc to atrophy and lose its smaller blood vessels. Uncontrolled hypertension leads to "copper wiring" of thickened arterial walls in the retina, causing them to appear less transparent. Veins crossing these arteries seem to stop abruptly before reaching either side, a condition called AV nicking. Other signs to look for in hypertensive retinopathy are hard exudates and cotton-wool patches, which result from infarcted nerve fibers. In patients with diabetes, the retina may reveal microaneurysms, hemorrhages, and neovascularization.
Common eye diseases observable on a funduscopic exam include glaucoma and macular degeneration. In glaucoma, increased intraocular pressure may cause the central cup of optic disc to deepen and widen, so it occupies greater than half of the disc diameter. In age-related macular degeneration (AMD), patches of hyperpigmentation and deposits composed of cellular debris, called drusen, can be seen scattered throughout the retina (particularly in the macula). In more severe stages, choroidal neovascularization is visible in the neovascular ("wet") form of AMD, whereas depigmentation and loss of the choriocapillaris are visible in the advanced atropic ("dry") form of AMD (also known as geographic atrophy). Cataracts can be more thoroughly examined by focusing the ophthalmoscope on opacified lenses.
Transcript
The ophthalmoscopic examination is one of the most important parts of the physical exam. If conducted properly, it can be used as a tool to not only assess the patients’ eyes but also their overall health. The simplest ophthalmoscope consists of a light source with a dimmer for adjusting the brightness, an aperture to look through, a disc for selecting lenses of different diopters and a diopter indicator that displays the power of the lens to focus light.
A diopter of zero means that the ophthalmoscope lens is neither converging nor diverging the light passing through it. Turning the dial counterclockwise toward negative, or red, diopter settings is useful in myopic or nearsighted patients whose retina lies closer than normal to the ophthalmoscope. Conversely, turning the dial clockwise toward positive, or green, diopter settings is useful in hyperopic or farsighted patients whose retina lies farther than normal from the ophthalmoscope.
This video will review the important landmarks that a physician should look for during an ophthalmoscopic inspection as well as provide the steps needed to conduct an effective examination.
Let’s start with the landmarks. The ophthalmoscope is primarily used to examine the fundus, which is the portion of the posterior wall of the eye where visual processing primarily takes place. Therefore, the exam is also known as the fundoscopic exam.
The fundus consists of the choroid, retina, fovea, macula, optic disc, and retinal vessels. The first anatomical landmark that you should notice when viewing the fundus is the optic disc, which is where the optic nerve and retinal vessels enter the back of the eye. The disc usually contains a central whitish physiologic cup where the vessels enter. The cup normally occupies less than half the diameter of the entire disc. Just lateral and slightly inferior to the optic disc is the fovea, a darkened circular area that demarcates the point of central vision. Around the fovea is the macula, which appears as an oval-shaped pigmented area.
Now that we have an understanding of the landmarks, let’s review the procedural steps needed to effectively carry out fundus evaluation. Upon entering the examination room, greet your patient and explain the procedure briefly. As with any examination, wash your hands thoroughly or apply topical disinfectant solution before proceeding. Unless the patient’s refractive errors make it difficult to focus on the retina, it is usually best to remove your own eyeglasses for the exam.
Turn on the ophthalmoscope to its brightest setting. Remove any filters by adjusting the filter setting until the largest white disc appears. Turn the diopter indicator to zero. Be sure to keep your index finger on the lens disc during the exam, so the diopters can be adjusted as necessary to focus in on retinal structures. Position yourself about a foot away from the patient, making sure that your eye and the patient’s eye are at the same level. Ask the patient to stare at a spot on the wall just over your shoulder…
To examine the patient’s right eye, hold the ophthalmoscope in your right hand and look through the aperture with your right eye. As you peer through the aperture, keep both eyes opened. Press the ophthalmoscope firmly against your bony orbit and hold the handle at a slight angle away from the patient’s face. Placing your opposite thumb on the patient’s eyebrow will prevent you from bumping the ophthalmoscope against the patient’s orbit during the exam.
Position the ophthalmoscope about 15° laterally to the patient’s line of vision. Direct the ophthalmoscope’s light to the patient’s pupil and look for an orange-red glow, which is known as the red reflex. Be sure to note any opacities that seem to interfere. As you remain focused on the red reflex, move the ophthalmoscope inward along the 15° line until you are almost on top of the patient’s eye. If the image appears out of focus, try adjusting the diopters by rotating the lens disc one or two settings in the positive or negative direction. After adjustment, the optic disc and retinal vessels should come into sharp focus.
The disc appears as a yellow, orange, or pinkish oval that largely fills the field of view. Sometimes the disc isn’t visible right away; in that case, identify a blood vessel and follow it towards the disc. You will know you are going in the right direction if the blood vessel appears to get wider. Keep in mind, the ophthalmoscope’s light may need to be dimmed in order to keep the patient comfortable and to avoid the spasmodic constriction of the pupil.
Carefully examine the disc for color, outline clarity, relative size of central cup, and symmetry with the contralateral eye. White or dark pigmented rings and crescents are often seen around the disc and have no pathologic significance. Then, follow the retinal vessels as they extend away from the disc in all four directions. Veins will appear redder and wider than arteries. As you follow the retinal vessels, look for spontaneous venous pulsations, which appear as subtle variations in the width. Take special note of arteriovenous crossings and look for any lesions in the retina, noting their size, shape and location. If the image is lost while searching the retina, it means the light fell out of the pupil as the ophthalmoscope was moved. It takes some practice to keep the light inside.
Next, ask the patient to look directly into the light of the ophthalmoscope to examine the fovea and the surrounding macula. The macula often appears to shimmer. Finally, look for opacities in the lens by adjusting the diopters to a point between 10 positive and 12 positive. To examine the patient’s left eye, perform the same steps while holding the ophthalmoscope in your left hand and looking through the aperture with your left eye.
You have just watched a JoVE video documenting an ophthalmologic examination. You should now know the important landmarks in the fundus of the eye viewed during this exam and understand the systematic sequence of steps that every physician should follow in order to conduct an effective ophthalmologic assessment. As always, thanks for watching!