Auscultation refers to the act of listening to the sounds produced by the body during a physical examination.
Historically, the term “auscultation” was synonymous with “immediate auscultation,” in which the examiner’s ear was placed directly against the patient’s skin. Although this was standard practice for centuries, the method proved inadequate in nineteenth-century France, due to social norms and suboptimal diagnostic yield. Therefore, in 1816, René Laënnec invented the first stethoscope. This was a hollow wooden tube with a flat surface on one end-to be placed on the patient’s skin, and an opening at the other end-to listen to the sounds transmitted. Since then, stethoscope has undergone many technologic advances, but it still remains a tool that is inseparable from clinical practice.
This video will illustrate the parts of the stethoscope and demonstrate how to use this instrument during any physical examination.
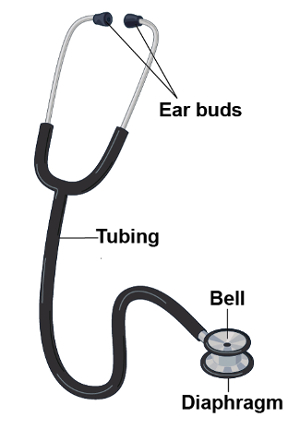
First, let’s review what are the different parts of a stethoscope and what is their function. The basic parts include the ear buds, the tubing and the chest piece. Now-a-days commonly used stethoscopes have two flat surfaces on the chest piece-one is the diaphragm and other is the bell.
Usually, the diaphragm is applied firmly against the skin to listen to the high frequency sounds such as S1 and S2. The firm application is necessary as this allows the high frequency sounds from within the patient vibrate to the membrane of the diaphragm, which in turn results in propagation of sound through the column of air inside the stethoscope and into the examiner’s ears. Conversely, when applied lightly, the bell transmits low frequency sounds such as S3 or S4. The open bell acts as a cup that directly transmits sounds from within the patient through the tubing. Pressing more firmly with the bell can stretch the underlying skin, essentially turning it into a diaphragm. Certain stethoscopes have only one side to the chest piece, which can be used as a diaphragm and a bell; firm pressure makes the chest piece a diaphragm, while light pressure makes it a bell.
Now, let’s go over some important steps related to auscultation that can be applied to any physical examination. Throughout the entirety of the patient encounter, use your unaided sense of hearing to identify findings that may be diagnostically useful, like hoarse voice or grunting respirations.
Before patient contact, decontaminate the stethoscope with any of the standardly available agents. Place the stethoscope ear buds in your ears with the tips pointing forward in order to create a seal that drowns out ambient noise. By gently tapping on both surfaces, confirm which side of the chest piece is active. To switch between the two sides, rotate the piece until you hear a click, and then tap to confirm.
Hold the chest piece in your dominant hand. There are two commonly used handgrips for this. One way is to support the piece between the middle phalanges of your second and third fingers with your thumb tucked under the tubing to keep the tube off the patient’s skin, which can potentially reduce some noise artifacts. Another way is to support it between the distal phalanges of your thumb and second finger. When using this grip, you should normally tuck the remaining fingers under the tubing. Except, in certain maneuvers where these fingers need to be held in slight extension to keep the fingers themselves off the patient’s skin. For example, during auscultation at the base of the heart.
There are specific techniques of auscultation for pulmonary, cardiac, abdominal, and vascular examinations, which will be covered in the respective videos of these collections. As you listen, consider the physiology and mentally picture the anatomy, which may help to parse the variety of sounds that are heard simultaneously. Train the mind to form a visual representation of the sounds being heard, as this may help in better clinical characterization of the underlying pathology. Certain electronic stethoscopes allow examiners to record sounds and actually create visual representations of the findings.
You’ve just watched JoVE’s video on general approach to auscultation during a physical examination. You should now understand the different parts of a stethoscope, and how to use this instrument effectively.
Making meaning out of the variety of sounds that one appreciates with the stethoscope can seem daunting to the early learner. Through deliberate practice, with consideration of anatomy and physiology of the structures being examined, and possibly the use of visual representation of sound, auscultation becomes a powerful diagnostic tool for the clinician. As always, thanks for watching!