A subscription to JoVE is required to view this content.  Sign in or start your free trial.
Immunohistochemistry and Immunocytochemistry: Tissue Imaging via Light Microscopy
  • 00:01Concepts
  • 03:39Preparation of Cells for Immunocytochemistry
  • 06:20Preparation of Formalin-Fixed Paraffin-Embedded Sections for Staining
  • 08:11Staining
  • 12:11Results

Inmunohistoquímica e Inmunocitoquímica: Imágenes de tejidos a través de microscopía óptica

English

Share

Overview

Fuente: Michael S. Lee1 y Tonya J. Webb1
1 Departamento de Microbiología e Inmunología, Facultad de Medicina de la Universidad de Maryland y el Centro Integral del Cáncer Marlene y Stewart Greenebaum, Baltimore, Maryland 21201

La inmunohistoquímica (IHC) y la inmunocitoquímica (ICC) son técnicas utilizadas para visualizar la expresión y localización de antígenos específicos utilizando anticuerpos. El primer uso publicado de IHC fue en 1941 cuando Albert Coons utilizó la técnica para visualizar la presencia de antígeno neumocócico en secciones de tejido de ratones infectados con Pneumococcus (1). El nombre, inmunohistoquímica, se deriva de las raíces “inmuno-“, en referencia a los anticuerpos, y “histo-“, en referencia a las secciones de tejido utilizadas en IHC. La raíz “cito-” en inmunocitoquímica destaca la diferencia clave entre ICC e IHC. Mientras que IHC utiliza secciones de tejido entero, ICC utiliza células que han sido aisladas de tejido o cultivadas en cultivo. La diferencia en las muestras utilizadas significa que la preparación de muestras difiere técnicamente entre iHC y la CPI, pero de lo contrario los protocolos para ICC e IHC son idénticos y uno encontrará que los términos se utilizan con frecuencia indistintamente.

Tanto en IHC como en ICC, los anticuerpos con etiquetas químicas o fluorescentes, como la peroxidasa o la rodamina, respectivamente, se utilizan para visualizar la distribución de cualquier antígeno de interés a través de la unión específica del anticuerpo etiquetado al antígeno. En el caso de IHC, las rodajas finas de tejido se inmovilizan en una diapositiva para mantener la estructura del tejido antes de ser manchado, permitiendo la visualización de antígenos en el contexto de tejidos enteros (Figura 1). En el caso de la CPI, las células se distribuyen uniformemente en una diapositiva antes de ser teñidas, permitiendo la visualización de la distribución de antígenos dentro de las células individuales, pero no dentro de la estructura de cualquier tejido específico. Debido a las similitudes entre los dos protocolos, este protocolo se centrará en iHC para abordar las complejidades adicionales de la preparación de muestras involucradas en el IHC.

Figure 1
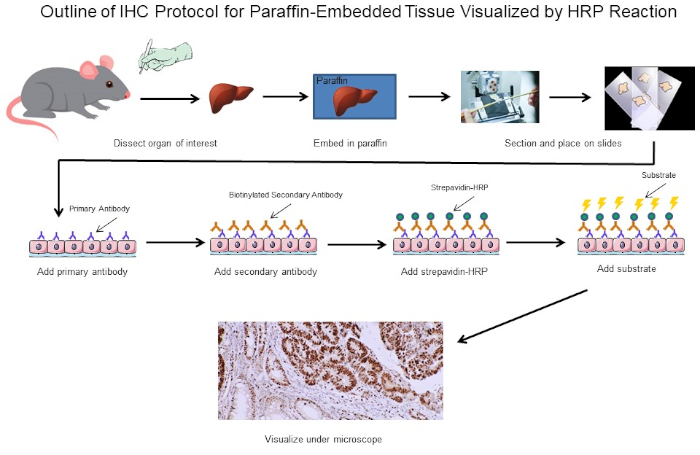
Figura 1: Esquema del Protocolo IHC. Esquema visual de un protocolo IHC para tejido incrustado en parafina diseccionado desde un ratón. Este protocolo utiliza un anticuerpo secundario biotinilado y estrepavidina-HRP para visualizar la ubicación de la unión de anticuerpos. Otras opciones, como los anticuerpos etiquetados fluorescentemente, también son posibles. Haga clic aquí para ver una versión más grande de esta figura.

La primera decisión importante al realizar IHC es cómo preparar las secciones de tejido con el fin de mantener la estructura del tejido durante todo el proceso de tinción. Las dos opciones principales son secciones fijas de formalina de tejido incrustado en parafina o secciones frescas de tejido congelado. No hay una respuesta simple sobre qué método utilizar, ya que depende de qué análisis posterior se llevará a cabo. La formalina-fijación de los tejidos incrustados de parafina generalmente se piensa para preservar mejor la morfología del tejido para obtener imágenes óptimas, mientras que la congelación de tejido fresco puede preservar la función proteica para ensayos posteriores fuera de IHC. Además, se ha demostrado que las secciones de tejido congelado fresco son más adecuadas para el análisis de la expresión génica (2). Una tercera consideración es si los anticuerpos para su antígeno de interés son adecuados para secciones de tejido fijo o congelado, ya que algunos anticuerpos solo se han optimizado para un tipo específico de sección y pueden no funcionar para otros. Por último, también hay que determinar cuánto tiempo necesitan para almacenar las secciones de tejido, ya que las muestras congeladas frescas deben mantenerse a -80 oC y no pueden durar más de un año, mientras que las secciones fijas se pueden almacenar durante mucho más tiempo a temperatura ambiente. Estas son algunas de las principales consideraciones para determinar si se deben utilizar secciones fijas de formalina de tejido incrustado en parafina o secciones frescas de tejido congelado. En última instancia, si uno tiene suficiente tejido, puede ser mejor sólo tener algunos de ambos.

En este experimento, nos propusimos determinar si la expresión de ciclina D1 se incrementó en el bazo agrandado a partir de un modelo espontáneo de ratón de desarrollo de linfoma. Las muestras de tejido esplénico se aislaron primero de ratones de tipo salvaje, ratones transgénicos que no tienen linfoma o ratones transgénicos que tienen linfoma desarrollado espontáneamente. Las muestras de tejido del bazo se fijaron en paraformaldehído, incrustadas en parafina, seccionadas, teñidas con un anticuerpo primario anticiclina D1 de ratón seguido de un anticuerpo secundario anti-ratón de caballo, y desarrolladas con 3,3-diaminobenzidina (DAB). Las secciones fueron contrarrestadas en Harris Hematoxylin Solution y luego las secciones fueron imágenes con aumento 20X.

Reactivos

Secciones integradas en Parafina

  1. 4% Paraformaldehyde (PFA)
  2. Etanol (anhidro desnaturalizado, grado histológico 100%, 95%, 80%, 75% y 50%). Se puede diluir a partir de 100% de stock utilizando agua destilada doble (ddH2O)
  3. Xileno
  4. Diapositiva de vidrio compatible con IHC para asegurar que la sección de tejido permanezca unida durante todo el procedimiento. Las guías de vidrio compatibles con IHC tienen un recubrimiento especializado y están disponibles en varios minoristas. Si realiza ICC, utilice una diapositiva con cámara. Las diapositivas acotadas permiten que las células se salpiquen en las cámaras y se coloquen en la incubadora hasta que las células se adhieran a la diapositiva y alcancen la confluencia adecuada, momento en el que las cámaras se pueden retirar y la tinción puede continuar de la misma manera que IHC.
  5. Parafina
  6. 0.3% Peróxido de hidrógeno (H2O2)/metanol: Para preparar, añadir 1 mL 30% H2O 2 O2 a 99 mL de metanol. Conservar a -20oC
  7. Tampón de recuperación de antígenos: tampón de citrato IHC pH 6.0

Secciones Frescas Congeladas

  1. Compuesto de incrustación de temperatura de corte óptima (OCT)
  2. Fijador óptimo: 4% PFA o acetona que se ha enfriado a -20 oC

Tinción

  1. Búfer de bloqueo: debe ser determinado por el usuario. Un ejemplo es el suero de caballo diluido en 1X PBS
  2. Anticuerpo primario diluido: ver las especificaciones del fabricante
  3. Anticuerpo secundario biotinylato diluido: ver las especificaciones del fabricante
  4. Peroxidasa de ávidina-caballo diluida (HRP): Sólo para la visualización de peroxidasa. Consulte las especificaciones del fabricante.
  5. DAB u otro sustrato compatible
  6. Contramancha (opcional)
  7. Etanol (anhidro desnaturalizado, grado histológico 100% y 95%)
  8. Xileno
  9. Montaje Organo/Limoneno

Procedure

1. Preparación de células para la inmunocitoquímica Células de semilla de interés sobre diapositivas con cámara o cubredes con cámara añadiendo 0,5 ml de suspensión celular a los pozos de una placa de cultivo de 24 pozos.Nota: Algunas células pueden requerir crecimiento en los labios de cubiertatratada, como los cubreobjetos tratados con polilisina. Las condiciones óptimas de tratamiento deben ser determinadas por el usuario dependiendo del tipo de célula qu…

Results

IHC and ICC have a vast range of applications. For example, one use of IHC is to examine the expression of oncogenes in spontaneous mouse models of tumor development. In Figure 2, we set out to determine if cyclin D1 expression was increased in enlarged spleens in a spontaneous mouse model of lymphoma development. Splenic tissue samples were fixed in paraformaldehyde, embedded in paraffin, sectioned, stained using an anti-cyclin D1 antibody (diluted 1:200 in blocking buffer), and then the sections were imaged at 20X magnification. Cyclin D1 expressing cells are indicated by the reddish-brown color against the blue tissue background. These results suggest that cyclin D1 expression was increased in enlarged spleens, indicating a correlation between cancer development and cyclin D1 expression in this model.

Figure 2
Figure 2: Splenic Cyclin D1 Expression in a Spontaneous Double Transgenic (DTG) Mouse Model of Lymphoma. An image of splenic tissue stained with an anti-Cyclin D1 primary antibody, counterstained with methyl green, and visualized using a biotinylated secondary antibody and ABC reagent activated with DAB substrate. The reddish-brown color represents locations where the antibody has bound indicating the presence of Cyclin D1 expressing tumor cells within the structure of splenic tissue that has been counterstained blue. Please click here to view a larger version of this figure.

Applications and Summary

Immunohistochemistry (IHC) and immunocytochemistry (ICC) are techniques used to visualize the expression and localization of specific antigens using antibodies. Tissues are first cut into thin sections that maintain the tissue morphology and placed on a slide. The antibodies are then added and will bind the antigen of interest and are equipped with a specific tag that allows them to be visualized under a microscope. Thus, through this basic concept, the distribution of antigens in the context of tissue structure can be visualized and studied. However, while the overarching concept is basic, there are multiple different approaches and variations that have been developed that increase both the complexity and usefulness of these techniques. This paper has covered the basic concept of IHC and ICC, the main decisions that need to be considered when using these techniques, and a detailed step-by-step protocol. The images produced by IHC and ICC are generally the final product and can be published as is to highlight obvious differences in amounts or distribution of staining between different conditions.

References

  1. Coons, A. H. Creech, H. J., Jones, N. and Berliner, E. The Demonstration of Pneumococcal Antigen in Tissues by the Use of Fluorescent Antibody, The Journal of Immunology, 45 (3), 159-170 (1942).
  2. Ripoli, F. L., Mohr, A., Hammer, S. C., Willenbrock, S., Hewicker-Trautwein, M., Hennecke, S., Escobar, H. M. and Nolte, I. A comparison of fresh frozen vs. Formalin-fixed, paraffin-embedded specimens of canine mammary tumors via branched-DNA assay. International Journal of Molecular Sciences, 17 (5) (2016).

Transcript

Immunocytochemistry and immunohistochemistry are staining methods for a protein of interest in cultured cells and tissues, respectively. The basic principle of both related techniques involves using specific antibodies tagged with a detection system to identify and visualize the protein and determine its location within the cells and tissues, as well as the relative levels. The process in either experiment begins with sample preparation.

For immunocyctochemistry, which specifically visualizes protein or antigen locations in cells, this involves three steps. The first step is plating, which entails culturing the cells in growth media on a cover slip or slide, typically, in the wells of a culture plate. This is followed by fixation, where a precipitating or crosslinking agent like paraformaldehyde is added to the cells to preserve the structural integrity of the proteins and prevent enzyme activity from degrading them. The last step is permeabilization, which involves adding a detergent to make the cell membranes permeable for the staining.

In the counterpart method, immunohistochemistry, proteins or antigens are visualized in tissues and sample preparation has five steps. First, the whole tissue is subjected to fixation, usually with paraformaldehyde. This is followed by embedding of the tissue in a block of paraffin, and then sectioning of this block using a machine called a microtome to cut the tissue into thin slices which can be placed onto slides. Next, the slides are subjected to deparaffinization, or removal of the paraffin from around the tissue slice. Then, an optional antigen retrieval step can be performed. This can either be done using heat or enzymes to unmask epitopes that were cross-linked during fixation making them available for antibody binding. After the appropriate sample preparation, a target-specific primary antibody is added to the cell or tissue sample. This primary antibody should bind to the protein of interest. Next, a secondary antibody is added, which detects and binds to the primary antibody. This secondary antibody is conjugated to, or can bind to, an enzyme called HRP. When its specific substrate, DAB, is added, HRP converts this to an insoluble, brown precipitate. This brown stain marks the location of the target protein. The slides are also stained with hematoxylin, which labels the nuclei in blue and provides a spatial reference point for determining subcellular localization. After that, mounting media is added to the slide, followed by a cover slip in order to seal and preserve the stained sample. Finally, the slides can be imaged on a light microscope.

In this video, you will observe the sample preparation technique for plated cells and tissue sections, followed by immunostaining of the tissue sections.

First, the cells of interest need to be seated onto coverslips. To do this, working in a tissue culture hood, place individual coverslips into the wells of a 24-well plate. Then, close the sash and turn on the UV light to sterilize the coverslips for at least 15 minutes. Next, turn off the UV light. To lift the cells of interest from a confluent 10-centimeter dish, aspirate the media, wash briefly with PBS, and add trypsin to the cells for 2 minutes. Then, tap the side of the plate to ensure the cells have detached and neutralize the trypsin with media. Next, add 0. 5 mL of the cell suspension into each well, making sure to cover the coverslips. Place the plate into a humidified CO2 incubator and allow the cells to grow at 37 degrees celsius until they are 50-70% confluent.

Once the cells reach the optimal confluency, aspirate the culture medium from each well, and then fix the cells by incubating them in . 5 mL of 4% paraformaldehyde diluted in 1X PBS for 20 minutes at room temperature. After removing the fixative, rinse the cells be adding 1 mL of 1X PBS over each coverslip. Immediately aspirate the PBS, then repeat the rinse 2 more times for a total of 3 washes.

Now, permeablize the cells by adding 0.5 mL of 0.1% Triton X-100 in 1X PBS to each well. Leave the plate at room temperature for 15 minutes. Aspirate off the permeabilization buffer and then rinse the cells by adding 1 mL of 1X PBS into each well. Immediately aspirate off the PBS and repeat the rinse 2 more times for a total of 3 washes. Now that the cells on the coverslips are fixed and permeabilized, proceed to the staining procedure demonstrated for the following immunohistochemistry example with the exception that the incubations should be performed within the wells of the 24-well plate rather than directly on a tissue section slide.

To begin, obtain prepared, formalin-fixed, paraffin-embedded tissue sections. Deparaffinize the slides by placing them into a slide rack and then completely immersing them into 250 mL of 100% xylene. Allow the slides to incubate for 5 minutes in the xylene. Then, remove the slides from the container, wipe them off with a paper towel, and place them into a new xylene bath in a fresh container for a further 5 minutes.

Next, rehydrate the sections in a series of graded ethanol solutions starting with 100% ethanol for 3 minutes. Wipe off the slide rack with a paper towel and transfer the slides to a new container of 100% ethanol for another 3 minutes. Continue this cycle of washing, drying with a paper towel, and transferring the slides to a new bath following the indicated concentrations of ethanol for the specified time. After the final ethanol wash, wipe off the rack with a paper towel and incubate the slides in 100 mL of .3% hydrogen peroxide for 30 minutes at room temperature in order to block any endogenous peroxidase activity. Wash the slides in 250 mL of 1X PBS for 5 minutes. Repeat this wash in a container of fresh 1X PBS for an additional 5 minutes.

Next, perform antigen retrieval by immersing the slides in 250 mL of IHC citrate buffer at pH 6.0 and boiling them for 20 minutes. Then, proceed to the staining protocol.

To begin the staining process for IHC, circle the sections with a hydrophobic pen to identify the minimal area that the buffer needs to cover. Then, use a pipette to place 100 microliters of blocking buffer, which in this experiment is horse serum diluted in 1X PBS, over the section. Incubate the slides for 1 hour at room temperature. Following this, remove the blocking buffer using a pipette.

Next, dilute the primary antibody and blocking buffer at a 1:100 dilution by adding 990 microliters of horse serum diluted in 1X PBS into a 1. 5 mL Eppendorf tube, followed by 10 microliters of the primary antibody. Add 100 microliters of the diluted primary antibody to each section, and incubate the slides for 30 minutes at room temperature. When the timer sounds, drain the primary antibody off each slide, and then wash them in 250 mL of 1X PBS for 5 minutes. Repeat this wash once more using fresh 1X PBS.

While the slides are washing in 1X PBS, dilute the secondary antibody to a 1:200 dilution by adding 995 microliters of blocking buffer to a 1.5 mL tube followed by 5 microliters of the secondary antibody, which in this case is biotinylated horse anti-mouse IGG. Add 100 microliters of the diluted secondary antibody to each section, and then incubate the slides for 30 minutes at room temperature. After 30 minutes, remove the secondary antibody by draining it off the sections, then wash the slides in 250 mL of 1X PBS for 5 minutes. Repeat this wash using fresh 1X PBS.

Now, add 100 microliters of avidin-biotin complex reagent, and incubate the sections in the dark for 30 minutes at room temperature. Next, wash the slides by immersing them in 250 mL of 1X PBS for 5 minutes. Similar to previous wash steps, repeat this wash one more time using fresh 1X PBS. Next, develop the slides by incubating the sections in 100 microliters of DAB for up to 5 minutes. Stop the development by immersing the sections in 250 mL of distilled water for 5 minutes.

Now, slides can be counterstained, if desired. To do this, briefly dip the slides in 250 mL of Harris Hematoxylin Solution. Rinse off the counterstain by washing the slides in 250 mL of distilled water for 5 minutes. Repeat this wash 1 more time using fresh distilled water. Next, dehydrate the sections. To do this, first incubate the slides in 95% ethanol for 5 minutes. Blot the slides on a paper towel, and transfer them to a new container of fresh 95% ethanol for another 5 minutes. Continue the cycle of washing, blotting with a paper towel, and transferring the slides to a new bath, following the indicated solutions for 5 minutes each.

After the final incubation, blot the slides with a paper towel, then add a drop of mounting media, such as Organo-Limonene Mount, to the slides. Now, place a coverslip over the sections, taking care not to trap air bubbles. The slides are now ready to be observed under a microscope for analysis.

To observe the stained sections, use a standard light microscope to visualize the stain, and a digital camera to capture the image. In this particular example of IHC, spleen tissues from wild type and spontaneous, double-transgenic, or DTG mice, are compared for studying Dyclin D1 expression in lymphoma. The tissues were paraffin-embedded, sectioned, and stained with anticyclin D1 antibody, and imaged at 20X magnification. Cyclin D1 expressing cells are indicated by the reddish-brown color against the blue tissue background. Comparing the staining intensities among the images from the various mice, the non-enlarged spleens have relatively low amounts of Cyclin D1 expression irrespective of the mouse genotype. In contrast, the enlarged spleen from the DTG mouse, shows increased reddish-brown staining indicating a correlation between cancer development and Cyclin D1 expression in this mouse model.

Tags

Cite This
JoVE Science Education Database. JoVE Science Education. Immunohistochemistry and Immunocytochemistry: Tissue Imaging via Light Microscopy. JoVE, Cambridge, MA, (2023).