The described protocol provides an optimized quantitative proteomics analysis of tissue samples using two approaches: label-based and label free quantitation. Label-based approaches have the advantage of more accurate quantitation of proteins, while a label-free approach is more cost-effective and used to analyze hundreds of samples of a cohort.
Method Article
Comprehensive Workflow of Mass Spectrometry-based Shotgun Proteomics of Tissue Samples
* These authors contributed equally
In This Article
Summary
Abstract
Recent advances in mass spectrometry have resulted in deep proteomic analysis along with the generation of robust and reproducible datasets. However, despite the considerable technical advancements, sample preparation from biospecimens such as patient blood, CSF, and tissue still poses considerable challenges. For identifying biomarkers, tissue proteomics often provides an attractive sample source to translate the research findings from the bench to the clinic. It can reveal potential candidate biomarkers for early diagnosis of cancer and neurodegenerative diseases such as Alzheimer's disease, Parkinson's disease, etc. Tissue proteomics also yields a wealth of systemic information based on the abundance of proteins and helps to address interesting biological questions.
Quantitative proteomics analysis can be grouped into two broad categories: a label-based and a label-free approach. In the label-based approach, proteins or peptides are labeled using stable isotopes such as SILAC (stable isotope labeling with amino acids in cell culture) or by chemical tags such as ICAT (isotope-coded affinity tags), TMT (tandem mass tag) or iTRAQ (isobaric tag for relative and absolute quantitation). Label-based approaches have the advantage of more accurate quantitation of proteins and using isobaric labels, multiple samples can be analyzed in a single experiment. The label-free approach provides a cost-effective alternative to label-based approaches. Hundreds of patient samples belonging to a particular cohort can be analyzed and compared with other cohorts based on clinical features. Here, we have described an optimized quantitative proteomics workflow for tissue samples using label-free and label-based proteome profiling methods, which is crucial for applications in life sciences, especially biomarker discovery-based projects.
Introduction
Proteomics technologies have the potential to enable the identification and quantification of potential candidate markers that can aid in the detection and prognostication of the disease1. Recent advancements in the field of mass spectrometry have accelerated clinical research at the protein level. Researchers are trying to address the challenge of complicated pathobiology of several diseases using mass spectrometry-based proteomics, which now offers increased sensitivity for protein identification and quantification2. Accurate quantitative measurement of proteins is crucial to comprehend the dynamic and spatial cooperation among proteins in healthy and diseased individuals3; however, such analysis on a proteome-wide scale is not easy.
One major limitation of proteomic profiling of clinical specimens is the complexity of biological samples. Many different types of samples have been investigated to study the disease proteome, such as cell lines, plasma, and tissues4,5. Cell lines are widely used as models in in vitro experiments to mimic different stages of disease progression. However, one major limitation with cell lines is that they easily acquire genotypic and phenotypic changes during the process of cell culture6. Body fluids such as plasma could be an attractive source for biomarker discovery; however, due to the highly abundant proteins and dynamic range of protein concentration, plasma proteomics is a bit more challenging7. Here, peptides originated from the most abundant proteins can suppress those derived from the low abundant proteins even if the mass/charge ratio is the same6. Although there have been advancements in the depletion and fractionation technologies in the last few years, getting good coverage still remains a major limitation of plasma proteomics8,9. The use of tissues for proteomic investigation of disease biology is preferred as tissue samples are most proximal to the disease sites and offer high physiological and pathological information to provide better insights into the disease biology10,11.
In this manuscript, we have provided a simplified protocol for the quantitative proteomics of tissue samples. We have used a buffer containing 8 M urea for the tissue lysate preparation as this buffer is compatible with mass spectrometry-based investigations. However, it is mandatory to clean the peptides to remove salts before injecting them into the mass spectrometer. One important point to remember is to reduce the urea concentration to less than 1 M before adding trypsin for protein digestion as trypsin exhibits low activity at 8 M urea concentration. We have explained two approaches of quantitative global proteomics: label-based quantification using iTRAQ (isobaric tags for relative and absolute quantification) and label-free quantification (LFQ). The iTRAQ-based quantitative proteomics is mainly used for comparing multiple samples varying in their biological condition (e.g., normal versus disease or treated samples). The approach utilizes isobaric reagents to label the N-terminal primary amines of peptides12. The iTRAQ reagents contain one N-methyl piperazine reporter group, a balancer group, and one N-hydroxy succinimide ester group that reacts with N-terminal primary amines of peptides13. Digested peptides from each condition are labeled with a particular iTRAQ reagent. Following the labeling, the reaction is stopped and labeled peptides from different conditions are pooled into a single tube. This combined sample mixture is analyzed by mass spectrometer for identification and quantification. After the MS/MS analysis, reporter ion fragments with low molecular masses are generated and the ion intensities of these reporter ions are used for the quantification of the proteins.
Another approach, label-free quantification is used to determine the relative number of proteins in complex samples without labeling peptides with stable isotopes.
Protocol
This study was reviewed and approved by institutional review boards and the ethics committee of the Indian Institute of Technology Bombay (IITB-IEC/2016/026). The patients/participants provided their written consent to participate in this study.
1. Tissue lysate preparation
NOTE: Perform all the following steps on the ice to keep the proteases inactive. Make sure the scalpels and any tubes used are sterile to avoid any cross-contamination.
- Take ~30 mg of tissue in a bead beating tube, add 200 µL of 1x phosphate buffer saline (PBS) and vortex it.
NOTE: In this study, fresh frozen human brain tumor tissues were taken for the lysate preparation. The protocol can be used for any fresh frozen tissue with some changes depending on the type of tissues (soft or hard tissues) and cellular complexity of the tissues. - After that, spin the tube to settle the tissue and carefully remove the PBS using a pipette. Perform another PBS wash if there are still traces of blood left in the tissue.
- Add 300 µL of urea lysis buffer (8 M urea, 50 mM Tris pH 8.0, 75 mM NaCl, 1 mM MgCl2) and protease inhibitor cocktail (PIC) as per the manufacturer's protocol.
NOTE: The volume of the lysis buffer should be enough to grind the tissue during the sonication process and to suspend what is extracted. Too little lysis buffer may result in inefficient tissue lysis, while too much lysis buffer will dilute the protein lysate. - Place the tube on ice and sonicate the tissue at an amplitude of 40% for 2.5 min with pulse cycles of 5 s (ON/OFF, respectively).
- Add zirconium beads to the tubes and homogenize the tissue using a bead beater for 90 s with 5 min incubation on ice. Repeat this step twice.
- Once the tissue is adequately homogenized, incubate the tube on ice for 10 min.
- After incubation, centrifuge the sample at 6,018 x g for 15 min at 4 °C to separate the cell debris from the supernatant.
- Collect the supernatant in the fresh labeled tube and store at -80 °C as aliquots until further use.
2. Protein quantification and quality check of tissue lysates
- Quantify the protein concentration in the tissue lysate using Bradford's reagent as described in the Supplementary File 1.
- Following the protein quantification, run 10 µg of tissue lysate on a 12% SDS-PAGE gel to check the quality of the lysate.
NOTE: Further downstream processing must be carried out only for the lysates clearing the quality checks.
3. Enzymatic digestion of proteins
NOTE: The steps for enzymatic digestion are shown in Figure 1a.
- For digestion, take 50 µg of proteins and add ddH2O to make up the volume to 20 µL.
- Now, prepare 20 mM Tris (2-carboxyethyl) phosphine (TCEP) from the stock (0.5 M TCEP) by adding 0.8 µL from stock to the protein lysate to reduce the disulfide bonds in the proteins and incubate the sample at 37 °C for 60 min.
- Prepare 40 mM iodoacetamide (IAA) in ddH2O and add 1.6 µL to alkylate the reduced cysteine residues. Incubate in the dark for 10 min at room temperature.
- Add dilution buffer containing 25 mM Tris pH 8.0 and 1 mM CaCl2 in a 1:8 ratio to dilute the urea concentration to less than 1 M in the sample. At this point, check the pH.
NOTE: If using trypsin as a digestion enzyme, make sure the concentration of urea is less than 1 M. - To perform digestion, add trypsin at an enzyme/substrate ratio of 1:50. Incubate the tubes at 37 °C in a shaking dry bath for 16 h for overnight digestion.
NOTE: The trypsin enzyme is a highly reactive protease that is prone to self-digestion. Take extra care and perform the addition of trypsin swiftly over the ice. - After 16 h of incubation, dry the digested peptides in a vacuum concentrator.
4. Desalting of digested peptides
NOTE: To perform the desalting of peptides, use C18 stage tips.
- Activate the C18 stage tip by adding 50 µL of methanol. Centrifuge the tip at 1,000 x g for 2 min at RT. Discard the filtrate collected at the bottom of the tube. Repeat twice.
- Add 50 µL of acetonitrile in 0.1% formic acid to wash the stage tip. Centrifuge the tube at 1,000 x g for 2 min at RT. Discard the filtrate collected at the bottom of the tube. Repeat this step twice.
- Add 50 µL of 0.1% (v/v) FA to equilibrate the column. Again, perform the centrifugation at 1,000 x g for 2 min at RT and discard the filtrate.
- Reconstitute the dried digested peptides in 50 µL of 0.1% formic acid.
NOTE: Avoid air bubble formation inside the stage tips while passing the sample. The stage tips should not be completely dried during the centrifugation step, as drying can lead to peptide loss. - Add the reconstituted peptides into the activated stage tip and pass the sample through the stage tip by centrifugation at 1,000 x g for 2 min. Repeat this step at least four times. Store the flow-through at 4 °C.
- To wash the sample, add 50 µL of 0.1% (v/v) formic acid. Repeat the centrifugation step and discard the filtrate.
- For the elution of peptides, add 50 µL of 40% (v/v) ACN in 0.1% formic acid (v/v) and pass it through the stage tip by centrifugation. Collect the filtrate in a fresh tube. Repeat the step with 50% and 60% ACN in 0.1% formic acid and collect the filtrate in the same fresh tube.
- Dry the desalted peptides collected in the fresh tube using a vacuum concentrator.
NOTE: The dried desalted peptides are ready to be injected, or it can be stored at -20 °C for 6 months. For long-term storage (>6 months), store the peptides at -80 °C.
5. Quantification of desalted peptides
- Reconstitute the dried desalted peptides in 0.1% FA.
- Wipe the photometric measurement plate with lint -free tissue using 70% ethanol.
- Use 2 µL of 0.1% FA to set the blank.
- Add 2 µL of reconstituted samples onto the plate in replicates.
- Place the plate in the spectrophotometer and measure the absorbance at 205 nm and 280 nm.
- Calculate Molar Absorptivity (ε) using the following formula:
ε = 27 / [1 - 3.85 * A280 / A205]
NOTE: Molar absorptivity (ε) is a measure of the probability of the electronic transition or how well a species absorbs the particular wavelength of radiation that is being incident on it. The value of ε should be in the range of 31 mL mg-1cm-1 to 33 mL mg-1cm-1. If the value does not fall in the range, this indicates that the samples are not properly digested. - Calculate the peptide concentration in µg/µL using the following formula:
Concentration of peptide = Net OD (205) / 0.051 * ε
6. Label-free quantitation (LFQ) of the digested peptides
NOTE: For label-free quantitation, use the LC and MS parameters mentioned in the Supplementary File 2. A high coverage data was obtained when three biological replicates of the same type of the sample were run in the mass spectrometer.
- Liquid chromatography setup
- After the quantification of desalted peptides, take 2 µg of peptides in a vial and make up the volume to 10 µL using 0.1% FA. The concentration of desalted peptides will be 200 ng/µL.
- Open the auto-sampler of the liquid chromatography system (see Table of Materials) and place the vial inside the autosampler.
- Use 0.1% (v/v) FA to equilibrate the pre-column and analytical column.
- Take 1 µg of desalted digested peptide from the vial and load it onto the column.
- Set the LC gradient according to the sample complexity. In this experiment, LC gradient was used for 120 min for label-free quantitation of the tissue samples.
- MS setup: Before optimizing any proteomics assays, perform a quality control check of the instrument by monitoring some peptides of Bovine Serum Albumin (BSA) using any software for system suitability and analyzing coverage of BSA (Figure 2A,B). The acquisition parameters were set into the instrument using the MS data acquisition software (see Table of Materials).
- Open the software, double click on Instrument Set Up and select the template from peptides-ID with default parameters.
- Set the MS parameters using Supplementary File 2 and Save it as a new method.
- Now, open the software to fill the sample details; double click on the Sequence Setup, and fill in the details such as sample type, sample name, file save location, instrument method file, the volume of injection, and position of the sample.
- Once all the information is filled, select the row and start the Run.
7. Label-based quantitation (iTRAQ) of digested peptides
NOTE: Label-based quantification can be performed using different isobaric labels such as iTRAQ or TMT reagents, etc. Here, iTRAQ 4-plex was used for the labeling of digested peptides from three tissue samples. The procedure of iTRAQ 4-plex labeling is mentioned below.
- Labeling of digested peptides using iTRAQ reagents.
NOTE: In this experiment, peptides from three tissue samples are used. From each tissue sample, 80 µg of digested peptides are taken in four tubes for labeling with iTRAQ reagents (114, 115, 116, and 117) (see Supplementary File 3 for the detailed experimental parameters).- Before using the iTRAQ reagent, bring each vial of the reagent to room temperature (approximately 5 min). Give a brief spin of approximately 30 s to bring the solution at the bottom of each vial.
NOTE: Make sure that in each vial, 10-15 µL solution should be present. - For iTRAQ labeling, reconstitute the dried peptides in 20 µL of dissolution buffer provided in the iTRAQ labeling kit.
- Reconstitute the labels by adding 70 µL of ethanol from the vial provided in the kit and mix the solution for 30 s and spin it for 10 s.
NOTE: It is advisable that all the steps be carried out as per the manufacturer's instructions. - Add the homogeneously mixed iTRAQ labels (114, 115, 116, and 117) to their respective tubes containing peptide samples and allow for the labeling reaction to take place.
- Mix the components of each tube by vortexing the tube for 30 s, and then spin the tube for 10 s to bring the mixture back to the bottom of the tube.
NOTE: Check the pH of the solution using pH paper. pH should be greater than 8; if not, add up to 10 µL of the dissolution buffer to adjust the pH. - Incubate each tube at room temperature for 90 min. At the end of the reaction, quench any excess unbound label in the tube by adding MS grade water.
- Incubate the tubes at room temperature for 30 min to 1 h.
- Once the incubation is over, transfer all the labeled contents into a single tube and dry the labeled peptides in a vacuum concentrator.
NOTE: A similar labeling procedure can be followed for TMT labeling.
- Before using the iTRAQ reagent, bring each vial of the reagent to room temperature (approximately 5 min). Give a brief spin of approximately 30 s to bring the solution at the bottom of each vial.
- Liquid chromatography setup
- Reconstitute the samples in 0.1% formic acid, open the autosampler of nano LC, and place the samples inside the autosampler. Use the parameters mentioned in Supplementary File 2 for LC setup.
- Set the LC gradient according to the complexity of the sample. LC gradient of 180 min was used in this experiment for label-based quantitation (iTRAQ) of the tissue samples.
NOTE: For less complex samples, short gradient can efficiently separate most peptides. However, if the sample is very complex, use a longer gradient for better separation of peptides.
- MS setup for iTRAQ technique
- Set up all the MS parameters for label-based quantitation in the same way as used for the label-free quantitation except for the collision energy, which was set to 35% for MS/MS fragmentation in the label-based quantitation.
8. Data analysis
- Analyze the raw (MS/MS spectrum) files obtained from LC-mass spectrometer using a commercially available analysis software (see Table of Materials).
NOTE: The Human Reference Proteome database from Uniprot (UP000005640) comprising 71,785 proteins sequences was used to obtain protein identities using Sequest HT and Mascot (v2.6.0) search engines. The parameters for label-free quantitation and label-based quantitation are described in Supplementary File 4.
Results
We have used two different approaches for discovery proteomics: label-free and label-based proteomics approaches. The protein profile of tissue samples on SDS-PAGE showed the intact proteins and could be considered for proteomic analysis (Figure 2A). The quality control check of the instrument was monitored via system suitability software and it showed the day-wise variation in the instrument performance (Figure 2B). We observed 91% sequence coverage of the BSA sample in 30 min of LC gradient (Figure 2C). The LC gradient was optimized using 500 ng of commercial HeLa cell digest and we observed 2425 proteins in a 2 h gradient as compared to 1488 proteins in a 1 h gradient (Figure 2D). We were able to identify, on an average, 2428 proteins across all three technical replicates of a pool tissue sample (Figure 2E).
The optimized LC and MS parameters were applied to three different biological tissue samples (Figure 3 and Supplementary File 2). The chromatogram showed good reproducibility between three different biological tissue samples. We identified 2725, 2748, and 2718 quantifiable proteins from tissue samples 1, 2, and 3, respectively, using a label-free based approach. We observed that 151 proteins were common in the first and second LFQ experiments, 163 proteins were shared between the second and third LFQ experiments, and 187 proteins were shared between the first and third experiments, while 2190 proteins were common in all three tissue samples (Figure 4A).
We inspected the chromatogram and checked the iTRAQ labels and found it to be present in almost all MS/MS spectrums. The three sets have been run for the iTRAQ experiment. Proteins number obtained from each set were 2455, 2285, and 2307, respectively. 287 proteins were found to be common in sample 1 and sample 2, 183 proteins were common in sample 2 and sample 3, and 195 proteins were common in sample 1 and sample 3. The total number of proteins common in all three samples was 1557 (Figure 4B).
We compared total peptide spectral matches (PSMs), peptide groups, total proteins, protein groups, and the number of proteins obtained after 1% FDR from the LFQ and iTRAQ experiment (Figure 4C).
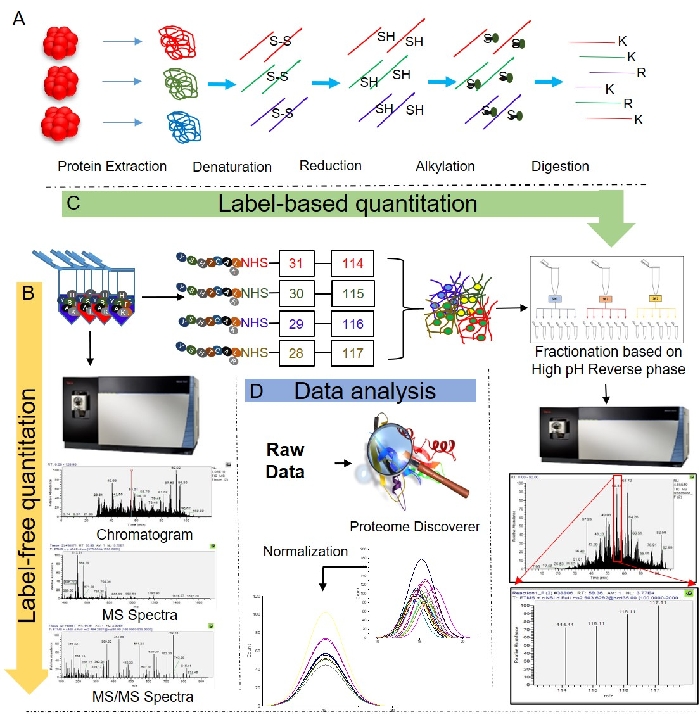
Figure 1: Workflow for tissue proteomics. (A) The sample processing steps to prepare samples from tissue lysate for the MS analysis. (B) Steps for label-free quantitation. (C) Steps for label-based quantitation. (D) Steps for data analysis using a proteome discoverer. Please click here to view a larger version of this figure.
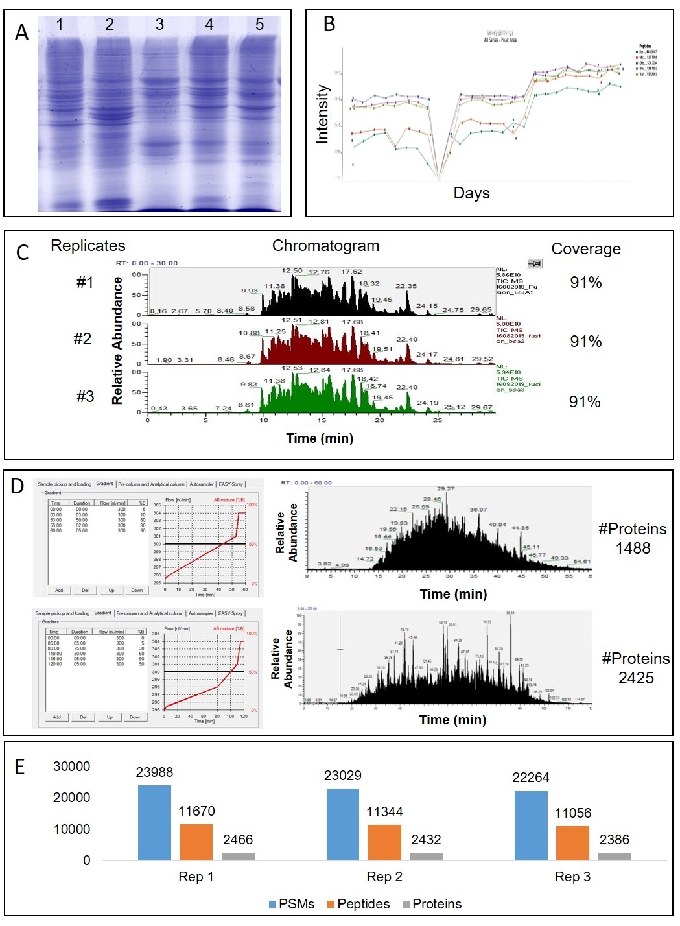
Figure 2: Quality check control of tissue samples and reproducibility of the instrument. (A) Quality check of tissue lysates on 12% SDS-PAGE (B) Monitoring of some peptides of BSA using Panorama to check the instrument variability across the different days. (C) The sequence coverage of BSA in three technical replicates. (D) Optimization of LC parameters for tissue samples. (E) The number of peptide spectral matches, peptides, and proteins in three different biological samples. Please click here to view a larger version of this figure.
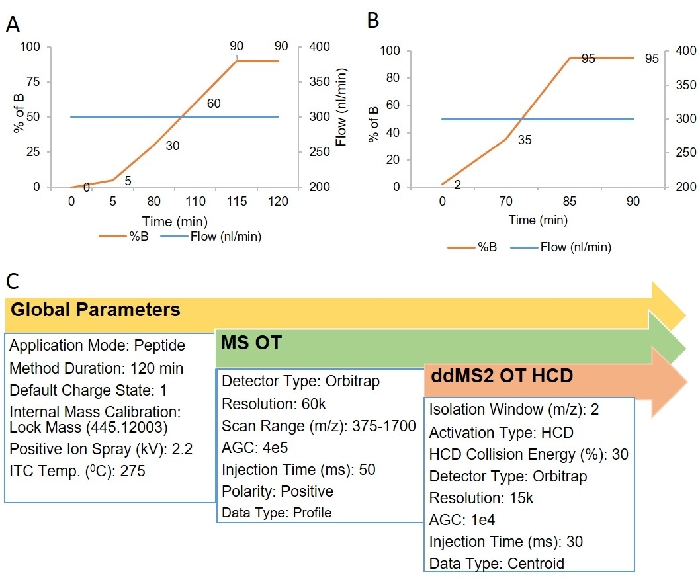
Figure 3: LC and MS parameters for proteomics analysis of tissue sample. (A,B) The liquid chromatography gradient used to separate the peptides for label-free quantitation (A) and label-based quantitation (B) of the tissue sample. (C) The MS parameters for label-free quantitation and label-based quantitation. Please click here to view a larger version of this figure.
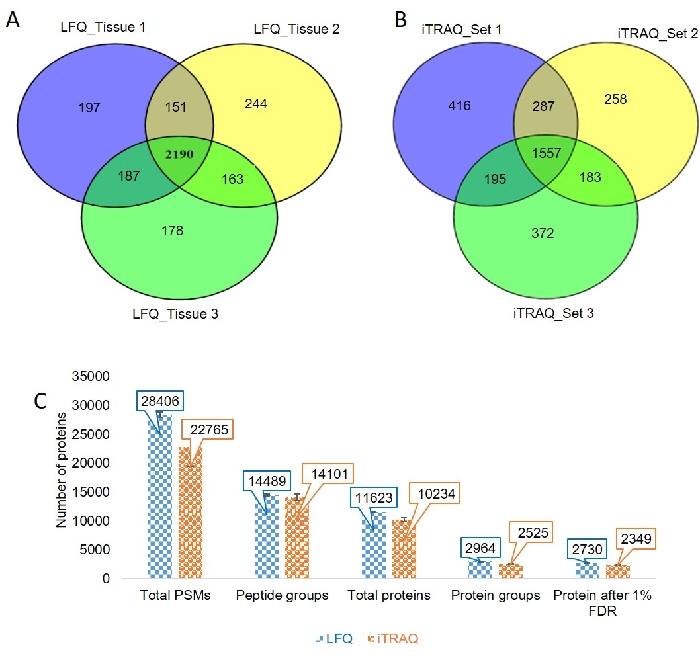
Figure 4: Label-free and label-based quantitation of tissue sample. (A) Venn diagram represents the common and exclusive proteins in tissue samples 1, 2, and 3 of the label-free experiment. (B) Venn diagram represents the common and exclusive proteins in tissue samples 1, 2, and 3 of the label-based experiment. (C) The comparative analysis of the number of peptide spectral matches (PSMs), peptide groups, total proteins, protein groups, and protein number after 1% FDR in label-free quantitation (LFQ) and label-based experiment (iTRAQ). Please click here to view a larger version of this figure.
Supplementary Files. Please click here to download this File.
Discussion
Tissue proteomics of biological samples enables us to explore new potential biomarkers associated with different stages of disease progression. It also explains the mechanism of signaling and pathways associated with disease progression. The described protocol for tissue quantitative proteomics analysis provides reproducible good coverage data. Most of the steps have been adapted from the manufacturer's instructions. In order to obtain high-quality data, the following steps are most crucial. Hence, extra care should be given while performing these steps.
The incomplete digestion of proteins and contamination of keratin may provide less coverage of proteins (n < 1000), thereby affecting the overall experiment. The pH of samples (pH 8) and concentration of urea in the samples (less than 1 M) will ensure the efficient digestion of proteins. The use of fresh buffer and handling of samples with care will reduce the chances of keratin contamination. iTRAQ reagents are extremely costly and it requires a sophisticated MS platform to perform the MS/MS and software to analyze the data. The proteomics experiments are sensitive to contamination from salts, peptide quantification, and labeling efficiency of iTRAQ/TMT reagents. Before the MS/MS analysis, ensure digested peptides are properly desalted to reduce the background noise in the data. In the case of the iTRAQ technique, fragmentation of the attached tag generates a low molecular mass reporter ion that can be used to relatively quantify the peptides and the proteins from which they have originated, whereas for label-free approach, the area under the curve is considered for quantitation. To increase the confidence in the quantitation of proteins, independent validation experiments especially, MRM/PRM should be performed.
The analysis of tissue samples using two quantitation methods (label-free and label-based proteomics) has been described to obtain a good coverage of proteins. The label-free quantitative proteomics approach offers several advantages for its use in clinical studies. The samples are run independently, and this is particularly important for studies that are undertaken for a patient cohort as there are a large number of samples to be analyzed via mass spectrometer. Using a technical replicate such as a pool of optimized peptides, one can ensure good reproducibility even if the samples are run at different time points. This approach has been used in large cohort studies such as the CPTAC, which is an effort of many international communities14.
The potential targets emerging from the study could be considered for validation using targeted proteomics approaches. We conclude that the projects based on tissue samples analysis could be heavily benefitted from the detailed workflows of quantitative proteomics provided in this study. The mentioned steps will help to optimize the method and map the proteome of tissue samples. The selection of quantitative proteomic techniques may depend upon the number of samples, availability of MS platforms, and the biological question to be addressed.
Disclosures
The authors have nothing to disclose.
Acknowledgements
We acknowledge MHRD-UAY Project (UCHHATAR AVISHKAR YOJANA), project #34_IITB to SS and MASSFIITB Facility at IIT Bombay supported by the Department of Biotechnology (BT/PR13114/INF/22/206/2015) to carry out all MS-related experiments.
Materials
| Name | Company | Catalog Number | Comments |
|---|---|---|---|
| Reagents | |||
| Acetonitrile (MS grade) | Fisher Scientific | A/0620/21 | |
| Bovine Serum Albumin | HiMedia | TC194-25G | |
| Calcium chloride | Fischer Scienific | BP510-500 | |
| Formic acid (MS grade) | Fisher Scientific | 147930250 | |
| Iodoacetamide | Sigma | 1149-25G | |
| Isopropanol (MS grade) | Fisher Scientific | Q13827 | |
| Magnesium Chloride | Fischer Scienific | BP214-500 | |
| Methanol (MS grade) | Fisher Scientific | A456-4 | |
| MS grade water | Pierce | 51140 | |
| Phosphate Buffer Saline | HiMedia | TL1006-500ML | |
| Protease inhibitor cocktail | Roche Diagnostics | 11873580001 | |
| Sodium Chloride | Merck | DF6D661300 | |
| TCEP | Sigma | 646547 | |
| Tris Base | Merck | 648310 | |
| Trypsin (MS grade) | Pierce | 90058 | |
| Bradford Reagent | Bio-Rad | 5000205 | |
| Urea | Merck | MB1D691237 | |
| Supplies | |||
| Hypersil Gold C18 column | Thermo | 25002-102130 | |
| Micropipettes | Gilson | F167380 | |
| Stage tips | MilliPore | ZTC18M008 | |
| Zirconia/Silica beads | BioSpec products | 11079110z | |
| Equipment | |||
| Bead beater (Homogeniser) | Bertin Minilys | P000673-MLYS0-A | |
| Microplate reader (spectrophotometer) | Thermo | MultiSkan Go | |
| pH meter | Eutech | CyberScan pH 510 | |
| Probe Sonicator | Sonics Materials, Inc | VCX 130 | |
| Shaking Drybath | Thermo | 88880028 | |
| Orbitrap Fusion mass spectrometer | Thermo | FSN 10452 | |
| Nano LC | Thermo | EASY-nLC1200 | |
| Vacuum concentrator | Thermo | Savant ISS 110 | |
| Software | |||
| Proteome Discoverer | Thrermo | Proteome Discoverer 2.2.0.388 |
References
- Petricoin, E., Wulfkuhle, J., Espina, V., Liotta, L. A. Clinical proteomics: revolutionizing disease detection and patient tailoring therapy. Journal of Proteome Research. 3 (2), 209-217 (2004).
- Geho, D. H., Petricoin, E. F., Liotta, L. A. Blasting into the microworld of tissue proteomics: a new window on cancer. Clinical Cancer Research: An Official Journal of the American Association for Cancer Research. 10 (3), 825-827 (2004).
- Hashimoto, Y., Greco, T. M., Cristea, I. M. Contribution of mass spectrometry-based proteomics to discoveries in developmental biology. Advances in Experimental Medicine and Biology. 1140, 143-154 (2019).
- Faria, S. S., et al. A timely shift from shotgun to targeted proteomics and how it can be groundbreaking for cancer research. Frontiers in Oncology. 7, 13(2017).
- Ray, S., et al. Proteomic technologies for the identification of disease biomarkers in serum: advances and challenges ahead. Proteomics. 11 (11), 2139-2161 (2011).
- Chen, E. I., Yates, J. R. Cancer proteomics by quantitative shotgun proteomics. Molecular Oncology. 1 (2), 144-159 (2007).
- Geyer, P. E., Holdt, L. M., Teupser, D., Mann, M. Revisiting biomarker discovery by plasma proteomics. Molecular Systems Biology. 13 (9), 942(2017).
- Ray, S., et al. Proteomic analysis of Plasmodium falciparum induced alterations in humans from different endemic regions of India to decipher malaria pathogenesis and identify surrogate markers of severity. Journal of Proteomics. 127, 103-113 (2015).
- Ray, S., et al. Clinicopathological analysis and multipronged quantitative proteomics reveal oxidative stress and cytoskeletal proteins as possible markers for severe vivax malaria. Scientific Reports. 6, 24557(2016).
- Sharma, S., et al. Multipronged quantitative proteomic analyses indicate modulation of various signal transduction pathways in human meningiomas. Proteomics. 15 (2-3), 394-407 (2015).
- Sharma, S., Ray, S., Moiyadi, A., Sridhar, E., Srivastava, S. Quantitative proteomic analysis of meningiomas for the identification of surrogate protein markers. Scientific Reports. 4, 7140(2014).
- Aslam, B., Basit, M., Nisar, M. A., Khurshid, M., Rasool, M. H. Proteomics: Technologies and their applications. Journal of Chromatographic Science. 55 (2), 182-196 (2017).
- Wiese, S., Reidegeld, K. A., Meyer, H. E., Warscheid, B. Protein labeling by iTRAQ: A new tool for quantitative mass spectrometry in proteome research. Proteomics. 7 (3), 340-350 (2007).
- Rudnick, P. A., et al. A description of the Clinical Proteomic Tumor Analysis Consortium (CPTAC) common data analysis pipeline. Journal of Proteome Research. 15 (3), 1023-1032 (2016).
Reprints and Permissions
