

ERRATUM NOTICE
Important: There has been an erratum issued for this article. Read more …
Summary
This procedure was established to be used for developing advanced 3D hepatic cultures in vitro, which can provide a more physiologically relevant assessment of the genotoxic hazards associated with nanomaterial exposures over both an acute or long-term, repeated dose regimes.
Abstract
Due to the rapid development and implementation of a diverse array of engineered nanomaterials (ENM), exposure to ENM is inevitable and the development of robust, predictive in vitro test systems is essential. Hepatic toxicology is key when considering ENM exposure, as the liver serves a vital role in metabolic homeostasis and detoxification as well as being a major site of ENM accumulation post exposure. Based upon this and the accepted understanding that 2D hepatocyte models do not accurately mimic the complexities of intricate multi-cellular interactions and metabolic activity observed in vivo, there is a greater focus on the development of physiologically relevant 3D liver models tailored for ENM hazard assessment purposes in vitro. In line with the principles of the 3Rs to replace, reduce and refine animal experimentation, a 3D HepG2 cell-line based liver model has been developed, which is a user friendly, cost effective system that can support both extended and repeated ENM exposure regimes (≤14 days). These spheroid models (≥500 µm in diameter) retain their proliferative capacity (i.e., dividing cell models) allowing them to be coupled with the ‘gold standard’ micronucleus assay to effectively assess genotoxicity in vitro. Their ability to report on a range of toxicological endpoints (e.g., liver function, (pro-)inflammatory response, cytotoxicity and genotoxicity) has been characterized using several ENMs across both acute (24 h) and long-term (120 h) exposure regimes. This 3D in vitro hepatic model has the capacity to be utilized for evaluating more realistic ENM exposures, thereby providing a future in vitro approach to better support ENM hazard assessment in a routine and easily accessible manner.
Introduction
Due to the rapid development and implementation of a diverse array of engineered nanomaterials (ENM) across a plethora of human-based applications (e.g., food, cosmetics, clothing, sporting equipment, electronics, transport and medicine), it is inevitable that humans will be exposed to ENM on a regular basis. With this, there are heightened concerns that the novel, size specific physio-chemical characteristics that deem these materials advantageous in numerous applications could cause adverse effects upon human health and the environment concomitantly. Currently many international activities are in place to actively reflect more physiologically relevant exposures to these ENM and assess the potential toxicity of these materials over acute, long-term, and repeated low-dose exposure scenarios.
Hepatic toxicology is key when considering ENM exposure, as it is widely known that the liver is a major site of ENM accumulation post exposure1,2. Moreover, the liver is the primary organ system for metabolism and detoxification of substances that enter systemic circulation3. Based upon the accepted understanding that 2D hepatocyte models do not accurately mimic the complexities of intricate multicellular interactions or appropriately represent metabolic activity observed in vivo, a greater focus into developing robust and physiologically relevant in vitro 3D liver models for in vivo substitute technologies has been established4,5. Utilizing advanced 3D culture technologies improves the longevity of in vitro hepatic models allowing for long term, repeated exposure regimes to be investigated. Additionally, this advanced culture format promotes the formation of enhanced physiological, organotypic features such as bile canaliculi, active transporter processes and improved CYP450 drug metabolizing capabilities, thus improving the predictivity of the models6. Current 3D in vitro hepatic models consisting of mono-cultures (hepatocytes only) or co-cultures (hepatocytes with nonparenchymal cells) exist in several formats, ranging from microtissues or spheroids in ultralow adhesion plates, hanging drop spheroids, cells embedded in matrices and/or scaffolds and microfluidic cell culture platforms, all of which are deemed effective advanced in vitro models for hepatic toxicity assessment6,7. However, the majority of these model systems are high maintenance, require specialized equipment and are expensive. Furthermore, these models are often static (i.e., nondividing cell models) that prevents their use in the assessment of hazard endpoints, such as genotoxicity testing utilizing methods that quantify fixed DNA damage. Genotoxicity is a core prerequisite in regulatory toxicology, and it is a vital component of the risk assessment of any toxicant8. There is no single assay that can be applied to quantify all forms of DNA damage that may arise following exposure to an exogenous agent. However, a core component of the in vitro genotoxicity testing battery is the micronucleus assay, which is a reliable and multifacetted technique that measures gross chromosomal damage9. It is a gold standard technique described by the OECD Test Guideline 487, for assessing in vitro DNA damage and genotoxicity and is part of the test battery requirement for regulatory hazard assessment10,11.
The human hepatocellular carcinoma cell line, HepG2, is used widely for initial hazard assessment screening as the cells are readily available, relatively inexpensive to source, simple to culture and amenable to high throughput screening12,13. When cultured into 3D spherical structures, they have been shown to recapitulate the liver microenvironment well and offer a hepatic model with sufficient proliferative capabilities to support the micronucleus assay3. Further development of the HepG2 spheroid models was established to improve the longevity and liver-like functionality of the model in order to support genotoxicity hazard assessment over long-term, repeated exposure regimes (≤14 days). Thus, in line with the principles of the 3Rs to replace, reduce and refine animal experimentation, the present protocol has been established to provide an advanced 3D in vitro hepatic model capable of reliably evaluating multiple toxicological endpoints (e.g., liver functionality, (pro-)inflammatory markers, cytotoxicity and genotoxicity) following acute, long-term and repeated chemical and ENM exposures in a routine and easily accessible manner.
Here, we present a method to establish a physiologically relevant 3D hepatocyte cell line based in vitro model system for genotoxicity hazard assessment following acute or long-term, repeated ENM exposures. The protocol can be broken down into 6 key stages: culturing cryopreserved HepG2 cells; HepG2 spheroid preparation; HepG2 spheroid transfer from hanging drop to agarose suspension; HepG2 spheroid harvest; micronucleus assay and scoring; and data analysis.
Protocol
1.Culturing cryopreserved HepG2 cells
NOTE: HepG2 cells, obtained from American Type Culture Collection (ATCC) were cultured in 1x Dulbecco's Modified Eagle Medium (DMEM) with 4.5g/L D-glucose and L-glutamine supplemented with 10% foetal bovine serum (FBS) and 1% penicillin/streptomycin antibiotic.
- Pre-warm DMEM cell culture medium (including the supplements) in a 37 °C water bath for 30 min.
- Remove one vial of HepG2 cells from liquid nitrogen and thaw in a 37 °C water bath for 2-3 min, whilst gently swirling the vial to allow for uniform thawing of the cell suspension. Take care not to submerge the vial above the O-ring in order to reduce the potential for contamination.
- Once thawed, remove the vial from the water bath and spray generously with 70% ethanol to decontaminate the outer surface of the vial before placing under a sterile, Class II laminar tissue culture hood.
- Carefully pipette the contents of the cryovial of HepG2 cells into a centrifuge tube containing 9 mL of pre-warmed DMEM cell culture medium (with supplements).
- Using a 10 mL strippette, transfer 10 mL of the cell suspension into a 25 cm2 disposable cell culture flask and incubate the culture for 3 days (from seeding) at 5% CO2 and 37 °C until ~80% confluency is reached before undergoing sub-culture into a larger 75 cm2 disposable cell culture flask.
- Once 80% confluency is reached, sub-culture cells under sterile conditions by trypsinization with 0.05% trypsin/EDTA solution pre-warmed in a 37°C water bath for 30 min. At no point should the cells be allowed to dry out.
- As cells form an adherent monolayer, remove the media by tipping into a disinfectant waste pot. Then immediately wash the monolayer to remove all traces of existing media by rinsing the flask twice with 3 mL of sterile 1x PBS solution kept at room temperature. Also, discard PBS into disinfectant waste pot.
- Once PBS wash is removed, add 5 mL of pre-warmed 0.05% trypsin-EDTA solution, ensuring to cover the entire surface of the cells and incubate cells for 6-8 min at 37 °C and 5% CO2.
- Gently tap the flask to dislodge the cells from the bottom of the flask and then add 5 mL of DMEM cell culture medium (with supplements) to neutralize the trypsin enzyme.
- Transfer the cell suspension into a 50 mL centrifuge tube and pipette the cell suspension up and down thoroughly to ensure that cells are completely disassociated.
- Centrifuge the diluted cell suspension at 230 x g for 5 min. Discard the supernatant into disinfectant and re-suspend cell pellet in 25mL of DMEM cell culture medium (with supplements).
- Transfer cell suspension into a 75 cm2 disposable cell culture flask and incubate at 37 °C and 5% CO2 for a further 3 days before undergoing spheroid preparation. Once the HepG2s have had time to acclimatize and once again reach ~80% confluency, determine the cell concentration in preparation for spheroid seeding.
2. HepG2 spheroid preparation
- Repeat sub-culture steps stated above, except after centrifugation, re-suspend the cell-pellet in 1 mL of DMEM culture medium pre-warmed in a 37 °C water bath. Pipette cell suspension up and down thoroughly.
- Score cell viability using the Trypan Blue Exclusion Assay (see OSHA SOP 3.21 Reproductive Toxins, Mutagens, Teratogens and Embryotoxins – Procedures for Safe Handling and Storage (2019) for health and safety guidance)14 with a 1:1 ratio of cell suspension to pre-filtered 0.4% Trypan blue solution.
- Prior to cell counting, take 1 mL of Trypan blue solution using a 1 mL syringe and filter with a 0.45 µm filter unit into a sterile, 1 mL tube.
- Transfer 10 µL of filtered, Trypan blue solution into a 0.2 mL tube and add 10 µL of cell suspension. Remaining filtered Trypan blue solution can be stored up to 3 months at room temperature for future use.
- Spray the haemocytometer thoroughly with 70% ethanol and wipe dry with a sterile paper towel before securing the coverslip on top using breath vapor. Sliding the coverslip across the breath moistened surface induces cohesive forces by generating Newton rings.
- Gently pipette the Trypan blue cell suspension up and down using a 1000 µL pipette (to reduce sheer stress) before adding 10 µL to the haemocytometer. Ensure that the solution is dispersed underneath the cover slip and covers the entire grid without air bubbles.

Figure 1: Counting cells using a haemocytometer. Diagrammatic representation of a haemocytometer highlighting which quadrant to count cells from. Please click here to view a larger version of this figure.
- Under the microscope, count the live (unstained) and dead (stained blue) cells found in the four large corner squares (Figure 1). Exclude any cells found to overlap or sit on the interior two edges of the large corner squares (i.e., on the lines) in the count.
- Using the following calculation, calculate the average number of live, viable cells (unstained) present in the sample:
Total Number of Cells/mL = Live Cell Count x x 10,000
where dilution refers to how many times the stock solution was diluted in Trypan blue (2x in this case) and # of squares counted refers to the four large corner squares of the haemocytometer counted - Based on the viable HepG2 cell count and using the following formula:
C1V1=C2V2
where C1 = the concentration of viable cells currently,
V1 = the volume of cell suspension currently,
C2 = the concentration of cell suspension wanted,
V2 = the volume of cell suspension wanted - Prepare a 10 mL stock solution of HepG2 cell suspension with DMEM cell culture medium at a concentration of 2.0 x 10⁵ cells/mL in order to achieve 4000 HepG2 cells per 20 µL hanging drop. Mix the cell suspension thoroughly by gently pipetting up and down using a 1000 µL pipette to ensure all cells are fully suspended within the media.
- To the wells of a 96-well cell culture plate, add 100 µL of sterile, room temperature PBS to prevent the hanging drops from drying out during incubation.
- Take the lid of a standard flat bottom 96-well cell culture plate, invert it and carefully pipette 20 µL drops of the cell suspension into the center of each well groove of the lid, as shown in Figure 2. Use a multi-channel pipette but add only 2 - 4 drops at once as multiple seeding can affect the accuracy and placement of the drops.
- Center the drops within the grooves of the wells laid out on the lid; otherwise they will not hang in the center of the wells when the lid of the plate is turned over and are at risk of falling off into the plate. Gently flip the lid of the 96-well plate, so the drops are now hanging and carefully place on top of the 96-well plate.
- Place the whole 96 well plate with lid gently into an incubator at 37 °C and 5% CO2 for 3 days prior to spheroid transfer onto agarose.
NOTE: Extra care must be taken not only when transporting the plates to/from the incubators, but when opening and closing the incubator in general as excessive movement can cause the plates to shift and the spheroids to either fall or form incorrectly.
 x 10,000
Figure 2: 3D HepG2 in vitro spheroid model preparation. (A) The HepG2 cells seeded in 20 µL drops onto the lid of a 96-well plate. (B) The HepG2 cells post-seeding in the hanging drop model to allow for spheroid formation. Please click here to view a larger version of this figure.
3. HepG2 spheroid transfer from hanging drop to agarose suspension
NOTE: On Day 3 post seeding into hanging drops, the spheroids are transferred into the wells of the same 96-well plate all of which have been previously coated with a fine layer of 1.5% agarose gel.
- Prepare agarose gels and autoclave (i.e., day 2 post seeding) prior to the day of plate coating (i.e., day 3 post seeding).
- To prepare a 1.5% agarose gel, weigh 0.30 g of agarose into a clean, glass bottle and then add 20 mL of phenol-red free DMEM medium. Autoclave the agarose for 1 h at 230 °C for sterilization. The agarose coating prevents the HepG2 spheroids from adhering to the base of wells and forming a cellular monolayer instead of retaining their 3D spheroid structure.
- On Day 3 post seeding, remove the 96-well plate containing the HepG2 hanging drop spheroids out of the incubator and carefully flip the lid so the spheroids are no longer hanging.
- Using a multichannel pipette, remove and discard the 100 µL of PBS previously added to the base of the 96-well plate. Allow the plates to airdry for 2-3 min whilst heating the agarose in preparation for coating.
CAUTION: This procedure results in very hot, liquid agarose which if spilt onto the skin may burn and cause injury. Furthermore, care must be taken when handling the glass bottle containing the liquid agarose as this too can be very hot. - Using the 1.5% agarose gels previously prepared, heat the glass bottle containing the 20 mL agarose gel for 30 s in a microwave at the maximum watt (i.e., 900 W). To coat two 96-well plates, one 20 mL bottle of pre-prepared 1.5% agarose gel should be sufficient.
- Once melted, gently swirl the agarose by rotating the glass bottle to remove any bubbles and then add 50 µL of agarose into the base of each well.
NOTE: When adding the agarose, ensure not to angle the plate >45° as the agarose sets quickly and will not form a flat, level layer that can disrupt spheroid growth. It is important to work efficiently at this stage to prevent the agarose from solidifying before the plate is completely coated. - Allow the plate to stand for 2 min at room temperature before adding 100 µL of pre-warmed DMEM cell culture medium (with supplements) on top of the solid agarose layer in each well.
- Flip the lid of the 96-well plate and place back on top of the 96-well plate so the spheroids are now hanging once again.
- Centrifuge the plate for 3 min at 200 x g in order to transfer the spheroids from the hanging droplet into the individual wells of the 96-well plate. Following the transfer, the HepG2 spheroids should now be suspended in the cell culture medium. Allow them to settle for 24 h in the incubator at 37 °C and 5% CO2.
- Expose HepG2 spheroids of this size to either chemical or ENM treatments on Day 4 post seeding (i.e., 24 h after transfer to agarose coated plates).
- In order to maintain cell viability over extended culture periods, refresh the cell culture medium every 3 days. To do this, gently aspirate 50 µL of the cell culture medium from the surface of the well and replace with a fresh 50 µL of DMEM cell culture medium. Take care not to remove or disturb the spheroid when performing a medium change.
4. Nanomaterial/Chemical exposure
NOTE: The HepG2 liver spheroid model can support both ENM and chemical based exposure regimes, but the primary focus of this protocol is ENM exposures. Prior to exposure, the test ENM must be suitably dispersed; this can be performed as directed by the NanoGenoTox Dispersion Protocol (Grant Agreement No. 20092101, 2018)15.
- Following dispersion according to the NanoGenoTox Dispersion Protocol, dilute the ENM suspension from the starting concentration of 2.56 mg/mL to the final desired concentration in pre-warmed DMEM cell culture medium (including the supplements). A total volume of 5 mL is required to dose one 96 well plate.
- To expose the HepG2 spheroid to either a chemical or ENM, using a 200 µL pipette, aspirate 50 µL of cell culture medium from the surface of each well (leaving 50 µL in the well so as not to disturbed the spheroids) and replace with 50 µL medium containing the test toxicant at the required dose.
- Once the test material has been applied, incubate the plates for the desired exposure time at 37 °C and 5% CO2.
- If a long-term (≥24 h) exposure regime is conducted, then immediately after the desired exposure timeframe has elapsed, harvest the spheroids for micronucleus endpoint analysis as described below in steps 6.1 – 6.4.
- However, with acute exposure regimes (e.g., ≤24 h), once the exposure period has ended, harvest, pool, and store 50 µL of supernatant from each well in the 96 well plate at -80 °C for further biochemical analysis later. Replace the cell culture medium with 50 µL of fresh medium containing 6 µg/mL of Cytochalasin B and leave to incubate for 1 – 1.5 cell cycles (i.e., 24 – 26 h for HepG2) in preparation for the cytokinesis block micronucleus assay harvest.
NOTE: For Acute (≤24 h) exposure regimes, the cytokinesis block micronucleus assay with Cytochalasin B can be applied but for long-term (≥24 h) exposure regimes, the mononuclear version (without Cytochalasin B) of the assay must be utilized as described below in Figure 4.
5. HepG2 spheroid harvesting
NOTE: Following either chemical or ENM exposure treatments, both cell culture medium or spheroid tissue can be harvested for multiple endpoint analysis. Depending on the endpoint analysis, spheroids can either be harvested individually (e.g., for image analysis) or pooled together (e.g., for cytokinesis block micronucleus assay).
- Remove the 96-well plate from the incubator.
- Using a 200 µL pipette, aspirate the 100 µL of cell culture medium including the spheroid tissue from each well and collect in a sterile, 15 mL centrifuge tube. Take care to avoid contact with the agarose.
- Once collected, centrifuge the spheroid suspension at 230 x g for 5 min. Remove the supernatant and store at -80 °C for further endpoint analysis (e.g., liver function tests) later.
- Re-suspend the pellet of spheroids in 1 mL of sterile, room temperature PBS (1x).
- Once washed, centrifuge the spheroid suspension again at 230 x g for 3 min. Discard the supernatant, re-suspend in 500 µL of 0.05% trypsin-EDTA solution and incubate for 6-8 min at 37 °C and 5% CO2.
- Following incubation, gently pipette the trypsinized cells up and down to fully disassociate and re-suspend the HepG2 cells prior to neutralizing with 1 mL of DMEM cell culture medium.
- Centrifuge the diluted cell suspension at 230 x g for 5 min. Discard the supernatant into disinfectant and re-suspend cell pellet in 2mL of room temperature PBS (1x).
- Centrifuge the cell suspension at 230 x g for 5 min. Discard the supernatant into disinfectant and then re-suspend the cell pellet once more in 2 mL of cold PBS (1x). Ensure the cells are well dispersed to prevent clumps of cells obscuring the field of view when mounted onto microscope slides.
6. Micronucleus assay and scoring
For the manual method of the micronucleus assay, a cytocentrifuge is required to produce a cytodot (a defined, concentrated region of cells) in the centre of the microscope slide. This process supports more efficient scoring of the slide as it allows the scorer to easily locate the cells of interest, as opposed to evaluating a whole slide where the cells can be widely spread.
- Dip frosted microscope slides (three per dose) in 70% ethanol followed by ddH2O and leave to air dry for 5 min.
- Place prepared microscope slides into cuvette funnel as shown in Figure 3A, where the glass slide (iii) is placed in the metal support (iv) with a filter card (ii) and cuvette funnel (i) secured on top.
- Arrange cuvette funnels in the cytocentrifuge with the funnel facing up, so 100 µL of cell suspension can be directly added into each one.
- Cytospin for 5 min at 500 x g to ensure cells are evenly distributed onto the surface of the slide.

Figure 3: Cytospin setup to prepare treated cells on microscope slides. (A) Displays the individual components, (i) cuvette funnel, (ii) filter card, (iii) glass microscope slide and (iv) metal support required to cytospin HepG2 cells onto microscope slides. (B) The final cuvette funnel set up. (C) The correct placement of the cuvette funnel within the cytocentrifuge. Please click here to view a larger version of this figure.
- Leave slides to air dry before fixation in ice-cold, 90% methanol for 10 min.
- Once fixed, leave the slides to air dry overnight at room temperature before storing at -20 °C for up to 6 months.
- When required, remove the pre-prepared microscope slides from -20 °C freezer and allow to warm to room temperature before undertaking Giemsa staining.
CAUTION: According to Regulation (EC) No. 1272/2008 [CLP], Giemsa staining solution is a highly flammable liquid which can be toxic if swallowed and cause damage on contact with the eyes, skin or if inhaled. Refer to the associated SDS sheet for detailed storage, handling and health and safety advice on this chemical prior to use. - Whilst the slides are defrosting, prepare a 20% Giemsa staining solution (25 mL required to stain ~30 slides) diluted in phosphatase buffer (pH 6.8). Mix thoroughly by gently swirling the solution before filtering using folded filter paper placed in a funnel.
- Using a Pasteur pipette, add 3 – 5 drops of filtered Giemsa solution to the cytodot on each slide and leave for 8 – 10 min.
- Wash slides in two successive phosphatase buffer washes before briefly rinsing under cold water to remove any excess stain leftover. Leave slides to air dry.
- Once dry, in a fume hood, dip stained slides in xylene for 10 s before adding a drop of mounting medium to the center of the cytodot and a place a glass coverslip on top.
- Leave microscope slides in the fume hood overnight to dry before manual scoring; they can be stored indefinitely at room temperature.
7. Data analysis
- As described in the OECD Test Guidelines 487 (2014)11, to assess and quantify DNA damage induced as a result of exposure to an ENM or chemical agent, use a light microscope (100x objective with immersion oil) 2000 mononucleated or 1000 binucleated cells per biological replicate to score for the presence of micronuclei, as shown in Figure 4.

Figure 4: Micronucleus assay scoring decision tree. Schematic decision tree to highlight the necessity for different scoring and cytotoxicity assessment procedures when using the micronucleus assay with 3D models following acute or long-term exposure regimes. Acute (≤24 h) exposures allow use of the cytokinesis blocked micronucleus assay, while long-term (≥24 h) exposures require the mononuclear version of the assay; both of which are described in OECD Test Guideline 487. Please click here to view a larger version of this figure.
- Based on the proportion of micronuclei present per number of mononucleated or binucleated cells scored, calculate a percentage of genotoxicity value.
- In order to assess the DNA damage observed is not as a result of cell debris caused by a high proportion of apoptotic cells, take a measure of cytotoxicity alongside. In this case, depending on the presence of Cytochalasin B, use either CPBI or RVCC calculation (as described in Figure 4). Genotoxicity must only be evaluated in samples where cytotoxicity is less than 55% ± 5% as defined in OECD Test Guideline 48711.
Representative Results
Suitability of this cell-line based 3D liver spheroid model for long-term culture and genotoxic hazard assessment was evaluated by conducting baseline characterization to determine the viability and liver-like functionality of the model over the duration of 14 days in culture as well as its applicability for the micronucleus assay.
Baseline Characterization of the 3D HepG2 Liver Spheroid Model
Prior to any in vitro toxicological assessment, it is important to check that the 3D HepG2 spheroids have formed properly before performing the agarose transfer or chemical/ENM treatment. HepG2 spheroids produced using the hanging drop method usually take 2 - 3 days post seeding (4000 cells/spheroid) to form compact, spherical shaped spheroids with an average diameter of 495.52 µm W x 482.69 µm H as shown in Figure 5A-5C. HepG2 spheroids that have formed correctly and are acceptable to be used for in vitro toxicological assessment must have a compact, spherical shaped structure with a smooth surface and no visual projections. Figure 5 provides examples of good quality (Figure 5D-F) and a poor quality (Figure 5G-I) spheroids. The latter of which should be discarded. Typically, 90-95% of spheroids formed per plate will form correctly and be viable for further experimentation.

Figure 5: Light microscopy images displaying the natural morphology of the HepG2 spheroids formed via the hanging drop method. (A-C) show Day 2 and (D-I) Day 4 HepG2 liver spheroids post seeding. (D-F) are examples of good quality HepG2 spheroids whilst (G-I) shows poorly formed spheroids. All images were taken on a X20 objective using a microscope. The scale bar represents 20 µm. Please click here to view a larger version of this figure.
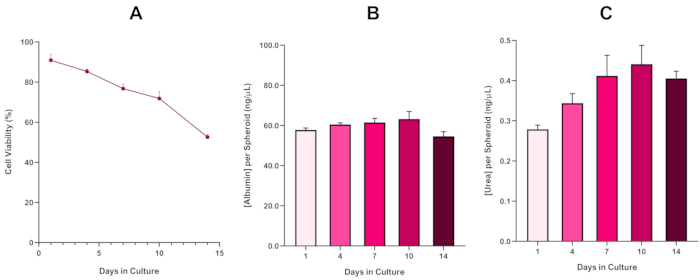
To further confirm HepG2 spheroid viability, a basic colorimetric Bromocresol Green Albumin (BCG) Assay or Urea Assay can be performed to assess their liver-like functionality. Liver-like functionality was assessed in line with viability using the Trypan Blue Exclusion Assay over a 14 day culture period to determine the longevity of the liver spheroid model and establish if it could support long-term or repeated ENM/chemical based hazard assessment (Figure 6). Albumin concentration remained consistent over the duration of the culture period. Urea production displays an increase in the concentration of urea produced per spheroid over a week in culture before reaching a plateau by day 7. It is important to note that the levels of albumin and urea produced in the 3D HepG2 spheroids are substantially higher than that observed in the same cell line cultured in a 2D format. Indeed, 2D cultures of HepG2 cells, peak albumin and urea levels were 0.001 mg/mL and 0.010 ng/µL respectively. Furthermore, in previous work published by Shah et al. using an almost identical HepG2 spheroid system, the authors highlight a notable improvement in metabolic activity (CYP1A1 and CYP1A2) in the 3D HepG2 in vitro model systems when compared to the 2D cultured HepG2 cells5.

Figure 6: 14-Day baseline characterisation data for HepG2 liver spheroids. Following transfer from hanging drop, (A) highlights the viability of the HepG2 spheroid model over a 14 day period whilst (B) and (C) highlight the liver-like albumin and urea functionality respectively. Mean data ± SEM presented, n = 4. Please click here to view a larger version of this figure.
With the inevitable development of a necrotic core, a known limitation of 3D liver spheroid cultures, the viability of this HepG2 based model had to be established to demonstrate it was able to sustain long-term (5-10 day) exposure regimes whilst maintaining the proliferative capability required to support the micronucleus assay5. Indeed, this 3D liver spheroid model has been shown to retain >70% viability over 10 days in culture. Based on this and in conjunction with the sustained liver-like functionality observed over the ≥14 day culture period, this 3D liver spheroid model can thus support long-term, repeated ENM exposure regimes up to 10 days long (i.e., before viability of the spheroids drop below 70%). For reference, it is advised that albumin levels for HepG2 spheroids seeded at 4000 cells/spheroid should be ≥20.0 ng/µL whilst urea production should be ≥0.25 ng/µL before conducting an in vitro toxicological assessment with this model.
Genotoxicity Assessment of Engineered Nanomaterials
For genotoxicity assessment, the micronucleus assay was used to determine the presence of micronuclei following both acute (24 h) and long-term (120 h) ENM exposures. Aflatoxin B1 is a known liver carcinogen16,17 and is a recommended positive control for the micronucleus assay. Optimization experiments have shown that 0.1 µM of Alfatoxin B1 induces a significant positive (≥2.0 fold increase) genotoxic response in 3D HepG2 liver spheroids and thus is used in every micronucleus assay conducted with this model. To ensure the validity of the micronucleus assay results using the HepG2 spheroid model, the background micronucleus frequency for HepG2 cells used in this 3D in vitro model should lie within a range of 0.6% – 1.2%. As a result, Alfatoxin B1 should induce a genotoxic response of at least two-fold higher than that seen with the negative control; thus, 0.1 µM of Alfatoxin B1 should induce a micronuclei frequency between 1.5% – 3.0%. Using these control parameters, ENM associated genotoxicity in vitro can then be reliably assessed. Based on OECD Test Guideline 487, it is important to note that when testing an ENM or chemical, the concentrations selected should not induce more than 55% ± 5% cytotoxicity (indicated by a reduction in CPBI or RVCC values in relation to the negative control)11. Figure 7 illustrates the data generated when Aflatoxin B1 and two ENMs (titanium dioxide (TiO2) and sliver (Ag)) were evaluated following both acute and long-term exposures in the HepG2 spheroids, and subsequent genotoxic potential was analyzed using the micronucleus assay. Both ENMs assessed were tested at a noncytotoxic, low dose of 5.00 µg/mL over an acute (24 h) exposure and long-term (120 h) exposure regime. A similar trend for genotoxicity across both TiO2 and Ag ENMs can be observed, whereby the elevated genotoxicity response that resulted following 24 h exposure was not evident after a long-term 5 day exposure. This was despite sustained genotoxicity induced by the Aflatoxin B1 positive control at both time-points.

Figure 7: Genotoxicity assessment following TiO2 and Ag ENM exposure on HepG2 liver spheroids. Genotoxicity (micronucleus frequency) assessment using the micronucleus assay post (A) acute (24 hour) and (B) long-term (120 hour) exposure to 5.00 µg/mL of TiO2 and Ag ENM. Negative control is a media only, whilst the positive control is 0.1 µM of Aflatoxin B1. Mean data (n=2) presented ± SD. Significance indicated in relation to the negative control: * = p≤ 0.05. Please click here to view a larger version of this figure.
Discussion
Applications for 3D hepatic models vary considerably depending on the particular biochemical endpoint or adverse outcome pathway being targeted. Each model has its benefits and limitations, from interdonor variation in primary human hepatocyte (PHH) models to reduced cytochrome p450 activity in cell-line based models, but all are valuable in their own right6,12,18,19. When assessing genotoxicity there are limitations in the models compatibility with regulatory approved endpoints such as the in vitro micronucleus assay, as active proliferation is required. This is necessary, as genotoxicity assessment requires the quantification of fixed DNA damage to be assessed post cell division when there is opportunity for DNA repair to correct transient lesions. Unfortunately, highly differentiated hepatocyte (i.e., HepaRG) based spheroids or PHH microtissues, which are deemed to exhibit the most physiologically relevant liver-like characteristics form static (non-proliferative) models12,19,20. As a result, the 3D HepG2 spheroid model presented here provides a suitable, alternative model able to support genotoxicity testing. HepG2 cell-line based spheroids have sufficient actively dividing cells on the outer surface of the spheroids whilst maintaining basic liver-like characteristics, such as albumin and urea production and some CYP450 activity5,12,19. Principally this in vitro liver model has been developed to complement the micronucleus assay, as this is one of the two in vitro assays recommended in the battery for genotoxicity testing8,10,11,21. However, the model can be readily applied to DNA sequencing analysis and gene expression (RNA) technologies, while it has the potential to be further adapted and utilized for other DNA damage endpoints, such as the comet assay. Nonetheless, it is important to consider the role that ENM interference plays in some endpoint analyses. For example, flow cytometry-based analyses may not be suitable for ENM genotoxicity assessment specifically due to particle interference22.
One limiting factor of spheroid models that actively undergo cell division is their size. Optimization of seeding density is critical as there needs to be enough cells that allow the model to continue to proliferate; but not too high a cell number, which results in the spheroid becoming overly compact, leading to an increased necrotic core. The cause of this necrosis is believed to be restricted oxygen and nutrient diffusion, as the limit of this diffusion is thought to be approximately 100 – 150 µm of tissue23,24. However, this does depend of the cell type, cell number, scaffold interactions and culture conditions25. Since, it has been shown that approximately 700 µm diameter is the limit for avoiding premature onset of necrosis in the center of C3A spheroids, seeding 4000 HepG2 cells per spheroid ensures the diameter of the model at the time of exposure is ≤500 µm26. Furthermore, Shah et al. established that HepG2 cells seeded above 5000 cells per spheroid exhibited a 25% reduction in viability following 7 days in culture, which could pertain to the average diameter of 680 µm and limited availability of nutrients in a 20 µL hanging drop5. To overcome this, the model devised in the present protocol undergoes a critical step where the hanging drop is transferred to agarose coated wells following initial formation of the spheroid. This ensures a greater volume of culture medium is present to sustain the ever-growing number of cells within the spheroids. As a result, the HepG2 spheroid model remains over 70% viable following 10 days in culture and can be utilized for long-term hazard assessment in vitro.
Whilst the HepG2 spheroid model can support both acute and long-term exposure regimes, refreshing cell culture medium during extended culture periods is restricted for this model as complete replacement of the medium is not advised due to the potential loss of the spheroids. It is presumed that with ENM exposures, the tendency for homogenous ENM dispersions to agglomerate and sediment is high. However, it is notable that the rate at which an ENM sediments can vary depending on the particle parameters (e.g., size, shape and density) and can be determined theoretically using the in vitro sedimentation, diffusion and dosimetry (ISDD) model, or its recent derivatives, often referred to when regarding ENM (suspension) exposure approaches27,28. With this is mind, it is assumed that if only 50% of the cell culture medium is carefully removed from the surface of the cell culture, the disruption and subsequent removal of the ENM dose should in theory be minimal. However, with Brownian motion at play, this may not strictly be the case and further work into the deposition and sedimentation of each particular ENM to be tested should be undertaken to ensure the correct dosimetry is retained throughout the long-term exposure regimes27. Principally this is a potential limitation to consider when performing repeated dosing regimes as this could be critical to the final, accumulated concentration. Chemical based exposures on the other hand, whilst not without their own limitations to consider, offer a more simplistic approach in that chemical substances tend to remain in solution and thus a direct replacement of the original chemical concentration in addition to the newly added concentration ensures that any chemical lost during media refreshment is replaced accordingly29. Future applications would include evaluating the suitability of the model for repeated exposure regimes over long-term culture periods as repeated dosing strategies are crucially important for assessing the ability of a particular organ system to ameliorate or overcome the adverse effects, if any, induced by bioaccumulation of a xenobiotic substance.
In conclusion, this 3D in vitro hepatic model has the capacity to be utilized for evaluating a range of realistic exposure scenarios, thereby providing a future in vitro approach to better support both ENM and chemical hazard assessment in a routine and easily accessible manner.
Disclosures
The authors have nothing to disclose.
Acknowledgments
The authors would like to acknowledge that this research has received funding from the European Union’s Horizon 2020 research and innovation programme for the PATROLS project, under grant agreement No.760813
Materials
| Name | Company | Catalog Number | Comments |
| Aflotoxin B1 | Sigma Aldrich, UK | A6636-5MG | |
| Agarose | Sigma Aldrich, UK | A9539-50G | |
| Autoclave Tape | |||
| BCG Albumin Assay | Sigma Aldrich, UK | MAK124 | |
| Bovine Serum Albumin Powder | Sigma Aldrich, UK | A9418 | |
| Cell Freezing Aid | Thermo Fisher Scientific, UK | 5100-0001 - Mr Frosty | |
| Centrifuge | Eppendorf | 5810 R | |
| Cytochalasin B | Merck, UK | 250233 | |
| Cytology Metal Clips | |||
| Cytospin 4 Centrifuge | ThermoFisher Scientific, UK | CM00730202 | |
| DMEM with 4.5g/L D-Glucose, L-Glutamine | GIBCO, Paisley, UK | 41965-039 | |
| DMEM, phenol-red free with 4.5g/L D-Glucose, L-Glutamine with Hepes | GIBCO, Paisley, UK | 21063-029 | |
| DPX Mounting Medium | FisherScientific, UK | D/5330/05 | |
| Ethanol | FisherScientific, UK | 10048291 | |
| FBS | GIBCO, Paisley, UK | 10270-106 | |
| Filter Cards for Shandon Cytospin | FisherScientific, UK | 15995742 | |
| Frosted Glass Slides | ThermoFisher Scientific, UK | ||
| Giemsa's Stain Improved R66 Solution, Gurr | VWR Chemicals, UK | MFCD00081642 | |
| Glass Coverslips (24 x 60) | Deckglaser, VWR | ECN631-1575 | |
| Haemocytometer and Coverslip | |||
| Immersion Oil for Microscope | Zeiss, UK | 518F, ISO8034 | |
| Laminar Class II Tissue Culture Hood | Scanlaf Mars | ||
| Light Microscope | Zeiss, UK | Axiovert 40C | |
| Liquid Nitrogen | |||
| Methanol | FisherScientific, UK | 10284580 | |
| Microwave | |||
| Non-Filtered, Sterile 200µl and 1000µl Pipette tips | Greiner-Bio-One, UK | ||
| NuncMicroWell 96-Well Microplates | ThermoFisher Scientific, Denmark | 167008 | |
| P1000 and P200 micropipettes | |||
| P300 and P50 multi-channel pipettes | |||
| PBS pH 7.4 1X, MgCl2 and CaCl2 Free | GIBCO, Paisley, UK | 14190-094 | |
| Pen/Strep | GIBCO, Paisley, UK | 15140-122, Penicillin/Strepmyocin 100X or 10,000U/ml | |
| Phosphatase Buffer Tablets | GIBCO, Paisley, UK | 10582-013 | |
| Pipette Boy | |||
| Simport Scientific CytoSep Funnels for Shandon Cytospin 4 Centrifuges | FisherScientific, UK | 11690581 | |
| Sonifier SFX 550 240V CE 1/2" - Probe | Branson, USA | 101-063-971R | |
| T-25 and T-75 Tissue Culture Flask | Greiner-Bio-One, UK | T-25 (690175) and T-75 (660175) | |
| Trypan Blue Solution | Sigma Aldrich, UK | T8154-100mL | |
| Urea Assay Kit | Sigma Aldrich, UK | MAK006 | |
| Virkon Disinfectant | DuPont, UK | Rely+On Virkon | |
| Water Bath (37?C) | Grant JBNova 18 | ||
| Weighing Balance | |||
| Xylene | FisherScientific, UK | 10588070 | |
| 0.05% Trypsin-EDTA | GIBCO, Paisley, UK | 5300-054 | |
| 0.2mL and 1.0mL Eppendorf Tubes | Greiner-Bio-One, UK | ||
| 0.45µm Filter Unit | Millex HA, MF-Millipore, UK | SLHA033SS | |
| 1.0mL Syringe | BD Plastipak, FisherScientific, UK | 300185 | |
| 20mL LS Scintillation Glass Vials, 22-400 Foil Lined PP Caps | DWK Life Sciences GmbH, Germany | WHEA986581 | |
| 37?C and 5% CO2 ISO Class 5 Hepa Filter Incubator | NUAIRE DHD Autoflow | ||
| 3mL Pasteur Pipette | Greiner-Bio-One, UK | ||
| 50mL Conical Falcon Tubes | Greiner-Bio-One, UK | ||
| 50mL or 100mL Glass Bottles | |||
| 50mL Skirted Falcon Tubes | Greiner-Bio-One, UK | ||
| 5mL, 10mL and 25mL Pipettes | Greiner-Bio-One, UK | ||
| 9.4cm Square, Petri Dish | Greiner-Bio-One, UK | 688161 |
References
- Geiser, M., Kreyling, W. G. Deposition and biokinetics of inhaled nanoparticles. Particle and Fibre Toxicology. 7, 2 (2010).
- Modrzynska, J. Toxicological effects of nanoparticle deposition in the liver. Kgs. Lyngby, Denmark: Technical University of Denmark. , (2018).
- Elje, E., et al. The comet assay applied to HepG2 liver spheroids. Mutation Research/Genetic Toxicology and Environmental Mutagenesis. 845, 403033 (2019).
- Breslin, S., O'Driscoll, L. Three-dimensional cell culture: the missing link in drug discovery. Drug Discovery Today. 18, 240-249 (2013).
- Shah, U. -K., et al. A three-dimensional in vitro HepG2 cells liver spheroid model for genotoxicity studies. Mutation Research/Genetic Toxicology and Environmental Mutagenesis. 825, 51-58 (2018).
- Lauschke, V. M., Hendriks, D. F. G., Bell, C. C., Andersson, T. B., Ingelman-Sundberg, M. Novel 3D Culture Systems for Studies of Human Liver Function and Assessments of the Hepatotoxicity of Drugs and Drug Candidates. Chemical Research in Toxicology. 29, 1936-1955 (2016).
- van Grunsven, L. A. 3D in vitro models of liver fibrosis. Advanced Drug Delivery Reviews. 121, 133-146 (2017).
- Corvi, R., Madia, F. In vitro genotoxicity testing - can the performance be enhanced. Food and Chemical Toxicology. 106, 600-608 (2017).
- Doak, S. H., Manshian, B., Jenkins, G. J. S., Singh, N. In vitro genotoxicity testing strategy for nanomaterials and the adaptation of current OECD guidelines. Mutation Research/Genetic Toxicology and Environmental Mutagenesis. 745, 104-111 (2012).
- Fenech, M. Cytokinesis-block micronucleus cytome assay. Nature Protocols. 2, 1084-1104 (2007).
- OECD. OECD Guidelines. Test 489: In vivo Mammalian Alkaline Comet Assay. , (2016).
- Gerets, H. H. J., et al. Characterization of primary human hepatocytes, HepG2 cells, and HepaRG cells at the mRNA level and CYP activity in response to inducers and their predictivity for the detection of human hepatotoxins. Cell Biology and Toxicology. 28, 69-87 (2012).
- Sison-Young, R. L., et al. A multicenter assessment of single-cell models aligned to standard measures of cell health for prediction of acute hepatotoxicity. Archives of Toxicology. 91, 1385-1400 (2017).
- European Guidelines 2019. European Agency for Safety and Health at Work. , Available from: https://osha.europa.eu/en/safety-and-health-legislation/european-guidelines (2019).
- Jensen, K. A. The NANOGENOTOX Dispersion Protocol for NANoREG. European Union Grant Agreement n° 2009. 21, 01 (2014).
- Marchese, S., et al. Aflatoxin B1 and M1: Biological Properties and Their Involvement in Cancer Development. Toxins. 10, 214 (2018).
- Rushing, B. R., Selim, M. I. Aflatoxin B1: A review on metabolism, toxicity, occurrence in food, occupational exposure, and detoxification methods. Food and Chemical Toxicology. 124, 81-100 (2019).
- Kermanizadeh, A., Brown, D. M., Moritz, W., Stone, V. The importance of inter-individual Kupffer cell variability in the governance of hepatic toxicity in a 3D primary human liver microtissue model. Scientific Reports. 9, 7295 (2019).
- Berger, B., et al. Comparison of Liver Cell Models Using the Basel Phenotyping Cocktail. Frontiers in Pharmacology. 7, 443 (2016).
- Ramaiahgari, S. C., et al. A 3D in vitro model of differentiated HepG2 cell spheroids with improved liver-like properties for repeated dose high-throughput toxicity studies. Archives of Toxicology. , (2014).
- Li, Y., et al. Factors affecting the in vitro micronucleus assay for evaluation of nanomaterials. Mutagenesis. 32 (1), 151-159 (2016).
- Kirkland, D., Reeve, L., Gatehouse, D., Vanparys, P. A core in vitro genotoxicity battery comprising the Ames test plus the in vitro micronucleus test is sufficient to detect rodent carcinogens and in vivo genotoxins. Mutation Research/Genetic Toxicology and Environmental Mutagenesis. 721 (1), 27-73 (2011).
- Curcio, E., et al. Mass transfer and metabolic reactions in hepatocyte spheroids cultured in rotating wall gas-permeable membrane system. Biomaterials. 28, 5487-5497 (2007).
- Glicklis, R., Merchuk, J. C., Cohen, S. Modeling mass transfer in hepatocyte spheroids via cell viability, spheroid size, and hepatocellular functions. Biotechnology and Bioengineering. 86, 672-680 (2004).
- Asthana, A., Kisaalita, W. S. Microtissue size and hypoxia in HTS with 3D cultures. Drug Discovery Today. 17, 810-817 (2012).
- Gaskell, H., et al. Characterization of a functional C3A liver spheroid model. Toxicology Research. 5, 1053-1065 (2016).
- Cho, E. C., Zhang, Q., Xia, Y. The effect of sedimentation and diffusion on cellular uptake of gold nanoparticles. Nature Nanotechnology. 6, 385-391 (2011).
- Hinderliter, P. M., et al. ISDD: A computational model of particle sedimentation, diffusion and target cell dosimetry for in vitro toxicity studies. Particle and Fiber Toxicology. 7, 36 (2010).
- Kramer, N. I., di Consiglio, E., Blaauboer, B. J., Testai, E. Biokinetics in repeated-dosing in vitro drug toxicity studies. Toxicology in vitro. 30, 217-224 (2015).
Tags
3D Liver Models In Vitro Genotoxicity Testing Long-term Nanomaterial Exposure Hep G2 Model Viable And Functional Proliferation Biochemical Endpoints Genotoxicity Endpoints Micronucleus Assay Practice Runs Cell Seeding Changing Media 96 Well Culture Plate Sterile Room Temperature PBS Cell Suspension Multi-channel Pipette Spheroid FormationErratum
Formal Correction: Erratum: Advanced 3D Liver Models for In vitro Genotoxicity Testing Following Long-Term Nanomaterial Exposure
Posted by JoVE Editors on 01/26/2021.
Citeable Link.
An erratum was issued for: Advanced 3D Liver Models for In vitro Genotoxicity Testing Following Long-Term Nanomaterial Exposure. The Representative Results section was updated.
Figure 6 in the Representative Results section was updated from:
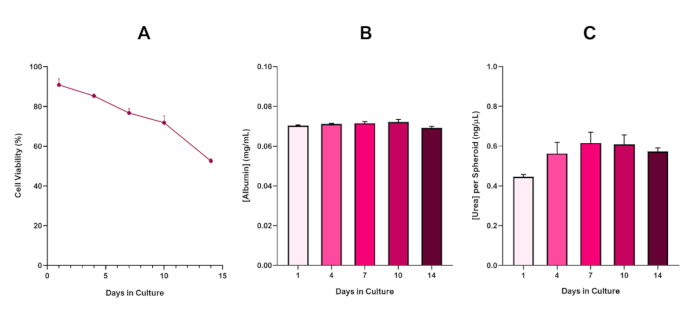
to:
The fourth paragraph in the Representative Results section was updated from:
With the inevitable development of a necrotic core, a known limitation of 3D liver spheroid cultures, the viability of this HepG2 based model had to be established to demonstrate it was able to sustain long-term (5-10 day) exposure regimes whilst maintaining the proliferative capability required to support the micronucleus assay5. Indeed, this 3D liver spheroid model has been shown to retain >70% viability over 10 days in culture. Based on this and in conjunction with the sustained liver-like functionality observed over the ≥14 day culture period, this 3D liver spheroid model can thus support long-term, repeated ENM exposure regimes up to 10 days long (i.e., before viability of the spheroids drop below 70%). For reference, it is advised that albumin levels for HepG2 spheroids seeded at 4000 cells/spheroid should be ≥0.06 mg/mL whilst urea production should be ≥0.4 ng/µL before conducting an in vitro toxicological assessment with this model.
to:
With the inevitable development of a necrotic core, a known limitation of 3D liver spheroid cultures, the viability of this HepG2 based model had to be established to demonstrate it was able to sustain long-term (5-10 day) exposure regimes whilst maintaining the proliferative capability required to support the micronucleus assay5. Indeed, this 3D liver spheroid model has been shown to retain >70% viability over 10 days in culture. Based on this and in conjunction with the sustained liver-like functionality observed over the ≥14 day culture period, this 3D liver spheroid model can thus support long-term, repeated ENM exposure regimes up to 10 days long (i.e., before viability of the spheroids drop below 70%). For reference, it is advised that albumin levels for HepG2 spheroids seeded at 4000 cells/spheroid should be ≥50.0 ng/μL whilst urea production should be ≥0.25 ng/µL before conducting an in vitro toxicological assessment with this model.
