Animal models are frequently employed to mimic serious bone injury in biomedical research. Due to their small size, establishment of stabilized bone lesions in mice are beyond the capabilities of most research groups. Herein, we describe a simple method for establishing and analyzing experimental femoral defects in mice.
A subscription to JoVE is required to view this content. Sign in or start your free trial.
Method Article
A Simple Critical-sized Femoral Defect Model in Mice
In This Article
Summary
Abstract
While bone has a remarkable capacity for regeneration, serious bone trauma often results in damage that does not properly heal. In fact, one tenth of all limb bone fractures fail to heal completely due to the extent of the trauma, disease, or age of the patient. Our ability to improve bone regenerative strategies is critically dependent on the ability to mimic serious bone trauma in test animals, but the generation and stabilization of large bone lesions is technically challenging. In most cases, serious long bone trauma is mimicked experimentally by establishing a defect that will not naturally heal. This is achieved by complete removal of a bone segment that is larger than 1.5 times the diameter of the bone cross-section. The bone is then stabilized with a metal implant to maintain proper orientation of the fracture edges and allow for mobility.
Due to their small size and the fragility of their long bones, establishment of such lesions in mice are beyond the capabilities of most research groups. As such, long bone defect models are confined to rats and larger animals. Nevertheless, mice afford significant research advantages in that they can be genetically modified and bred as immune-compromised strains that do not reject human cells and tissue.
Herein, we demonstrate a technique that facilitates the generation of a segmental defect in mouse femora using standard laboratory and veterinary equipment. With practice, fabrication of the fixation device and surgical implantation is feasible for the majority of trained veterinarians and animal research personnel. Using example data, we also provide methodologies for the quantitative analysis of bone healing for the model.
Introduction
It is estimated that half of the US population experience a fracture by the age of 651. For those patients with fractures treated surgically, 500,000 procedures involve the use of a bone graft2 and this number is expected to rise with an increasingly aging population3. Although bone is one of the few organs that has the capacity to completely heal without scarring, there are instances where the process fails3,4. Depending on the circumstances and quality of treatment, 2-30% of long bone fractures fail, resulting in non-union3,5. While there remains some debate on the definition, pseudoarthrosis, critical-sized or non-union bone injuries generally refers to an injury that does not heal over the natural lifetime of the subject6. For experimental purposes, this duration is shortened to the average time required for complete healing of an average-sized bone injury. Non-union bone lesions occur for numerous reasons, but major factors include extreme trauma resulting in a critically-sized gap, infection, poor angiogenesis, tobacco use, or inhibited osteoregenerative capacity due to disease or age7. Even if non-unions are successfully treated, it can cost in excess of $60,000 per procedure, depending on the type of injury and the approaches employed8.
In moderate cases, autologous bone grafting is employed. This strategy involves recovery of bone from a donor site and implantation at the site of injury. While this approach is extremely effective, the volume of available donor-derived bone is limited and the procedure involves an additional surgery, which results in persistent pain in many patients9,10. In addition, the efficacy of the autologous bone graft is dependent of the health of the patient. Bone substitutes made from synthetic materials or processed cadaveric bone are abundantly available11-13, but they have significant limitations, including poor host-cell adhesion properties, reduced osteoconductivity, and the potential for immune rejection14. There is therefore an urgent need for bone regeneration technologies that are safe, effective and widely available.
Our ability to improve bone regenerative strategies is critically dependent on the ability to mimic serious bone trauma in test animals, but the generation and stabilization of large bone lesions is technically challenging. In most cases, serious long bone trauma is mimicked experimentally by establishing a defect that will not naturally heal. Although it can vary with species15, this is achieved by complete removal of a bone segment that is larger than 1.5 times the diameter of the bone cross-section16. The bone is then stabilized with a metal implant to maintain proper orientation of the fracture edges and allow for mobility. Due to their small size and the fragility of their long bones, establishment of such lesions in mice are beyond the capabilities of most research groups. As such, long bone defect models are confined to rats and larger animals. Nevertheless, mice afford significant research advantages in that they can be genetically modified and bred as immune-compromised strains that do not reject human cells and tissue.
For human cell-based applications, immune-compromised mice are attractive to work with because they are physiologically well-characterized, easy to house, cost effective, and easily analyzed radiologically and histologically. Of paramount importance is that immune-compromised mice do not reject cells from different species including humans. Their small size also permits the testing of very small numbers of cells or volumes of experimental scaffolds in orthopedic applications. Several murine orthopedic models have been reported that afford various degrees of bone stability17,18. Those systems that result in very high levels of stability, such as external fixators and locking plates predominantly heal by intramembranous ossification although endochondral healing has been reported19. In contrast, those that permit some micro- and/or macro-motion, such as those employing unfixed or partially-fixed medullary pins, generally heal with a predominance of endochondral ossification20,21. Delayed union or non-union defects of long bone are particularly difficult to achieve in mice due to the extra level of stabilization required. However, a number of approaches have been reported, including medullary pins with interlocking nails, locking plates and external fixators22. These systems generally work well, but given their complicated design they can be technically challenging to install. For example, Garcia et al.23 devised an elegant interlocking pin system for use in mice, but the procedure involves incisions at two separate sites and extensive modification of the femur to accommodate the pins. These procedures were performed under a dissecting microscope.
Herein, we describe a simple femoral medullary pin with a central collar designed to prevent closing of a 3 mm bone deficit and also delineate the original edges of the defect. While the pin was not fixed to the bone itself, precise sizing of the pin diameter and reaming of the medullary cavity results in sufficient interference to minimize torsional motion (Figure 1). With careful selection of inbred age, gender and strain-matched mice, the result is a highly reproducible hypertrophic non-uniondefect22 which can be easily evaluated radiologically. Moreover regions of interest can be reproducibly defined after micro-computed tomography (µCT) for measurement of de novo bone formation and histomorphological parameters. The pins were prototyped in our laboratory using readily available tools.
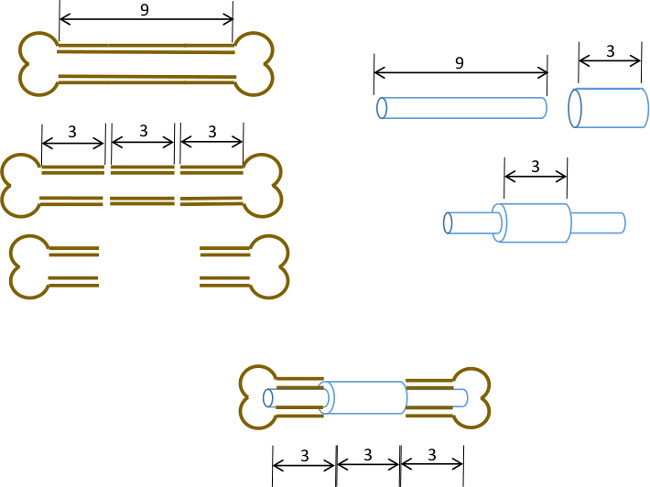
Figure 1: Experimental principle. Diagrammatic summary of the segmental defect model. The central 3 mm segment of a 9-10 mm murine femur is excised surgically (left). A 3 mm long, 19 gauge surgical steel tube is passed over a 9 mm long, 22 G stainless steel tube and fixed with adhesive at the exact center (right). The resultant pin is fitted into the medullary canals of the remaining proximal and distal portions of the femur with the 19 G collar replacing the 3 mm segment of bone (below, center).
Access restricted. Please log in or start a trial to view this content.
Protocol
NOTE: This protocol is designed for female nude (Nu/J) mice (18-25 g, 6 weeks) acquired from Jackson Laboratories. Since strains of mice vary slightly in terms of anatomy and growth rate, we advise that the fabrication of pins is optimized to the strain, gender and age of the recipients prior to implantation into live subjects. If the strains are carefully matched, the interference fit between the pin and marrow cavity is highly reproducible. Procedures for housing, diet and general animal husbandry are beyond the scope of this protocol, but all mice were housed in accordance with the Guide for the Care and Use of Laboratory Animals (8th Edition) and institutional policies set by the Institutional Animal Care and Use Committee (IACUC) and Department of Comparative Medicine (DCM) at Scott and White Hospital.
1. Fabrication of Pins

Figure 2: Pin assembly. (A) Photographs of the surgical steel tubing at various stages of assembly and a 4 mm diameter cylinder cut from 5 mm thick Gelfoam sheet. (B) After polishing the assembled pin (above), the Gelfoam cylinder is trimmed, positioned over the steel collar (middle), then autoclaved, resulting in a sterile pin coated with dried Gelfoam. This improves cell attachment at the site of injury and maintains the direction of healing (below). (C) An excised femur fitted with the medullary pin. (D) Examples of pin assemblies at various thicknesses and lengths demonstrating the flexibility of this approach. (E) µCT reconstruction of a pin-stabilized femoral defect illustrating the interaction of the medullary pin with the trabecular bone in the proximal and distal ends of the femur.
- Cut a 9 mm length of 22 G stainless hypodermic tubing, and a 3 mm length of 19 G tubing using a 23.8 mm diameter fiberglass reinforced heavy duty cut-off wheel fitted to a rotary tool. Use small fine-tipped pliers to immobilize the tubing (Figure 2A, above). Wear appropriate eye protection and handle rotary tool with care.
- Place a small amount (approximately 10 µl) of cyanoacrylate adhesive to the middle of the 9 mm shaft. Pass the 3 mm collar over the 9 mm shaft until in the center and twist to evenly distribute the glue between the collar and shaft. Measure dimensions with a pair of digital calipers and compare with Figure 1. Allow to set for at least 15 hr (Figure 2A, center).
- Use a 220 grit emery-impregnated disc to remove burrs and excessive glue.
- Using the rotary tool, polish the pin using a felt polishing disc.
- Rinse with deionized water and dry with compressed air.
- Test integrity by placing a 19 G hypodermic blunt needle over the shaft of the newly made pin and push against the collar. Ensure that the collar can resist approximately 25 g of weight.
- Rinse the pin in sterile-filtered phosphate buffered saline (Figure 2B, top). Ensure that the shaft of the pin fits snugly into the femoral medullary cavity with the collar flush against the edges of the cut bone (Figure 2C). Prototype various configurations for the specific purposes of the study and the recipient (Figure 2D). Make sure that the ends of the pin penetrate into the trabecular bone of the diaphysis so as to maximize fixation and improve the interference fit (Figure 2E).
NOTE: It is recommended that the fit is tested on bone specimens before implantation in live mice (e.g. Figure 2C). - Use a 4 mm diameter punch-biopsy cutter to cut a cylinder from a 5 mm thick sheet of surgical gelatin sponge. Use a scalpel to trim the cylinder to 3 mm length and pass a 20 G hypodermic needle along the length of the cylinder to generate a hole (Figure 2A, below).
NOTE: We have found that the positioning of a gelatin or collagen scaffold at the site of the defect improves cell retention and induces longitudinal growth along the axis of the bone. - Pass the gelatin foam cylinder over the pin and align with the collar (Figure 2B, center) and autoclave on a dry cycle at 120 °C at 15 psi. The gelatin foam will dry and darken in color (Figure 2B, below).
2. Surgical Technique
NOTE: The following procedure is written observing all guidelines set by the Guide for the Care and Use of Laboratory Animals (8th Edition). Please observe all additional policies set by the local IACUC and ensure an IACUC-approved animal use protocol (or equivalent) is in place before proceeding with the following sections.

Figure 3: Surgical instruments. (A) Surgical kit. Micro-drill (1), cutting wheel (2), absorbable suture (3), outer suture (4), scalpel blades (5), scalpel handle (6), sterile medullary pins wrapped in foil (7), medullary depth gauge made form hypodermic tubing (8), fine nosed forceps (9), rat-teeth forceps (10), blunt reaming needles (11), needle drivers (12), small hemostats (13), fine scissors (14), periosteal elevator (15), modified Kern forceps (16). (B): Modifications required to produce Kern-style bone-grips for mice.
- Select a surgical procedure room or clean laboratory with a closable door and no through-traffic. Sanitize a suitable work surface with a clinical grade quaternary-based disinfectant cleaner.
- While wearing disposable sterile gloves and robe, set up a sterile field of approximately 60 x 90 cm2 on the sanitized work surface with autoclaved cloth drapes.
NOTE: It is advisable to have an assistant remove the outer packaging and present the sterile materials to the investigator setting up the field. - Place a sanitized heating pad fitted to a warm water re-circulator on the drape and cover with sterile disposable drapes. Warm a bead sterilizer to operating temperature (250-265 °C, this takes up to 30 min).
- On the sterile field, arrange the surgical kit (Figure 3A) to provide convenient access to all components. Also, provide sterile cotton gauze (2 x 2 inch2), sterile Q-tips, a sterile steel bowl (500 ml) containing sterile saline (0.9% w/v), and chlorhexidine/isopropyl alcohol surgical disinfectant applicators.
- Assemble a small animal anesthesia unit next to the sterile field with an induction chamber and nose-cone assembly in accordance with veterinary guidance and the user manual. Use clinical grade oxygen as the gas supply and isoflurane, USP.
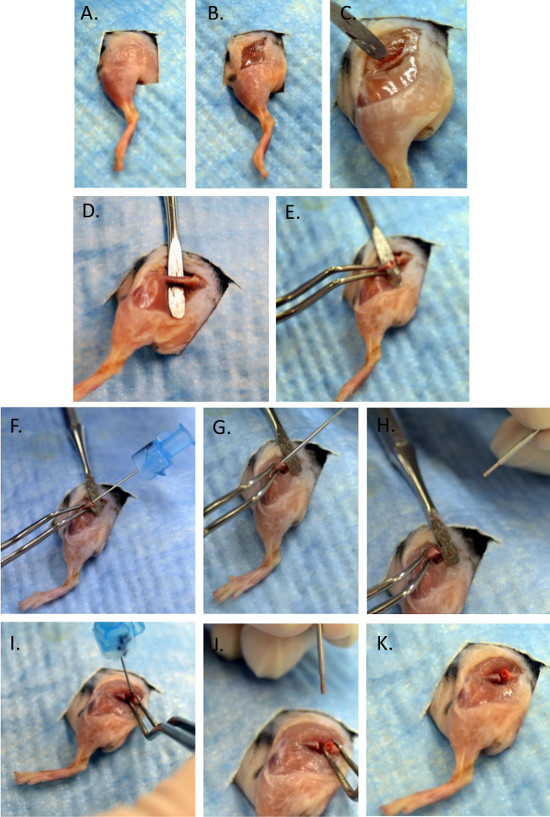
Figure 4: Surgical procedure. (A-C) Approach and exposure of the femur. (D-E) Elevation and cuts. (F-K) Reaming and sizing of medullary canals.
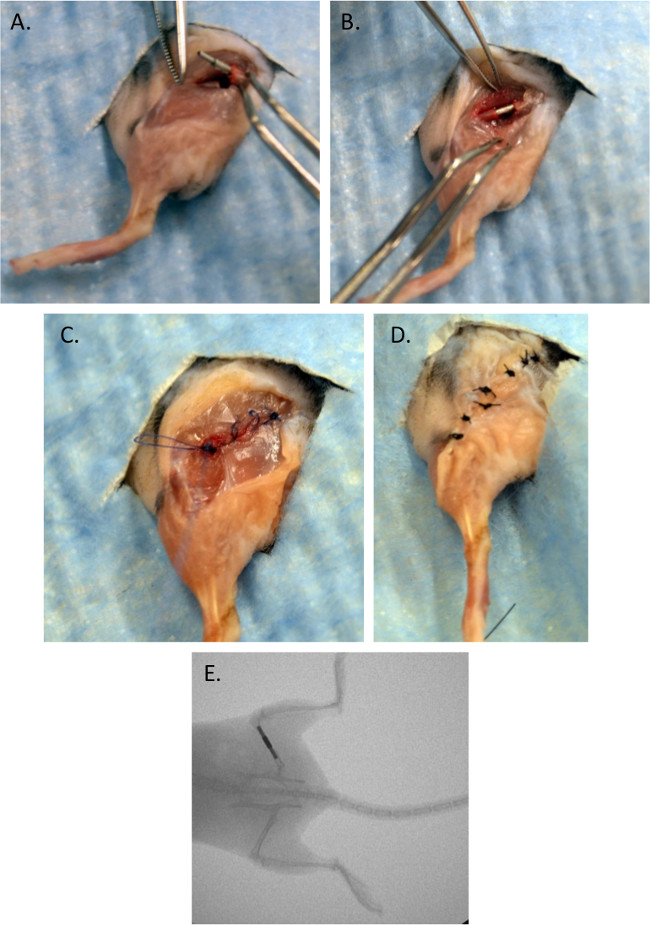
Figure 5: Surgical procedure. (A-B) Installation of pin. (C-D) Closure. (E) Typical image of properly positioned pin 24 hr after surgery.
- Place a mouse in the induction chamber of the anesthesia system and set the output to 2 L min-1 O2 and the isoflurane concentration to 3% (v/v).
- Check that the mouse is unconscious within 1 min; raise the concentration to 4% (v/v) if necessary. Remove the mouse, place on sterile field with the heating pad positioned underneath and apply the nose cone. Transfer flow to the cone, and reduce the isoflurane to 2.5%, wait for a further 20 sec, and test for adequate surgical plane in accordance with institutional policy. Typically, lack of a hind limb reflex when gently squeezed is adequate for determining adequate anesthesia.
- During the entire process, have an assistant monitor for strong regular breathing and pink coloration of the extremities and mouth region to ensure an appropriate level of oxygenation while unconscious. Adjust anesthesia in accordance with veterinary guidance and institutional policy if necessary. Apply sterile artificial tears lubricant ointment (15% (v/v) mineral oil, 83% (v/v) white petrolatum) to the eyes.
- Turn the mouse onto one side with the hind-limb facing upwards on a new disposable drape. If necessary, remove fur with an electric razor or hair removal cream. Wipe the site with sterile saline and remove the additional drape with excess fur. Place a new fenestrated drape over the mouse so as to cover all parts but the entire hind-limb (Figure 4A) but maintain view of the face and paw to monitor coloration and breathing.
- Locate the proximal and distal ends of the femur and incise the skin for 5-10 mm along the longitudinal axis (Figure 4B). Separate the skin layer from the fascia with a #15 scalpel, exposing a lateral approach to the femur via the biceps femoris and vastus lateralis. Locate where the septa of both muscles meet (it is a line of white tissue against the pink coloration of the muscle). With a scalpel, carefully dissect along the intermuscular boundary until the femur is visible (Figure 4B).
- Develop the incision with a blunt periosteal elevator so as to expose the entire diaphysis (Figure 4C). Use the elevator to further expose the central two thirds of the femur while taking care to preserve the posterior neurovascular bundle on the medial side (Figure 4D). Gently scrape soft tissue off of the bone with a scalpel, and dry with a sterile Q-tip or equivalent.
- Locate the center of the femur with calipers if necessary and mark with a sterile scalpel or marker, then mark 1.5 mm proximally and distally from the center. Gently grasp the femur using a pair of fine-nosed forceps previously fashioned in the Kern style to prevent excessive pressure on the bone.
NOTE: Exact dimensions for modifications are provided in Figure 3B. It is advisable to test the forceps on a euthanized specimen prior to use to ensure the bone will not break under pressure required for immobilization during cutting. - Using a fine drill fitted with a fine diamond-grit coated cutting wheel (8 mm diameter x 0.1 mm width), make the first cut with the elevator in place to protect tissue below (Figure 4E). Raising the cut femur to 45° while firmly holding the extremity of the diaphysis, make the second cut, removing a 3 mm segment.
NOTE: Face protection is recommended at this stage. - With the bone immobilized by forceps, carefully ream the medullary cavities of each end with a blunt 23 G hypodermic needle. Using a pre-made depth-gauge made from a length of 22 G tubing placed in 19 G tubing (Figure 3A, item 8), assess the depth of the reamed medullary cavity and ensure it is 3 mm (Figure 4F-K). If the medullary cavity resists the 22 G depth gauge, ream again with a blunt 22 G hypodermic needle.
- Carefully insert the medullary pin into the proximal then distal medullary cavities to bring the femur back out to its original length and establish a stable 3 mm gap (Figure 5A, B). If needed, apply a small amount of manual stress to achieve a good interference fit of the rod with the cortical bone of the femur. Ensure that the pin fits snugly into the medullary cavities of both sides and the edges of the cut bone are flush with the collar. If there is a gap, ream once again with a 22 G blunt needle.
- Reposition the muscle and peripheral tissue over the pin and close with a continuous absorbable 5-0 suture (Figure 5C). Close skin incision with 5-7 square knot nylon 5-0 sutures and seal with surgical adhesive (Figure 5D).
3. Postoperative Procedures
- After closing the skin incision, withdraw anesthesia, but allow O2 to remain flowing until the mouse begins to move; this should take less than 1 min. If the mouse remains motionless after 5 min of O2 administration, refer to institutional policies on veterinary intervention.
- When the mouse begins to move, gently transfer it to a cage preferably containing dry, autoclaved bedding.
- Place an igloo-type nest in each cage and the mouse will retreat into it, reducing movement. Check that the mouse recovers hind-limb mobility 5-10 min after recovery of consciousness.
- Perform daily postoperative monitoring in accordance with institutional policies. Provide gelatinized hydration and food on the floor of the cage for the first 5-7 days and administer analgesia and postoperative monitoring in accordance with institutionally approved policies.
NOTE: We administer 0.05-0.1 mg kg-1 buprenorphine24 with 0.25 ml saline subcutaneously, twice daily for the first 3 days and thereafter if the mouse does not regain normal utility.
- After the first 24 hr of recovery, perform live-animal X-ray imaging under anesthesia to visualize pin placement (Figure 4E). If the pin is dislocated, consider immediate revision surgery.
- At day 7 post-surgery, remove sutures under anesthesia and house in groups in accordance with institutional animal husbandry policies.
- After 2-5 weeks, humanely euthanize animals in accordance with the American Veterinary Medical Association approved methods for euthanasia25.
NOTE: An intraperitoneal injection of commercially available barbiturate-combination euthanasia cocktail is effective and humane, but local institutional policies on euthanasia should be followed. - Carefully dissect away the hind-limb by exposing the proximal femur and the pelvis from the medial side. Gently press the joint inwards from the lateral side of the limb while detaching the femoral head from the acetabulum (the hip socket) with a scalpel. Cut remaining muscle and skin with a sharp scalpel or micro-scissors, releasing the entire limb form the pelvis. With a sharp pair of rongeurs or heavy scissors, cut the lower hind-limb (tibia/fibula) approximately 5 mm below the knee joint.
NOTE: It is recommended that all specimens are stored in an identical manner prior to analysis. - Remove skin, but leave muscle in place. Fix the tissue in 10% buffered formalin supplemented with 10 mM CaCl2 fixative for 1 week followed by storage in phosphate buffered saline supplemented with 10 mM CaCl2 for up to 1 month prior to imaging. Perform fixation and storage at 4 °C. Alternatively, scan specimens immediately without fixation.
4. Analysis of Specimens
NOTE: Bone healing can be assessed by a wide variety of methodologies that are beyond the scope of this protocol. The following is a method that we have successfully employed using a specimen microCT (µCT) imager. It is recommended that the following parameters are tested initially, then optimized for the specific needs of the project.
- Wrap specimen in a thin layer of plastic sealing film and position it vertically in the instrument chamber. Make sure that the femur is perpendicular to the sample stage during the entire scan. Set the scan to the following parameters; voltage = 29 kV, current = 661 µA, power = 19 W, image pixel size (μm) = 21.00; 360 degree rotation = yes; frame averaging = on (5); rotation step (deg) = 1.00, random movement = on. Save images as JPEG files in a single destination folder per scan (e.g. Figure 6A).
NOTE: The scan should be complete in 57 min. - Utilize the reconstruction software to generate axial images based on the following parameters; smoothing = on (4), misalignment compensation = on, ring artifact reduction = on (5), beam-hardening correction (40%), CS rotation (deg) = 0.00. Set output to 2,000-15,000 Hounsfield units. Save images as JPEG files in a single destination folder per scan.
- Using the axial images and analytical software, define the region of interest (ROI) by first setting the proximal and distal edges of the original defect. Achieve this by selecting the sections that encompass the collar only. Because the collar is thicker than the medullary pin, these sections are easily defined (Figure 6B, left). Exclude the collar from calculations by drawing an exclusion zone around it (with a 100 µm margin) and transferring the zone to each of the sections in the ROI (Figure 6B, right).
NOTE: Polar moments of inertia, 3D reconstructions and calculations such as the volume of new bone (Figure 6C, D) can readily be achieved using the software.
Access restricted. Please log in or start a trial to view this content.
Results
Mice typically recover consciousness and hind-limb mobility 5-10 minutes after withdrawal of anesthesia. During the first 5 days, it is advisable to house mice individually and introduce environmental enrichment to prevent excess use of the limb. For this purpose, igloo-type nests reduce the need for nest building and encourage resting. We have also observed that provision of food and hydrogel on the floor of the cage reduces the probability of pin displacement. During the 5-day period, analgesia should be administered a...
Access restricted. Please log in or start a trial to view this content.
Discussion
Herein, we describe a simple method to generate a critical-sized pin-stabilized defect of the murine femur using standard laboratory and veterinary equipment. While the assembly of the pins and the surgical procedure itself requires practice, it is well within the capabilities of a well-trained biomedical research scientist or veterinarian.
The pin is positioned into the medullary canal without additional fixation, making the procedure technically more feasible than more complicated approaches...
Access restricted. Please log in or start a trial to view this content.
Disclosures
The authors have no competing financial interests.
Acknowledgements
We thank the staff and veterinarians at the Scott & White Hospital Department of Comparative Medicine, Temple, Texas, for their invaluable advice and assistance during the development of this technique. This work was funded in part by The Institute for Regenerative Medicine Program Funds, Scott & White RGP grant #90172, NIH 2P40RR017447-07 and NIH R01AR066033-01 (NIAMS). We thank Dr Suzanne Zeitouni for proofing the manuscript.
Access restricted. Please log in or start a trial to view this content.
Materials
| Name | Company | Catalog Number | Comments |
|---|---|---|---|
| Pin assembly | |||
| Dremel rotary tool | Dremel | 8220 | or equivalent |
| Heavy duty cut off wheel | Dremel | 420 | |
| Surgical tubing 19 G | Small Parts (Amazon) | B000FMZ8LY | OD 1.07 mm, ID 0.889 mm |
| Surgical tubing 21 G | Small Parts (Amazon) | B000FMZ8YQ | OD 0.82 mm, ID 0.635 mm |
| Surgical tubing 22 G | Small Parts (Amazon) | B000FMYLZS | OD 0.719 mm, ID 0.502 mm |
| Surgical tubing 23 G | Small Parts (Amazon) | B000FN0SY0 | OD 0.643 mm, ID 0.444 mm |
| Cyanoacrylate adhesive | Loctite | 1365882 | |
| Emery disc | Dremel | 413 | |
| Rubber polishing point | Dremel | 462 | |
| Felt polishing disc | Dremel | 414 | |
| Gelatin sponge | Surgifoam/Ethicon | 1974 | |
| Punch biopsy cutter | Miltex | 33-34 | |
| Surgery/post-operative | |||
| Warm pad and circulator pump | Stryker/Thermocare | TP700, TP700C, TPP722 | |
| Coverage quaternary spray | Steris | 1429-77 | |
| Bead sterilizer | Germinator/CellPoint Scentific | Germinator 500 | |
| Anesthesia system | VetEquip Inc | 901806 or 901807/901809 | |
| Isofluorane anesthetic | VETone/MWI | 501017, 502017 | |
| Surgical disinfectant | Chloraprep/CareFusion | 260449 | |
| Surgical tools | Fine Science Tools | various | recommend German made |
| Face protection | Splash Shield | 4505 | |
| Rechargable high speed drill | Fine Science Tools | 18000-17 | |
| Diamond cutting wheel | Strauss Diaiond | 361.514.080HP | |
| Absorbable sutures | Covidien | UM-213 | |
| Outer sutures | Ethicon | 668G | or equivalent |
| Vetbond | 3M | 1469SB | or equivalent |
| Hydration gel | Clear H2O | 70-01-1082 | |
| Diet gel | Clear H2O | 72-01-1062 | |
| Buprenorphine | Reckitt and Benckser | 12496-0757-01 | controlled substance |
| Mouse igloos | Bio Serv | K3328, 3570,3327 | |
| Euthanasia cocktail | Euthasol/Virbac | 710101 | controlled substance |
| Analysis | |||
| Live animal imager | Orthoscan | FD Pulse | or equivalent |
| Micro-CT unit and software | Bruker | Skyscan1174 | or equivalent |
| Sealing film/Parafilm M | VWR or Fisher | 100501-338, S37441 | |
| *Generic sources are suitable for all other items such as gause, drapes, protective clothing, animal care equipment. |
References
- Brinker, M. R., O'Connor, D. P. The incidence of fractures and dislocations referred for orthopaedic services in a capitated population. J Bone Joint Surg Am. 86, 290-297 (2004).
- Cheung, C. The future of bone healing. Clin Podiatr Med Surg. 22, 631-641 (2005).
- Rosemont, I. L. United States Bone and Joint Decade: The burden of musculoskeletal diseases and musculoskeletal injuries. , American Academy of Orthopedic Surgeons. (2008).
- Tzioupis, C., Giannoudis, P. V. Prevalence of long-bone non-unions. Injury. 38, Suppl 2. S3-S9 (2007).
- Marsh, D. Concepts of fracture union, delayed union, and nonunion. Clin Orthop Relat Res. , S22-S30 (1998).
- Spicer, P. P., et al. Evaluation of bone regeneration using the rat critical size calvarial defect. Nat Protoc. 7, 1918-1929 (2012).
- Green, E., Lubahn, J. D., Evans, J. Risk factors, treatment, and outcomes associated with nonunion of the midshaft humerus fracture. J Surg Orthop Adv. 14, 64-72 (2005).
- Kanakaris, N. K., Giannoudis, P. V. The health economics of the treatment of long-bone non-unions. Injury. 38, Suppl 2. S77-S84 (2007).
- Dimitriou, R., Mataliotakis, G. I., Angoules, A. G., Kanakaris, N. K., Giannoudis, P. V. Complications following autologous bone graft harvesting from the iliac crest and using the RIA: a systematic review. Injury. 42, Suppl 2. S3-S15 (2011).
- Boer, H. H. The history of bone grafts. Clin Orthop Relat Res. , 292-298 (1988).
- Aro, H. T., Aho, A. J. Clinical use of bone allografts. Ann Med. 25, 403-412 (1993).
- Burstein, F. D. Bone substitutes. Cleft Palate Craniofac. J. 37, 1-4 (2000).
- Kao, S. T., Scott, D. D. A review of bone substitutes. Oral Maxillofac Surg Clin North Am. 19, 513-521 (2007).
- Boden, S. D. Overview of the biology of lumbar spine fusion and principles for selecting a bone graft substitute. Spine. (Phila Pa 1976). 27, S26-S31 (1976).
- Hollinger, J. O., Kleinschmidt, J. C. The critical size defect as an experimental model to test bone repair materials). J Craniofac Surg. 1, 60-68 (1990).
- Key, J. The effect of local calcium depot on osteogenesis and healing of fractures. J. Bone Joint Surg. (Am). 16, 176-184 (1934).
- Holstein, J. H., et al. Advances in the establishment of defined mouse models for the study of fracture healing and bone regeneration). J Orthop Trauma. 23, S31-S38 (2009).
- Histing, T., et al. Small animal bone healing models: standards, tips, and pitfalls results of a consensus meeting. Bone. 49, 591-599 (2011).
- Cheung, K. M., et al. An externally fixed femoral fracture model for mice. J Orthop Res. 21, 685-690 (2003).
- Hiltunen, A., Vuorio, E., Aro, H. T. A standardized experimental fracture in the mouse tibia. J Orthop Res. 11, 305-312 (1993).
- Manigrasso, M. B., O'Connor, J. P. Characterization of a closed femur fracture model in mice. J Orthop Trauma. 18, 687-695 (2004).
- Garcia, P., et al. Rodent animal models of delayed bone healing and non-union formation: a comprehensive review. Eur Cell Mater. 26, 1-12 (2013).
- Garcia, P., et al. Development of a reliable non-union model in mice. J Surg Res. 147, 84-91 (2008).
- Flecknell, P. A. The relief of pain in laboratory animals. Lab Anim. 18, 147-160 (1984).
- Guidelines on the Euthanasia of Animals. , American Veterinary Medical Association. Schaumburg, IL 60173. (2013).
- Neill, K. R., et al. Micro-computed tomography assessment of the progression of fracture healing in mice. Bone. 50, 1357-1367 (2012).
- Bagi, C. M., et al. The use of micro-CT to evaluate cortical bone geometry and strength in nude rats: correlation with mechanical testing, pQCT and DXA. Bone. 38, 136-144 (2006).
- Hadjiargyrou, M., et al. Transcriptional profiling of bone regeneration. Insight into the molecular complexity of wound repair. J Biol Chem. 277, 30177-30182 (2002).
- Clough, B. H., et al. Bone regeneration with osteogenically enhanced mesenchymal stem cells and their extracellular matrix proteins. J Bone Miner Res. , (2014).
- Lu, C., et al. Cellular basis for age-related changes in fracture repair. J Orthop Res. 23, 1300-1307 (2005).
- Jepsen, K. J., et al. Genetic variation in the patterns of skeletal progenitor cell differentiation and progression during endochondral bone formation affects the rate of fracture healing. J Bone Miner Res. 23, 1204-1216 (2008).
- Thayer, T. C., Wilson, S. B., Mathews, C. E. Use of nonobese diabetic mice to understand human type 1 diabetes. Endocrinol Metab Clin North Am. 39, 541-561 (2010).
- Jee, W. S., Yao, W. Overview: animal models of osteopenia and osteoporosis. J Musculoskelet Neuronal Interact. 1, 193-207 (2001).
Access restricted. Please log in or start a trial to view this content.
Reprints and Permissions
