Bacteria are microscopic living organisms that have many distinguishing characteristics such as shape, arrangement of cells, whether or not they produce capsules, and if they form spores. These features can all be visualized by staining and aid in the identification and classification of different bacterial species.
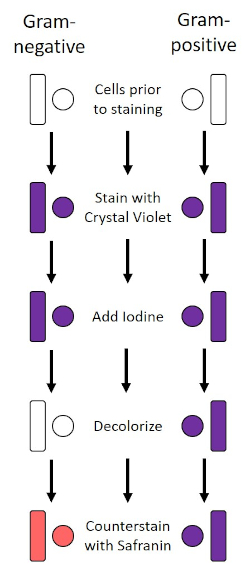
To examine the first two characteristics of cell shape and arrangement, we can use a simple technique called Gram staining. Here, crystal violet is applied to bacteria, which have been heat-fixed onto a slide. Next, Gram’s iodine solution is added to the slide, resulting in the formation of an insoluble complex between the crystal violet and the Gram’s iodine solution. A decolorizer is then applied and any bacteria with a thick peptidoglycan layer will stain purple, as this layer is not easily penetrated by the decolorizer. These bacteria are referred to as Gram-positive.
Gram-negative bacteria have a thinner peptidoglycan layer and will de-stain the decolorizer, losing the purple color. However, they will stain reddish-pink when a safranin counterstain is added, which binds to a lipopolysaccharide layer on their outside. Once stained, the cells can be observed for morphology, size, and arrangement, such as in chains or clusters, which further aids in classification and identification.
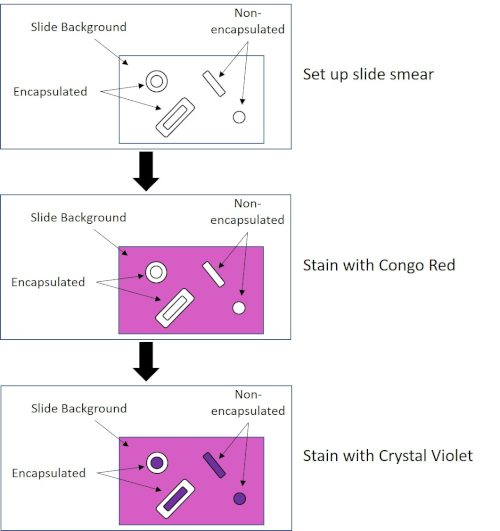
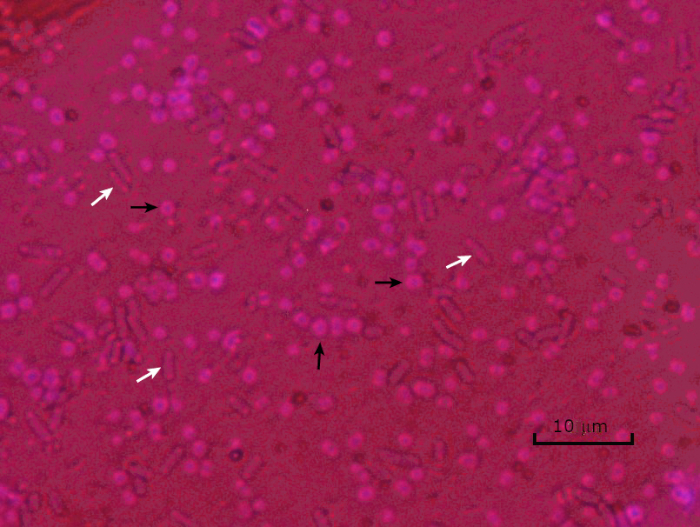
Another useful technique in the microbiologist’s toolkit is the capsule stain, used to visualize external capsules that surround some types of bacterial cells. Due to the capsule’s non-ionic composition and tendency to repel stains, simple staining methods won’t work. Instead, a negative staining technique is used, which first stains the background with an acidic colorant, such as Congo red, before the bacterial cells are stained with crystal violet. This leaves any capsule present as a clear halo around the cells.
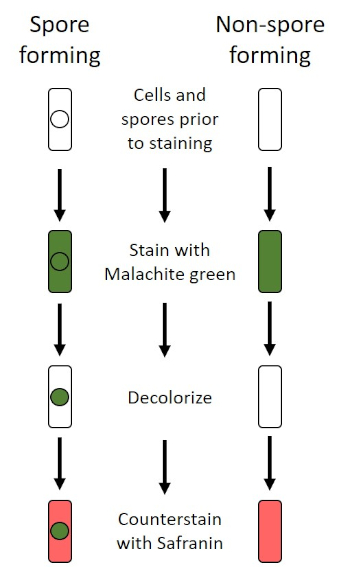
The final major staining technique covered here can help determine if the bacteria being studied forms spores. In adverse conditions, some bacteria produce endospores, dormant, tough, non-reproductive structures whose primary function is to ensure the survival of bacteria through periods of environmental stress, like extreme temperatures or dehydration. However, not all bacterial species make endospores, and they are difficult to stain with standard techniques because they are impermeable to many dyes. The Schaeffer-Fulton method uses malachite green stain, which is applied to the bacteria fixed to a slide. The slide is then washed with water before being counterstained with Safranin. Vegetative cells will appear pinkish-red, while any endospores present will appear green. In this video, you will learn how to perform these common bacterial staining techniques and then examine the staining samples using light microscopy.
To begin the procedure, tie back long hair and put on the appropriate personal protective equipment, including a lab coat and gloves.
Then, clean a fresh microscope slide with a laboratory wipe. Next, pipette 10 microliters of 1X phosphate-buffered saline onto the first slide. Then, use a sterile pipette tip to select a single bacterial colony from the LB agar plate. Smear the bacterial colony in the liquid to produce a thin, even layer. Set the slide on the benchtop, and allow it to fully air dry.
Once dried, light a Bunsen burner to heat-fix the bacteria. Using tongs, pass the slide through the burner flame several times, with the bacteria side up, taking care not to hold the slide in the flame too long, which may distort the cells.
Now, working over the sink, hold the slide level and apply several drops of Gram’s crystal violet to completely cover the bacterial smear and then place the slide onto the bench to stand for 45 seconds. Next, hold the slide at an angle and gently squirt a stream of water onto the top of the slide, taking care not to squirt the bacterial smear directly. Now, holding the slide level again, apply Gram’s iodine solution to completely cover the stained bacteria and then allow it to stand for another 45 seconds. Next, carefully rinse the iodine from the slide, as shown previously. While holding the slide at an angle, add a few drops of Gram’s decolorizer to the slide, allowing it to run down over the stained bacteria, just until the run-off is clear, for approximately 5 seconds. Immediately, rinse with water as shown previously. This will limit over-decolorizing the smear. Next, holding the slide level again, apply Gram’s safranin counterstain to completely cover the stained bacteria. After 45 seconds, gently rinse the Safranin from the slide with water, as shown previously, and then blot dry with paper towels.
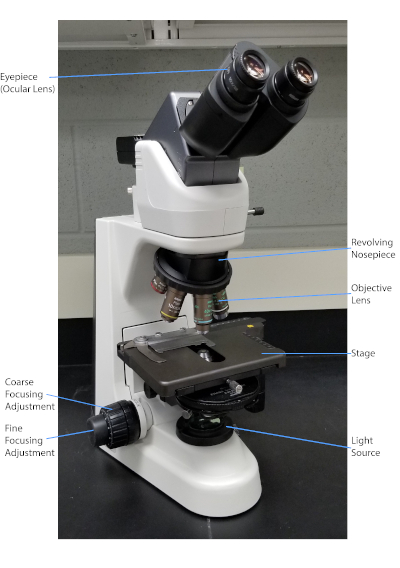
Finally, add a drop of immersion oil directly to the slide, and then examine the slide using a light microscope with a 100X oil objective lens.
To begin this staining protocol, first put on the correct personal protective equipment and then ensure that the glass slides that will be used are clean.
Next, prepare the solutions. To make 1% crystal violet solution, mix 0.25 grams of crystal violet powder with 25 milliliters of distilled water and vortex until dissolved. Then, prepare 1% Congo red solution by mixing 0.25 grams of Congo red powder with 25 milliliters of distilled water and vortex until dissolved. Now, pipette 10 microliters of the Congo red solution onto the slide. Using a clean, sterile pipette tip, select a single bacterial colony from the LB agar plate. Then, smear the bacterial colony into the dye to produce a thin, even layer. Completely air dry the bacterial slide for 5-7 minutes. Once the slide is dry, flood the smear with enough 1% crystal violet to cover the smear and let it sit for 1 minute. Now, hold the slide at an angle and gently squirt a stream of water onto the top of the slide, taking care not to squirt the bacteria directly. Continue holding the slide at a 45-degree angle until completely air-dried. Finally, add a drop of immersion oil directly to the slide, and then examine the slide using a light microscope with a 100X oil objective.
To perform endospore staining, first, prepare a 0.5% malachite green solution by mixing 0. 125 grams of malachite green powder with 25 milliliters of distilled water, and then vortex the solution until dissolved. Next, pipette 10 microliters of 1X PBS onto the center of the slide. Then, use a sterile pipette tip to select a single bacterial colony from the LB agar plate. Smear the bacteria into the liquid to produce a thin, even layer. Now, set the slide on the benchtop, and allow it to fully air dry. Once dried, light a Bunsen burner to heat-fix the bacteria. Pass the slide through the blue burner flame several times, with the bacteria side facing up. Then, once the slide has cooled, place a piece of precut lens paper over the heat-fixed smear. Next, turn on a hotplate to the highest setting, and bring a beaker of water to a boil.
Saturate the lens paper with the malachite green solution and, using tongs, place the slide on top of the beaker of boiling water to steam for 5 minutes. Keep the lens paper moist by adding more dye, one drop at a time, as needed. Next, again using tongs, pick up the slide from the beaker and remove and discard the lens paper. Allow the slide to cool for 2 minutes. Working over the sink, hold the slide at an angle, and gently squirt a stream of water onto the top of the slide. Now, hold the slide level and apply Safranin to completely cover the slide. Then, allow it to stand for 1 minute. Next, hold the slide at an angle and rinse as previously shown. Allow the slide to air dry on the benchtop. Finally, add a drop of immersion oil directly to the slide, and then examine the slide with a light microscope, with a 100X oil objective.
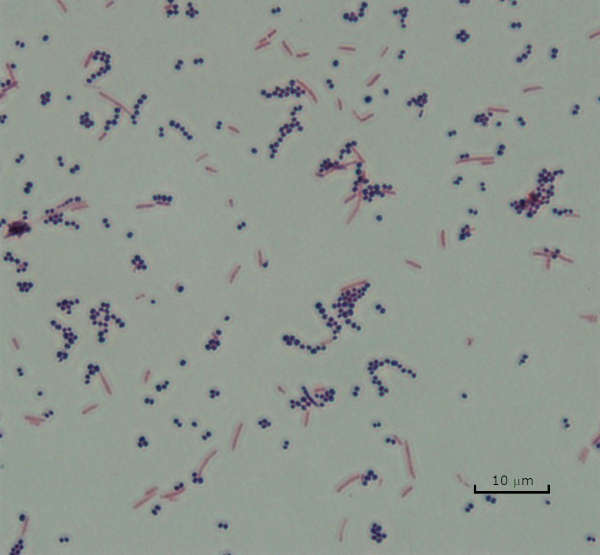
In the Gram staining protocol, two different colored stains can result. Dark purple staining indicates that the bacteria are Gram-positive and that they have retained the crystal violet stain. In contrast, reddish-pink staining is a characteristic of Gram-negative bacteria, which instead will be colored by the Safranin counterstain. Additionally, different shapes and arrangements of bacteria can be visualized after Gram staining. For example, it is possible to differentiate Cocci, or round bacteria, from rod-shaped Bacillus, or identify bacteria, which forms strands, compared to those which typically aggregate as clumps or occur singly.
In a capsule stained microscope image, the bacterial cells will typically be stained purple, and the background of the slide should be darkly stained. Against this dark background, the capsules of the bacteria, if present, will appear as a clear halo around the cells.
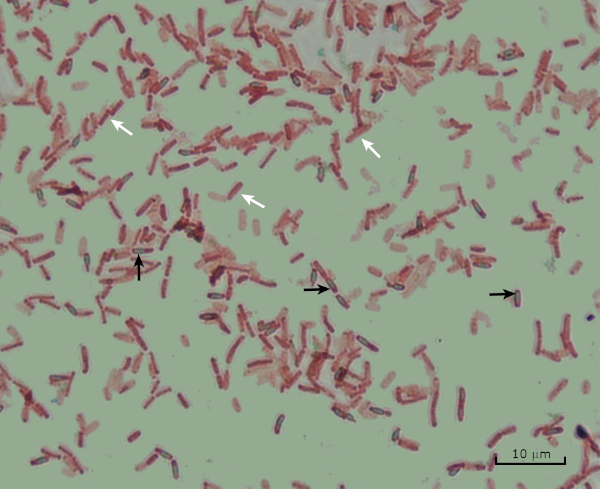
Lastly, in endospore staining, Vegetative cells will be stained red by the Safranin counterstain. If endospores are present in the sample, these will retain the malachite green stain and appear bluish-green in color.