JoVE Science Education
Microbiology
A subscription to JoVE is required to view this content.  Sign in or start your free trial.
JoVE Science Education Microbiology
Microscopy and Staining: Gram, Capsule, and Endospore Staining
  • 00:01Concepts
  • 03:12Gram Staining
  • 05:48Capsule Staining
  • 07:31Endospore Staining – Schaeffer-Fulton Method
  • 09:48Results

מיקרוסקופיה וכתמים: גרם, כמוסה וכתמים אנדוספור

English

Share

Overview

מקור: ריאנון מ. לה-ווק1, נטליה מרטין1, אנדרו ג’יי ואן אלסט1, וויקטור ג’יי דיריטה1
1 המחלקה למיקרוביולוגיה וגנטיקה מולקולרית, אוניברסיטת מדינת מישיגן, מזרח לנסינג, מישיגן, ארצות הברית

חיידקים הם מיקרואורגניזמים מגוונים שנמצאים כמעט בכל מקום על פני כדור הארץ. מאפיינים רבים מסייעים להבחין ביניהם, כולל אך לא רק לסוג, צורה וסידור של גראם, ייצור כמוסה ויצירת נבגים. כדי לבחון מאפיינים אלה, ניתן להשתמש במיקרוסקופיה קלה; עם זאת, כמה מאפיינים חיידקיים (למשל גודל, חוסר צבע, תכונות שבירה) מקשה להבחין חיידקים אך ורק עם מיקרוסקופ אור (1, 2). הכתמת חיידקים נחוצה בעת הבחנה בין סוגי חיידקים עם מיקרוסקופיה קלה. שני הסוגים העיקריים של מיקרוסקופים אור הם פשוטים מורכבים. ההבדל העיקרי ביניהם הוא מספר העדשות המשמשות להעצמת האובייקט. למיקרוסקופים פשוטים (לדוגמה זכוכית מגדלת) יש רק עדשה אחת להגדלת אובייקט, בעוד שלמיקרוסקופים מורכבים יש מספר עדשות לשיפור ההגדלה (איור 1). למיקרוסקופים מורכבים יש עדשה אובייקטיבית קרובה לעצם שאוסף אור כדי ליצור תמונה של האובייקט. לאחר מכן זה מוגדל על ידי העין (עדשת העין) אשר מגדיל את התמונה. שילוב העדשה האובייקטיבית והעין מאפשר הגדלה גבוהה יותר מאשר שימוש בעדשה אחת בלבד. בדרך כלל, מיקרוסקופים מורכבים יש עדשות אובייקטיביות מרובות של כוחות שונים כדי לאפשר הגדלה שונה (1, 2). כאן, נדון בהדמיית חיידקים עם כתמי גרם, כתמי כמוסה וכתמי אנדוספור.

Figure 1
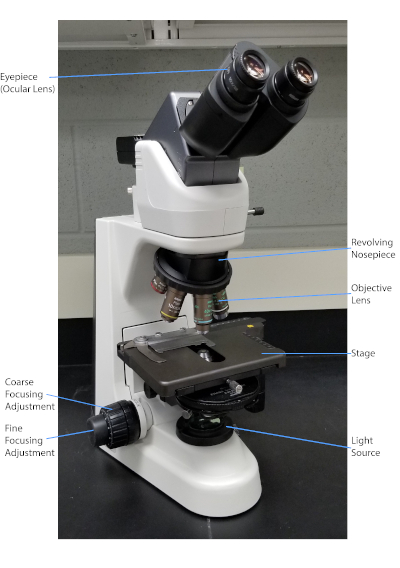
איור 1: מיקרוסקופ מורכב טיפוסי. החלקים החשובים ביותר של המיקרוסקופ מסומנים.

כתם גרם, שפותח בשנת 1884 על ידי הבקטריולוג הנס כריסטיאן גרם הדני (1), מבדיל חיידקים על סמך הרכב דופן התא (1, 2, 3, 4). בקצרה, כתם חיידקי ממוקם על שקופית מיקרוסקופ ולאחר מכן חום קבוע כדי לדבוק בתאים לשקופית ולהפוך אותם בקלות רבה יותר של כתמים (1). המדגם הקבוע בחום מוכתם בקריסטל ויולט, והופך את התאים לסגולים. השקופית היא סמוקה עם פתרון יוד, אשר מתקן את קריסטל סגול לקיר התא, ואחריו decolorizer (אלכוהול) לשטוף את כל קריסטל סגול לא קבוע. בשלב האחרון, כתם נגדי, ספרנין, מתווסף לתאי צבע אדומים (איור 2). כתם חיידקים חיובי גרם סגול בשל שכבת פפטידוגליקן עבה אשר לא חדירה בקלות על ידי decolorizer; חיידקים גרם שליליים, עם שכבת הפפטידוגיקאן הדקה יותר שלהם ותכולת שומנים גבוהה יותר, מתפרקים עם המנקה ומוכתמים באדום עם הוספת ספרנין (איור 3). כתמי גרם משמשים להבחנה בין תאים לשני סוגים (גראם-חיובי וסבתא שלילית) והוא שימושי גם כדי להבחין בצורת התא (ספירות או קוצ’י, מוטות, מוטות מעוקלים וספירלות) וסידור (תאים בודדים, זוגות, שרשראות, קבוצות ואשכולות) (1, 3).

Figure 2
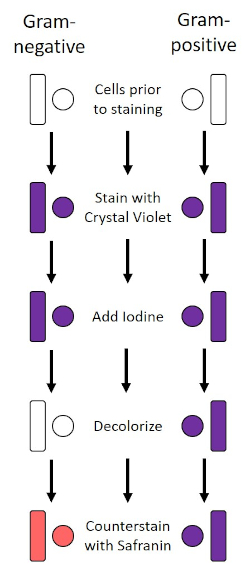
איור 2: שרטוט פרוטוקול הכתמת גרם. העמודה השמאלית מראה כיצד חיידקים גרם שלילי מגיבים בכל שלב של הפרוטוקול. העמודה הימנית מראה כיצד חיידקים חיוביים גרם מגיבים. כמו כן, מוצגות שתי צורות תאי חיידקים טיפוסיות: הבסילי (או המוטות) והקוס (או הכדורים).

Figure 3
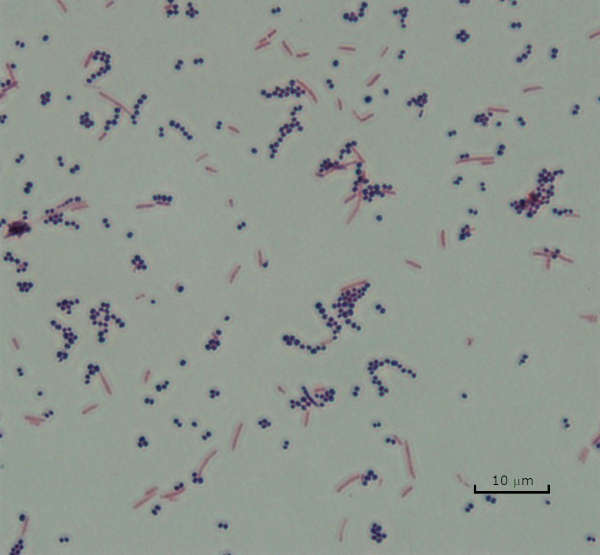
איור 3: תוצאות כתמי גרם. כתם גרם של תערובת של סטפילוקוקוס אאורוס (קוצ’י סגול חיובי גרם) ו Escherichia coli (מוטות אדומים גרם שלילי).

חיידקים מסוימים מייצרים שכבה חיצונית צמיגית חוץ-תאית הנקראת כמוסה (3, 5). כמוסות הן מבני מגן עם פונקציות שונות, כולל אך לא מוגבל לדבקות במשטחים וחיידקים אחרים, הגנה מפני ייבוש, והגנה מפני פאגוציטוזיס. כמוסות מורכבות בדרך כלל פוליסכרידים המכילים יותר מ 95% מים, אבל כמה עשוי להכיל polyalcohols ופולימינים (5). בשל הרכבם הלא יוני בעיקר ונטייתם להדוף כתמים, שיטות הכתמה פשוטות אינן פועלות עם כמוסה; במקום זאת, כתמי כמוסה משתמשים בטכניקת הכתמים שלילית שמכתימה את התאים והרקע, ומשאירה את הקפסולה כהילה ברורה סביב התאים (1, 3) (איור 4). כתמי כמוסה כרוכים בהמרצת דגימה חיידקית לכתם חומצי על שקופית מיקרוסקופ. שלא כמו כתמי גרם, כתם החיידק אינו קבוע בחום במהלך כתם כמוסה. תיקון חום יכול לשבש או לייבש את הקפסולה, מה שמוביל לתשלילים כוזבים (5). יתר על כן, תיקון חום יכול לכווץ תאים וכתוצאה מכך סליקה סביב התא אשר יכול להיות בטעות כמוסה, המוביל חיובי שווא (3). הכתם החומצי צובע את רקע השקופית; תוך כדי מעקב עם כתם בסיסי, קריסטל ויולט, צובע את התאים החיידקיים עצמם, משאיר את הקפסולה לא מוכתמת ומופיעה כהילה ברורה בין התאים לרקע השקופית (איור 5). באופן מסורתי, דיו הודו שימש כתם חומצי כי חלקיקים אלה לא יכולים לחדור את הקפסולה. לכן, לא הקפסולה ולא התא מוכתמים בדיו הודו; במקום זאת, הרקע מוכתם. קונגו אדום, ניגרוסין או אאוזין ניתן להשתמש במקום דיו הודו. כתמי כמוסה יכולים לעזור לרופאים לאבחן זיהומים חיידקיים כאשר מסתכלים על תרביות מדגימות המטופלים ומנחים טיפול מתאים למטופל. מחלות נפוצות הנגרמות על ידי חיידקים אנקפסולציה כוללות דלקת ריאות, דלקת קרום המוח, סלמונלוזיס.

Figure 4
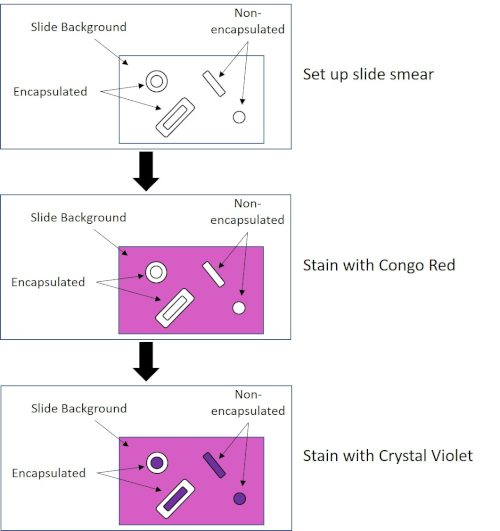
איור 4: שרטוט פרוטוקול הכתמת הקפסולה. החלונית העליונה מציגה את מריחת השקופית לפני כל יישום כתמים. החלונית האמצעית מראה כיצד השקופית והחיידקים נראים אחרי הכתם העיקרי, קונגו אדום. הלוח האחרון מראה כיצד השקופית והחיידקים דואגים לנגד, קריסטל ויולט.

Figure 5
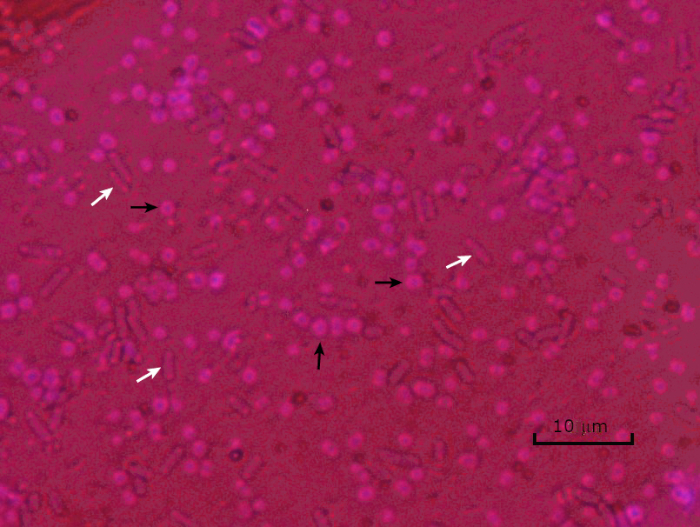
איור 5: תוצאות כתמי כמוסה. כתמי כמוסה של אצינטובקטר באומן (מסומן עם חצים שחורים) ו Escherichia coli ללא אנקפסולציה (מסומן עם חצים לבנים). שימו לב שהרקע כהה ותאי א. באומאני מוכתמים בסגול. הקפסולה סביב תאי A. baumannii ניכרת כהילה, בעוד E. coli אין הילה.

בתנאים שליליים (לדוגמה, הגבלה תזונתית, טמפרטורות קיצוניות או התייבשות), חיידקים מסוימים מייצרים אנדוספורים, מבנים לא פעילים מטבולית העמידים בפני נזק פיזי וכימי (1, 2, 8, 9). אנדוספורים מאפשרים לחיידק לשרוד תנאים קשים על ידי הגנה על החומר הגנטי של התאים; ברגע שהתנאים נוחים לצמיחה, הנבגים נבטים, וצמיחת החיידקים נמשכת. אנדוספורים קשים להכתים עם טכניקות הכתמה סטנדרטיות כי הם בלתי חדיר צבעים המשמשים בדרך כלל להכתמה (1, 9). הטכניקה המשמשת באופן שגרתי להכתמת אנדוספורס היא שיטת שייפר-פולטון (איור 6),המשתמשת בכתם הראשי של מלחיט גרין, כתם מסיס במים שנקשר חלש יחסית לחומר התאי, ולחום, כדי לאפשר לכתם לפרוץ את קליפת המוח של הנבג (איור 7). שלבים אלה צובעים את התאים הגדלים (המכונים תאים וגטטיביים בהקשר של ביולוגיה אנדוספורית), כמו גם אנדוספורים וכל נבגים חופשיים (אלה שכבר אינם נמצאים במעטפת התא לשעבר). תאים וגטטיביים נשטפים במים כדי להסיר את ירוק מלאכית; אנדוספורים שומרים על הכתם עקב חימום ירוק מלאכיט בתוך הנבג. לבסוף, התאים הצמחיים מוכתמים נגד ספרנין כדי לדמיין (איור 8). כתמים עבור אנדוספורים מסייעים להבדיל חיידקים לתוך לשעבר נבג ועבר שאינו נבג, כמו גם קובע אם נבגים נמצאים במדגם אשר, אם קיים, יכול להוביל לזיהום חיידקי על נביטה.

Figure 6
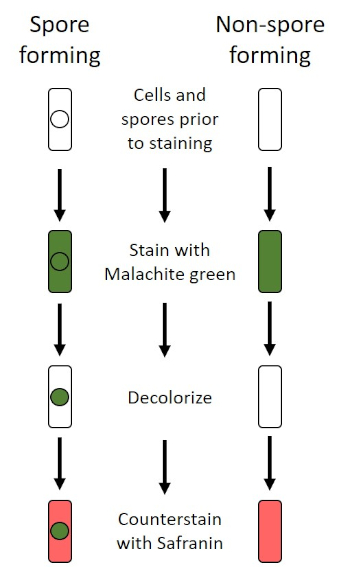
איור 6: שרטוט פרוטוקול הכתמת אנדוספור. העמודה השמאלית מראה כיצד חיידקים היוצרים נבג מגיבים בכל שלב של הפרוטוקול. העמודה הימנית מראה כיצד חיידקים שאינם נבגים מגיבים.

Figure 7
איור 7: דיאגרמה של מבנה אנדוספור. תא חיידקי המכיל אנדוספור עם מבני הנבג השונים המסומנים.

Figure 8
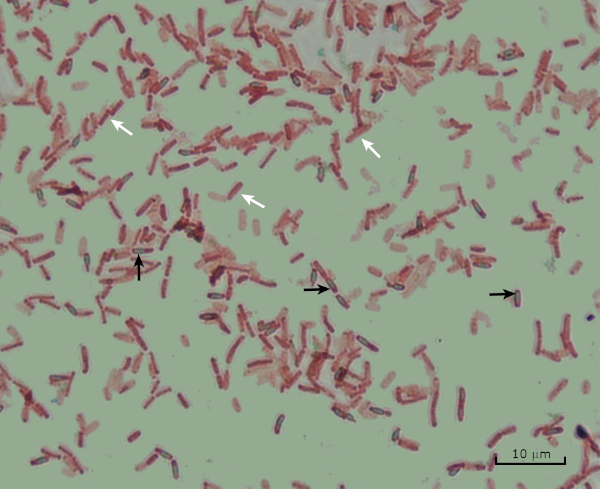
איור 8: תוצאות כתמי אנדוספור. כתם טיפוסי של אנדוספורים של בצילוס subtilis. התאים הצמחיים (המסומנים בחצים הלבנים) מוכתמים באדום, ואילו האנוספורים (המסומנים בחצים השחורים) מוכתמים בירוק.

Procedure

1. כתמי גרם הגדרת ללבוש כפפות וחלוק מעבדה לא דליק, כמו צבעים יהיה להכתים ידיים ובגדים. מבער בונזן משמש לחימום תיקון החיידקים. השתמש בזהירות בעת עבודה עם להבה; לקשור שיער ארוך. ריאגנטים כתם גרם זמין מסחרית ישמשו. ניקוי שקופיות מיקרוסקופ עם מגבו?…

Applications and Summary

Bacteria have distinguishing characteristics that can aid in their identification. Some of these characteristics can be observed by staining and light microscopy. Three staining techniques useful for observing these characteristics are Gram staining, Capsule staining, and Endospore staining. Each technique identifies different characteristics of bacteria and can be used to help physicians recommend treatments for patients, identify potential contaminants in samples or food products, and verify sample sterility.

References

  1. Black, J. G. Microbiology Principles and Explorations, 4th edition. Prentice-Hall, Inc., Upper Saddle River, New Jersey. (1999)
  2. Madigan, M. T. and J. M. Martinko. Brock Biology of Microorganisms, 11th edition. Pearson Prentice Hall, Upper Saddle River, New Jersey. (2006).
  3. Leboffe, M. J., and B. E. Pierce. A Photographic Atlas for the Microbiology Laboratory, 2nd ed. Morton Publishing Company, Englewood, Colorado. (1996).
  4. Smith, A. C. and M. A. Hussey. Gram stain protocols. Laboratory Protocols. American Society for Microbiology, Washington, DC. Available from: http://www.asmscience.org/content/education/protocol/protocol.2886. (2005).
  5. Hughes, R. B. and A. C. Smith. Capsule Stain Protocols Laboratory Protocols. American Society for Microbiology, Washington, DC. Available from: http://www.asmscience.org/content/education/protocol/protocol.3041. (2007).
  6. Anthony, E. E. Jr. A note on capsule staining. Science 73(1890):319-320 (1931).
  7. Finegold, S. M., W. J. Martin, and E. G. Scott. Bailey and Scott's Diagnostic Microbiology, 5th edition. The C. V. Mosby Company, St. Louis, Missouri. (1978).
  8. Gerhardt, P., R. G. E. Murray, W. A. Wood, and N. R. Krieg. Methods for general and molecular bacteriology. ASM Press, Washington, DC. (1994).
  9. Hussey, M. A. and A. Zayaitz. Endospore Stain Protocol. Laboratory Protocols. American Society for Microbiology, Washington, DC. Available from: http://www.asmscience.org/content/education/protocol/protocol.3112. (2007).

Transcript

Bacteria are microscopic living organisms that have many distinguishing characteristics such as shape, arrangement of cells, whether or not they produce capsules, and if they form spores. These features can all be visualized by staining and aid in the identification and classification of different bacterial species.

To examine the first two characteristics of cell shape and arrangement, we can use a simple technique called Gram staining. Here, crystal violet is applied to bacteria, which have been heat-fixed onto a slide. Next, Gram’s iodine solution is added to the slide, resulting in the formation of an insoluble complex between the crystal violet and the Gram’s iodine solution. A decolorizer is then applied and any bacteria with a thick peptidoglycan layer will stain purple, as this layer is not easily penetrated by the decolorizer. These bacteria are referred to as Gram-positive.

Gram-negative bacteria have a thinner peptidoglycan layer and will de-stain the decolorizer, losing the purple color. However, they will stain reddish-pink when a safranin counterstain is added, which binds to a lipopolysaccharide layer on their outside. Once stained, the cells can be observed for morphology, size, and arrangement, such as in chains or clusters, which further aids in classification and identification.

Another useful technique in the microbiologist’s toolkit is the capsule stain, used to visualize external capsules that surround some types of bacterial cells. Due to the capsule’s non-ionic composition and tendency to repel stains, simple staining methods won’t work. Instead, a negative staining technique is used, which first stains the background with an acidic colorant, such as Congo red, before the bacterial cells are stained with crystal violet. This leaves any capsule present as a clear halo around the cells.

The final major staining technique covered here can help determine if the bacteria being studied forms spores. In adverse conditions, some bacteria produce endospores, dormant, tough, non-reproductive structures whose primary function is to ensure the survival of bacteria through periods of environmental stress, like extreme temperatures or dehydration. However, not all bacterial species make endospores, and they are difficult to stain with standard techniques because they are impermeable to many dyes. The Schaeffer-Fulton method uses malachite green stain, which is applied to the bacteria fixed to a slide. The slide is then washed with water before being counterstained with Safranin. Vegetative cells will appear pinkish-red, while any endospores present will appear green. In this video, you will learn how to perform these common bacterial staining techniques and then examine the staining samples using light microscopy.

To begin the procedure, tie back long hair and put on the appropriate personal protective equipment, including a lab coat and gloves.

Then, clean a fresh microscope slide with a laboratory wipe. Next, pipette 10 microliters of 1X phosphate-buffered saline onto the first slide. Then, use a sterile pipette tip to select a single bacterial colony from the LB agar plate. Smear the bacterial colony in the liquid to produce a thin, even layer. Set the slide on the benchtop, and allow it to fully air dry.

Once dried, light a Bunsen burner to heat-fix the bacteria. Using tongs, pass the slide through the burner flame several times, with the bacteria side up, taking care not to hold the slide in the flame too long, which may distort the cells.

Now, working over the sink, hold the slide level and apply several drops of Gram’s crystal violet to completely cover the bacterial smear and then place the slide onto the bench to stand for 45 seconds. Next, hold the slide at an angle and gently squirt a stream of water onto the top of the slide, taking care not to squirt the bacterial smear directly. Now, holding the slide level again, apply Gram’s iodine solution to completely cover the stained bacteria and then allow it to stand for another 45 seconds. Next, carefully rinse the iodine from the slide, as shown previously. While holding the slide at an angle, add a few drops of Gram’s decolorizer to the slide, allowing it to run down over the stained bacteria, just until the run-off is clear, for approximately 5 seconds. Immediately, rinse with water as shown previously. This will limit over-decolorizing the smear. Next, holding the slide level again, apply Gram’s safranin counterstain to completely cover the stained bacteria. After 45 seconds, gently rinse the Safranin from the slide with water, as shown previously, and then blot dry with paper towels.

Finally, add a drop of immersion oil directly to the slide, and then examine the slide using a light microscope with a 100X oil objective lens.

To begin this staining protocol, first put on the correct personal protective equipment and then ensure that the glass slides that will be used are clean.

Next, prepare the solutions. To make 1% crystal violet solution, mix 0.25 grams of crystal violet powder with 25 milliliters of distilled water and vortex until dissolved. Then, prepare 1% Congo red solution by mixing 0.25 grams of Congo red powder with 25 milliliters of distilled water and vortex until dissolved. Now, pipette 10 microliters of the Congo red solution onto the slide. Using a clean, sterile pipette tip, select a single bacterial colony from the LB agar plate. Then, smear the bacterial colony into the dye to produce a thin, even layer. Completely air dry the bacterial slide for 5-7 minutes. Once the slide is dry, flood the smear with enough 1% crystal violet to cover the smear and let it sit for 1 minute. Now, hold the slide at an angle and gently squirt a stream of water onto the top of the slide, taking care not to squirt the bacteria directly. Continue holding the slide at a 45-degree angle until completely air-dried. Finally, add a drop of immersion oil directly to the slide, and then examine the slide using a light microscope with a 100X oil objective.

To perform endospore staining, first, prepare a 0.5% malachite green solution by mixing 0. 125 grams of malachite green powder with 25 milliliters of distilled water, and then vortex the solution until dissolved. Next, pipette 10 microliters of 1X PBS onto the center of the slide. Then, use a sterile pipette tip to select a single bacterial colony from the LB agar plate. Smear the bacteria into the liquid to produce a thin, even layer. Now, set the slide on the benchtop, and allow it to fully air dry. Once dried, light a Bunsen burner to heat-fix the bacteria. Pass the slide through the blue burner flame several times, with the bacteria side facing up. Then, once the slide has cooled, place a piece of precut lens paper over the heat-fixed smear. Next, turn on a hotplate to the highest setting, and bring a beaker of water to a boil.

Saturate the lens paper with the malachite green solution and, using tongs, place the slide on top of the beaker of boiling water to steam for 5 minutes. Keep the lens paper moist by adding more dye, one drop at a time, as needed. Next, again using tongs, pick up the slide from the beaker and remove and discard the lens paper. Allow the slide to cool for 2 minutes. Working over the sink, hold the slide at an angle, and gently squirt a stream of water onto the top of the slide. Now, hold the slide level and apply Safranin to completely cover the slide. Then, allow it to stand for 1 minute. Next, hold the slide at an angle and rinse as previously shown. Allow the slide to air dry on the benchtop. Finally, add a drop of immersion oil directly to the slide, and then examine the slide with a light microscope, with a 100X oil objective.

In the Gram staining protocol, two different colored stains can result. Dark purple staining indicates that the bacteria are Gram-positive and that they have retained the crystal violet stain. In contrast, reddish-pink staining is a characteristic of Gram-negative bacteria, which instead will be colored by the Safranin counterstain. Additionally, different shapes and arrangements of bacteria can be visualized after Gram staining. For example, it is possible to differentiate Cocci, or round bacteria, from rod-shaped Bacillus, or identify bacteria, which forms strands, compared to those which typically aggregate as clumps or occur singly.

In a capsule stained microscope image, the bacterial cells will typically be stained purple, and the background of the slide should be darkly stained. Against this dark background, the capsules of the bacteria, if present, will appear as a clear halo around the cells.

Lastly, in endospore staining, Vegetative cells will be stained red by the Safranin counterstain. If endospores are present in the sample, these will retain the malachite green stain and appear bluish-green in color.

Tags

Cite This
JoVE Science Education Database. JoVE Science Education. Microscopy and Staining: Gram, Capsule, and Endospore Staining. JoVE, Cambridge, MA, (2023).