JoVE Science Education
Microbiology
A subscription to JoVE is required to view this content.  Sign in or start your free trial.
JoVE Science Education Microbiology
Microscopy and Staining: Gram, Capsule, and Endospore Staining
  • 00:01Concepts
  • 03:12Gram Staining
  • 05:48Capsule Staining
  • 07:31Endospore Staining – Schaeffer-Fulton Method
  • 09:48Results

Microscopia e Coloração: Coloração de Gram, Cápsula e Endósporo

English

Share

Overview

Fonte: Rhiannon M. LeVeque1, Natalia Martin1, Andrew J. Van Alst1, e Victor J. DiRita1
1 Departamento de Microbiologia e Genética Molecular, Michigan State University, East Lansing, Michigan, Estados Unidos da América

Bactérias são microrganismos diversos encontrados em quase todos os lugares da Terra. Muitas propriedades ajudam a distingui-los umas das outras, incluindo, mas não se limitando ao tipo de coloração gram, forma e arranjo, produção de cápsula e formação de esporos. Para observar essas propriedades, pode-se usar microscopia leve; no entanto, algumas características bacterianas (por exemplo tamanho, falta de coloração e propriedades refrativas) dificultam a distinção de bactérias apenas com um microscópio leve (1, 2). A coloração de bactérias é necessária ao distinguir tipos bacterianos com microscopia leve. Os dois principais tipos de microscópios leves são simples e compostos. A principal diferença entre eles é o número de lentes usadas para ampliar o objeto. Microscópios simples (por exemplo, uma lupa) têm apenas uma lente para ampliar um objeto, enquanto microscópios compostos têm várias lentes para melhorar a ampliação (Figura 1). Microscópios compostos têm uma lente objetiva perto do objeto que coleta luz para criar uma imagem do objeto. Isso é então ampliado pela ocular (lente ocular) que amplia a imagem. Combinar a lente objetiva e a ocular permite uma ampliação maior do que usar apenas uma única lente. Normalmente, microscópios compostos têm múltiplas lentes objetivas de diferentes poderes para permitir diferentes ampliações (1, 2). Aqui, discutiremos a visualização de bactérias com manchas de Gram, manchas de cápsula e manchas de Endospore.

Figure 1
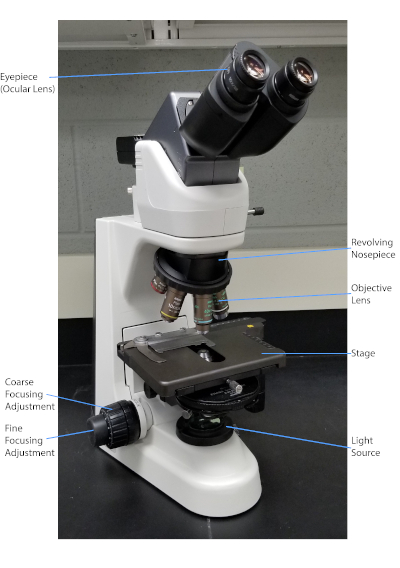
Figura 1: Um microscópio composto típico. As partes mais importantes do microscópio são rotuladas.

A mancha de Gram, desenvolvida em 1884 pelo bacteriologista dinamarquês Hans Christian Gram (1), diferencia bactérias baseadas na composição da parede celular (1, 2, 3, 4). Brevemente, uma mancha bacteriana é colocada em um slide de microscópio e, em seguida, fixada a calor para aderir as células ao slide e torná-las mais prontamente aceitando manchas (1). A amostra fixa de calor está manchada com Crystal Violet, tornando as células roxas. O slide é lavado com uma solução de iodo, que fixa o Cristal Violet na parede celular, seguido por um descolorador (um álcool) para lavar qualquer Violeta cristal não fixa. Na etapa final, uma contra-mancha, Safranin, é adicionada às células coloridas vermelhas (Figura 2). As bactérias gram-positivas mancham o roxo devido à espessa camada peptidoglycan que não é facilmente penetrada pelo descolorador; Bactérias gram-negativas, com sua camada peptidoglycan mais fina e maior teor lipídudo, se desarmam com o descolorador e são contra-manchadas de vermelho quando Safranin é adicionado (Figura 3). A coloração gramada é usada para diferenciar células em dois tipos (Gram-positivo e Gram-negativo) e também é útil para distinguir a forma celular (esferas ou cocci, hastes, hastes curvas e espirais) e arranjo (células únicas, pares, cadeias, grupos e clusters) (1, 3).

Figure 2
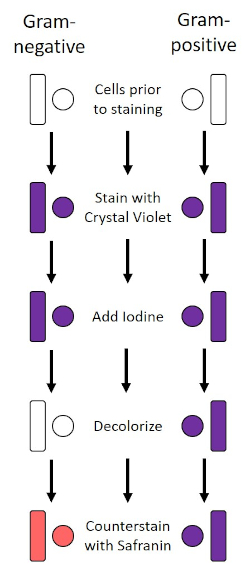
Figura 2: Esquema do Protocolo de Coloração de Grama. A coluna esquerda mostra como as bactérias Gram-negativas reagem a cada passo do protocolo. A coluna certa mostra como as bactérias Gram-positivas reagem. Além disso, são mostradas duas formas típicas de células bacterianas: os bacilos (ou hastes) e o cocci (ou esferas).

Figure 3
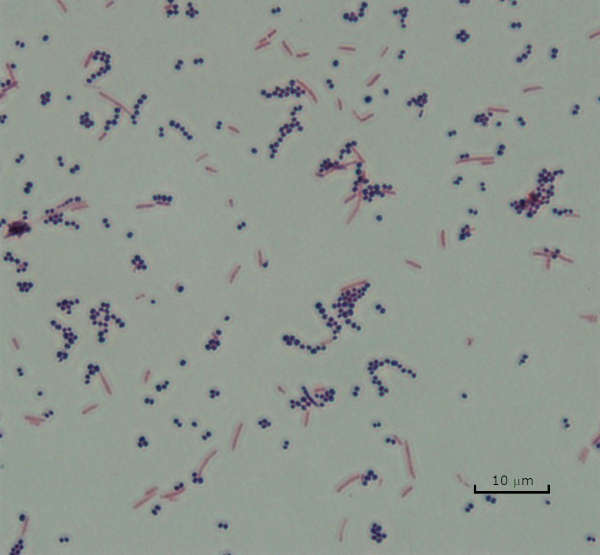
Figura 3: Resultados de coloração de grama. Uma mancha gram de uma mistura de Staphylococcus aureus (Gram-positivo cocci roxo) e Escherichia coli (barras vermelhas Gram-negativas).

Algumas bactérias produzem uma camada externa viscosa extracelular chamada cápsula (3, 5). As cápsulas são estruturas protetoras com várias funções, incluindo, mas não se limitando à adesão a superfícies e outras bactérias, proteção contra profanação e proteção contra fagocitose. As cápsulas são tipicamente compostas de polissacarídeos contendo mais de 95% de água, mas algumas podem conter polialcoólicos e poliaminas (5). Devido à sua composição não iônica e tendência a repelir manchas, métodos simples de coloração não funcionam com cápsula; em vez disso, a coloração da cápsula utiliza uma técnica de coloração negativa que mancha as células e o fundo, deixando a cápsula como um halo claro ao redor das células (1, 3) (Figura 4). A coloração da cápsula envolve a mancha de uma amostra bacteriana em uma mancha ácida em um slide de microscópio. Ao contrário da mancha gram, a mancha bacteriana não é fixada durante uma mancha de cápsula. A fixação de calor pode interromper ou desidratar a cápsula, levando a falsos negativos (5). Além disso, a fixação de calor pode encolher as células resultando em uma clareira ao redor da célula que pode ser confundida como uma cápsula, levando a falsos positivos (3). A mancha ácida colore o fundo do slide; enquanto segue com uma mancha básica, Crystal Violet, colore as próprias células bacterianas, deixando a cápsula sem manchas e aparecendo como um halo claro entre as células e o fundo do slide (Figura 5). Tradicionalmente, a tinta da Índia tem sido usada como mancha ácida porque essas partículas não podem penetrar na cápsula. Portanto, nem a cápsula nem a célula são manchadas pela tinta da Índia; em vez disso, o fundo está manchado. Congo Red, Nigrosin ou Eosin podem ser usados no lugar da tinta da Índia. A coloração da cápsula pode ajudar os médicos a diagnosticar infecções bacterianas ao analisar culturas a partir de amostras de pacientes e orientar o tratamento adequado do paciente. Doenças comuns causadas por bactérias encapsuladas incluem pneumonia, meningite e salmonelose.

Figure 4
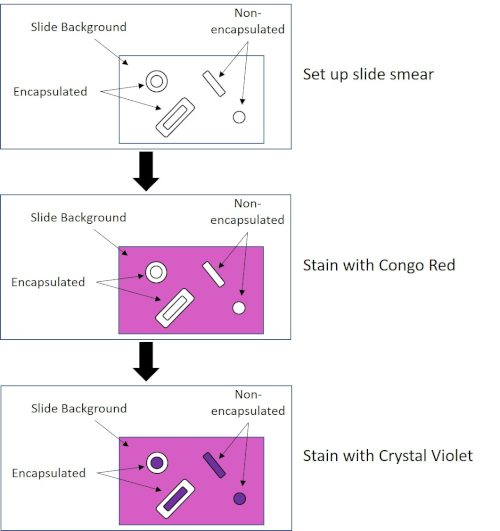
Figura 4: Esquema do Protocolo de Coloração da Cápsula. O painel superior mostra a mancha de slides antes de qualquer aplicação de mancha. O painel do meio mostra como o slide e as bactérias cuidam da mancha primária, Congo Red. O painel final mostra como o slide e as bactérias cuidam da contra-mancha, Crystal Violet.

Figure 5
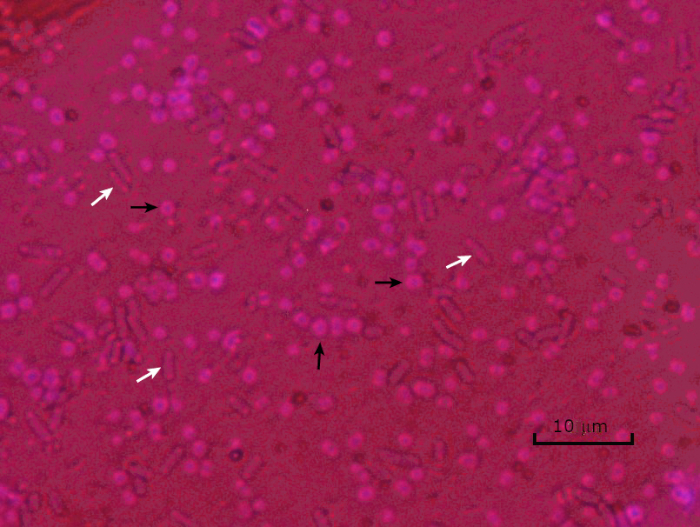
Figura 5: Resultados de coloração da cápsula. Coloração cápsula de Acinetobacter baumannii encapsulada (denotada com setas pretas) e Escherichia coli não encapsulada (denotada com setas brancas). Note que o fundo é escuro e as células A. baumannii estão manchadas de roxo. A cápsula ao redor das células de A. baumannii é evidente como um halo, enquanto E. coli não tem halo.

Em condições adversas (por exemplo, limitação de nutrientes, temperaturas extremas ou desidratação), algumas bactérias produzem endosporos, estruturas metabolicamente inativas resistentes a danos físicos e químicos (1, 2, 8, 9). Os endosporos permitem que a bactéria sobreviva a condições severas, protegendo o material genético das células; uma vez que as condições são favoráveis para o crescimento, os esporos germinam e o crescimento bacteriano continua. Os endosporos são difíceis de colorir com técnicas de coloração padrão porque são impermeáveis a corantes tipicamente usados para coloração (1, 9). A técnica rotineiramente utilizada para manchar endospores é o Método Schaeffer-Fulton (Figura 6),que utiliza a mancha primária Malachite Green, uma mancha solúvel em água que se liga relativamente fracamente ao material celular, e ao calor, para permitir que a mancha rompe através do córtex do esporo (Figura 7). Esses passos colorem as células em crescimento (chamadas células vegetativas no contexto da biologia endospora), bem como endosporos e quaisquer esporos livres (aqueles que não estão mais dentro do antigo envelope celular). As células vegetativas são lavadas com água para remover o Malachite Green; endosporos retêm a mancha devido ao aquecimento do Verde Malachite dentro do esporo. Finalmente, as células vegetativas são contra-manchadas com Safranin para visualizar (Figura 8). A coloração para endosporos ajuda a diferenciar bactérias em ex-esporos e ex-esporos, bem como determina se esporos estão presentes em uma amostra que, se presente, poderia levar à contaminação bacteriana após a germinação.

Figure 6
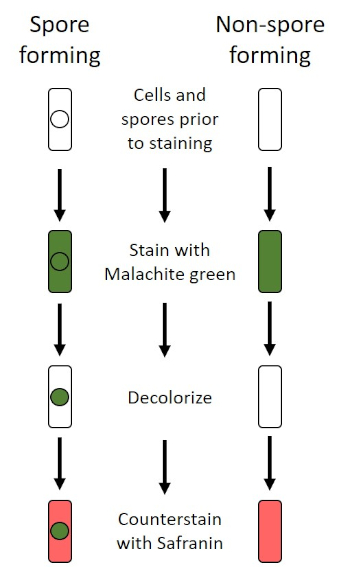
Figura 6: Esquema do Protocolo de Coloração de Endospore. A coluna esquerda mostra como as bactérias formadoras de esporos reagem a cada passo do protocolo. A coluna direita mostra como as bactérias que formam os não esporos reagem.

Figure 7
Figura 7: Diagrama da Estrutura Endospore. Célula bacteriana contendo um endospore com as várias estruturas de esporos rotuladas.

Figure 8
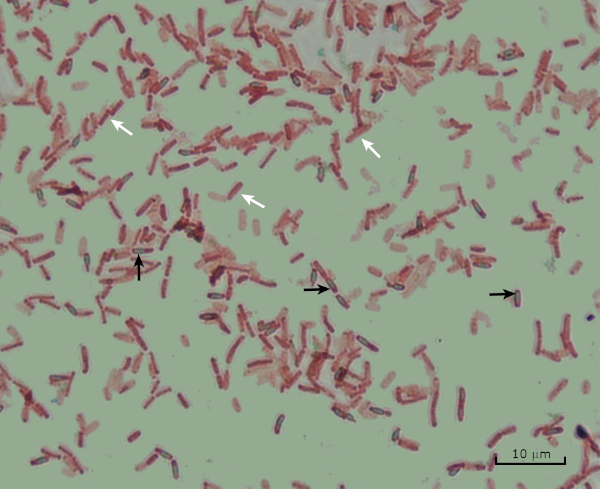
Figura 8: Resultados de Coloração de Endospore. Uma mancha típica de endosporos de Bacillus subtilis. As células vegetativas (denotadas com as setas brancas) estão manchadas de vermelho, enquanto os endosporos (denotados com as setas pretas) estão manchados de verde.

Procedure

1. Gram Staining Configuração Use luvas e um jaleco não inflamável, pois os corantes mancharão as mãos e as roupas. Um queimador Bunsen é usado para aquecer a bactéria. Use os cuidados ao trabalhar com chama; amarrar cabelo comprido. Serão utilizados reagentes de manchas Gram disponíveis comercialmente. Limpe slides de microscópio com lenços de laboratório. Protocolo Pipe…

Applications and Summary

Bacteria have distinguishing characteristics that can aid in their identification. Some of these characteristics can be observed by staining and light microscopy. Three staining techniques useful for observing these characteristics are Gram staining, Capsule staining, and Endospore staining. Each technique identifies different characteristics of bacteria and can be used to help physicians recommend treatments for patients, identify potential contaminants in samples or food products, and verify sample sterility.

References

  1. Black, J. G. Microbiology Principles and Explorations, 4th edition. Prentice-Hall, Inc., Upper Saddle River, New Jersey. (1999)
  2. Madigan, M. T. and J. M. Martinko. Brock Biology of Microorganisms, 11th edition. Pearson Prentice Hall, Upper Saddle River, New Jersey. (2006).
  3. Leboffe, M. J., and B. E. Pierce. A Photographic Atlas for the Microbiology Laboratory, 2nd ed. Morton Publishing Company, Englewood, Colorado. (1996).
  4. Smith, A. C. and M. A. Hussey. Gram stain protocols. Laboratory Protocols. American Society for Microbiology, Washington, DC. Available from: http://www.asmscience.org/content/education/protocol/protocol.2886. (2005).
  5. Hughes, R. B. and A. C. Smith. Capsule Stain Protocols Laboratory Protocols. American Society for Microbiology, Washington, DC. Available from: http://www.asmscience.org/content/education/protocol/protocol.3041. (2007).
  6. Anthony, E. E. Jr. A note on capsule staining. Science 73(1890):319-320 (1931).
  7. Finegold, S. M., W. J. Martin, and E. G. Scott. Bailey and Scott's Diagnostic Microbiology, 5th edition. The C. V. Mosby Company, St. Louis, Missouri. (1978).
  8. Gerhardt, P., R. G. E. Murray, W. A. Wood, and N. R. Krieg. Methods for general and molecular bacteriology. ASM Press, Washington, DC. (1994).
  9. Hussey, M. A. and A. Zayaitz. Endospore Stain Protocol. Laboratory Protocols. American Society for Microbiology, Washington, DC. Available from: http://www.asmscience.org/content/education/protocol/protocol.3112. (2007).

Transcript

Bacteria are microscopic living organisms that have many distinguishing characteristics such as shape, arrangement of cells, whether or not they produce capsules, and if they form spores. These features can all be visualized by staining and aid in the identification and classification of different bacterial species.

To examine the first two characteristics of cell shape and arrangement, we can use a simple technique called Gram staining. Here, crystal violet is applied to bacteria, which have been heat-fixed onto a slide. Next, Gram’s iodine solution is added to the slide, resulting in the formation of an insoluble complex between the crystal violet and the Gram’s iodine solution. A decolorizer is then applied and any bacteria with a thick peptidoglycan layer will stain purple, as this layer is not easily penetrated by the decolorizer. These bacteria are referred to as Gram-positive.

Gram-negative bacteria have a thinner peptidoglycan layer and will de-stain the decolorizer, losing the purple color. However, they will stain reddish-pink when a safranin counterstain is added, which binds to a lipopolysaccharide layer on their outside. Once stained, the cells can be observed for morphology, size, and arrangement, such as in chains or clusters, which further aids in classification and identification.

Another useful technique in the microbiologist’s toolkit is the capsule stain, used to visualize external capsules that surround some types of bacterial cells. Due to the capsule’s non-ionic composition and tendency to repel stains, simple staining methods won’t work. Instead, a negative staining technique is used, which first stains the background with an acidic colorant, such as Congo red, before the bacterial cells are stained with crystal violet. This leaves any capsule present as a clear halo around the cells.

The final major staining technique covered here can help determine if the bacteria being studied forms spores. In adverse conditions, some bacteria produce endospores, dormant, tough, non-reproductive structures whose primary function is to ensure the survival of bacteria through periods of environmental stress, like extreme temperatures or dehydration. However, not all bacterial species make endospores, and they are difficult to stain with standard techniques because they are impermeable to many dyes. The Schaeffer-Fulton method uses malachite green stain, which is applied to the bacteria fixed to a slide. The slide is then washed with water before being counterstained with Safranin. Vegetative cells will appear pinkish-red, while any endospores present will appear green. In this video, you will learn how to perform these common bacterial staining techniques and then examine the staining samples using light microscopy.

To begin the procedure, tie back long hair and put on the appropriate personal protective equipment, including a lab coat and gloves.

Then, clean a fresh microscope slide with a laboratory wipe. Next, pipette 10 microliters of 1X phosphate-buffered saline onto the first slide. Then, use a sterile pipette tip to select a single bacterial colony from the LB agar plate. Smear the bacterial colony in the liquid to produce a thin, even layer. Set the slide on the benchtop, and allow it to fully air dry.

Once dried, light a Bunsen burner to heat-fix the bacteria. Using tongs, pass the slide through the burner flame several times, with the bacteria side up, taking care not to hold the slide in the flame too long, which may distort the cells.

Now, working over the sink, hold the slide level and apply several drops of Gram’s crystal violet to completely cover the bacterial smear and then place the slide onto the bench to stand for 45 seconds. Next, hold the slide at an angle and gently squirt a stream of water onto the top of the slide, taking care not to squirt the bacterial smear directly. Now, holding the slide level again, apply Gram’s iodine solution to completely cover the stained bacteria and then allow it to stand for another 45 seconds. Next, carefully rinse the iodine from the slide, as shown previously. While holding the slide at an angle, add a few drops of Gram’s decolorizer to the slide, allowing it to run down over the stained bacteria, just until the run-off is clear, for approximately 5 seconds. Immediately, rinse with water as shown previously. This will limit over-decolorizing the smear. Next, holding the slide level again, apply Gram’s safranin counterstain to completely cover the stained bacteria. After 45 seconds, gently rinse the Safranin from the slide with water, as shown previously, and then blot dry with paper towels.

Finally, add a drop of immersion oil directly to the slide, and then examine the slide using a light microscope with a 100X oil objective lens.

To begin this staining protocol, first put on the correct personal protective equipment and then ensure that the glass slides that will be used are clean.

Next, prepare the solutions. To make 1% crystal violet solution, mix 0.25 grams of crystal violet powder with 25 milliliters of distilled water and vortex until dissolved. Then, prepare 1% Congo red solution by mixing 0.25 grams of Congo red powder with 25 milliliters of distilled water and vortex until dissolved. Now, pipette 10 microliters of the Congo red solution onto the slide. Using a clean, sterile pipette tip, select a single bacterial colony from the LB agar plate. Then, smear the bacterial colony into the dye to produce a thin, even layer. Completely air dry the bacterial slide for 5-7 minutes. Once the slide is dry, flood the smear with enough 1% crystal violet to cover the smear and let it sit for 1 minute. Now, hold the slide at an angle and gently squirt a stream of water onto the top of the slide, taking care not to squirt the bacteria directly. Continue holding the slide at a 45-degree angle until completely air-dried. Finally, add a drop of immersion oil directly to the slide, and then examine the slide using a light microscope with a 100X oil objective.

To perform endospore staining, first, prepare a 0.5% malachite green solution by mixing 0. 125 grams of malachite green powder with 25 milliliters of distilled water, and then vortex the solution until dissolved. Next, pipette 10 microliters of 1X PBS onto the center of the slide. Then, use a sterile pipette tip to select a single bacterial colony from the LB agar plate. Smear the bacteria into the liquid to produce a thin, even layer. Now, set the slide on the benchtop, and allow it to fully air dry. Once dried, light a Bunsen burner to heat-fix the bacteria. Pass the slide through the blue burner flame several times, with the bacteria side facing up. Then, once the slide has cooled, place a piece of precut lens paper over the heat-fixed smear. Next, turn on a hotplate to the highest setting, and bring a beaker of water to a boil.

Saturate the lens paper with the malachite green solution and, using tongs, place the slide on top of the beaker of boiling water to steam for 5 minutes. Keep the lens paper moist by adding more dye, one drop at a time, as needed. Next, again using tongs, pick up the slide from the beaker and remove and discard the lens paper. Allow the slide to cool for 2 minutes. Working over the sink, hold the slide at an angle, and gently squirt a stream of water onto the top of the slide. Now, hold the slide level and apply Safranin to completely cover the slide. Then, allow it to stand for 1 minute. Next, hold the slide at an angle and rinse as previously shown. Allow the slide to air dry on the benchtop. Finally, add a drop of immersion oil directly to the slide, and then examine the slide with a light microscope, with a 100X oil objective.

In the Gram staining protocol, two different colored stains can result. Dark purple staining indicates that the bacteria are Gram-positive and that they have retained the crystal violet stain. In contrast, reddish-pink staining is a characteristic of Gram-negative bacteria, which instead will be colored by the Safranin counterstain. Additionally, different shapes and arrangements of bacteria can be visualized after Gram staining. For example, it is possible to differentiate Cocci, or round bacteria, from rod-shaped Bacillus, or identify bacteria, which forms strands, compared to those which typically aggregate as clumps or occur singly.

In a capsule stained microscope image, the bacterial cells will typically be stained purple, and the background of the slide should be darkly stained. Against this dark background, the capsules of the bacteria, if present, will appear as a clear halo around the cells.

Lastly, in endospore staining, Vegetative cells will be stained red by the Safranin counterstain. If endospores are present in the sample, these will retain the malachite green stain and appear bluish-green in color.

Tags

Cite This
JoVE Science Education Database. JoVE Science Education. Microscopy and Staining: Gram, Capsule, and Endospore Staining. JoVE, Cambridge, MA, (2023).