This protocol is an excerpt from Liu et al. A Temperature Gradient Assay to Determine Thermal Preferences of Drosophila Larvae, J. Vis. Exp. (2018).
1. Temperature Gradient Setup
- Prepare single-directional gradient
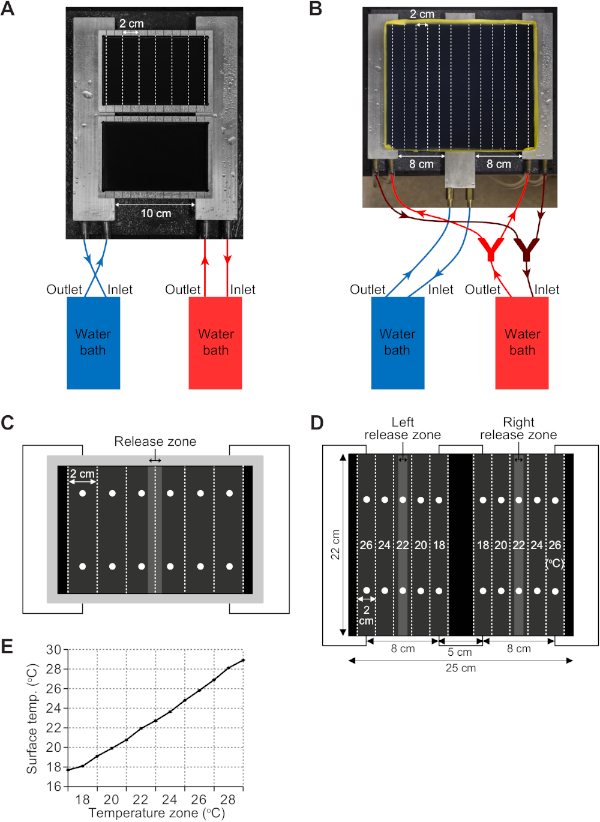
- To create a humid ambient environment during the assays, place the two aluminum blocks connected to two water baths on wet paper towels, separated by 10 cm (Figure 1A).
- Turn on the two water baths ~2 h prior to initiating the assay to allow enough time for the temperature of the aluminum blocks to equilibrate.
NOTE: It is recommended to perform a mock experiment to determine the temperature of each water bath that is needed to achieve the desired linear temperature gradient. Some typical temperature pairs to set the water baths are listed in Table 1. However, note that the surface temperatures are affected by ambient temperature. The length of tubing also affects the temperatures as there is cooling in the tubes. The length of the tubing in our setup is 1.5 m.
- Microwave 100 mL of 1% agarose at the high-power setting in a 500 mL round wide-mouth bottle and pour 25 mL/assay plate on a level benchtop. Prepare two assay plates, which can be placed on the aluminum blocks at the same time (Figure 1A).
- After the agarose has solidified (10-20 min), gently rub each agarose surface with a standard kitchen sponge or a melamine sponge to make the agarose surface slightly coarse, so that when spraying water on the agarose gel, a smooth thin water membrane will be created, and no water droplets will form.
- Fully submerge the plates in a container with distilled water until the assay is ready to be performed to prevent the plates from getting desiccated.
- Prepare a bidirectional gradient (optional)
- To create a humid ambient environment during the assays, place three aluminum blocks 8 cm apart (Figure 1B) on wet paper towels.
- Turn on the two water baths ~2 h prior to initiating the assay to allow enough time for the temperature of the aluminum blocks to equilibrate.
NOTE: It is recommended to perform a mock experiment to determine the temperature of each water bath for the bidirectional gradient. Some typical temperature pairs to set the water baths are listed in Table 2. However, note that the surface temperatures are affected by ambient temperature. The length of tubing also affects the temperatures as there is cooling in the tubes. The length of the tubing in our setup is 1.5 m.
- To prevent the agarose from spilling out of the plate, wrap the edges of the aluminum plate with labeling tape to form a 10 mm-high wall (Figure 1B).
- Using the high-power setting, microwave 200 mL of 1% agarose in a 500 mL round wide-mouth bottle and pour 120 mL on an assay plate.
- After the agarose has solidified (~30 min), gently rub each agarose surface with a standard kitchen sponge or a melamine sponge to make the agarose surface slightly coarse, so that when spraying water on the agarose gel, a smooth thin water membrane is created and no water droplets form.
- Fully submerge the assay plates in a container with distilled water until the assay is ready to be performed to prevent them from drying out.
- Set up single-directional gradient
- Prepare reagents and items on a bench next to the gradient assay apparatus (see the Table of Materials).
- To promote efficient temperature transfer, fill any gaps between the aluminum blocks and the assay plates by spraying water at the interface between the blocks and plate.
- Using gloves, remove the assay plates from the water container. If water invades between the agarose gel and the plate and causes bumps to form on the surface, remove the water with a P1000 micropipette.
- Place the assay plates on the aluminum blocks so that the demarcations that are 2 cm from either edge exactly match the edges of the aluminum blocks (Figure 1A,C).
- Spray water onto the surface of the plate (a thin water membrane covering the agarose surface is sufficient) to prevent the agarose gel from drying out. Make sure that the water membrane is continuous and free of water droplets since larvae can get trapped in water droplets.
- Cover the gradient system with a cardboard box to reduce water evaporation and help stabilize the temperature of the gel surface. Wait for 5-10 min to allow the temperature to equilibrate.
- Check the surface temperature at 12 points on the plate (Figure 1C). Take two measurements within each zone to establish whether or not there is variability within a zone. Make sure the temperature at both spots is within ± 0.2 °C of the desired temperature.
NOTE: Variability within a zone usually occurs because the exact distances of the two spots to the edge of the aluminum blocks are not identical. Adjust the position of the plate on the aluminum blocks to make sure that the demarcations that are 2 cm from either edge exactly match the edges of the aluminum blocks.
- If the measured temperature gradient deviates from the desired gradient, increase or decrease the water bath temperature setting(s) and recheck the surface temperature after the temperature of the water bath(s) stabilize(s).
- Cover the gradient system with a cardboard box until starting the assay.
- Set up bidirectional gradient (optional)
- Prepare reagents and items on a bench next to the gradient assay apparatus (see the Table of Materials).
- Spray water on the surfaces of the three aluminum blocks to promote efficient temperature transfer from the aluminum blocks to the assay plates by filling any gaps between the surfaces.
- Remove the assay plates carefully from the water container and place on the aluminum blocks. If water invades between the agarose gel and the plate, which might cause bumps to form on the surface, remove the water with a P1000 micropipette.
- Place the assay plate on the aluminum blocks so that the midlines of the first and last zones from either edge exactly match the edges of the two side aluminum blocks (Figure 1B,D).
- Spray water onto the surface of the plate (a thin water membrane covering the agarose surface is sufficient) to prevent the agarose gel from drying out. Make sure that the water membrane is continuous and free of water droplets, since larvae can get trapped in water droplets.
- Cover the gradient system with a cardboard box to reduce water evaporation and help stabilize the temperature of the gel surface. Wait 5-10 min to allow the temperature to equilibrate.
- Check the surface temperature at two points along the midline of each of the 10 zones (Figure 1D). Take two measurements within each zone to establish whether or not there is variability within a zone. Make sure the temperature at both spots is within ± 0.2 °C of the desired temperature.
NOTE: Variability within a zone usually occurs because the exact distances of the two spots to the edge of the aluminum blocks are not identical. Adjust the position of the plate on the aluminum blocks to make sure that the midlines of the first and last zones nearest each edge exactly match the edges of the two side aluminum blocks.
- If the measured temperature gradient deviates from the desired gradient, adjust the water bath temperature setting(s) and recheck the surface temperature after the temperature of the water bath(s) stabilize(s).
- Cover the blocks with a cardboard box until the start of the assay.
2. Assay and Calculation
- Remove the cardboard box and check the gel surface temperature immediately before transferring the larvae to the plate. Minimize the time that the cardboard box is open to prevent disrupting the temperature equilibration. If the surface is dry, spray a small amount of water on the surface.
- Distribute 150 ± 50 larvae near the center of each plate (between zones 3 and 4 out of the 6 zones) for the single-directional gradient (release zone; Figure 1C).
NOTE: For the bidirectional gradient, distribute 200-400 larvae along the middle zone of each half (Figure 1D).
- Place a microplate lid over each assay plate to prevent the larvae from crawling out. Cover the setup with a cardboard box to prevent light exposure, which might affect larval choice on the agarose gel.
NOTE: For the bidirectional gradient, it should not be necessary to cover the plate with a lid, because the plate is larger, and the preferred temperature of the larvae is in the middle zone. Consequently, few larvae accumulate at the edges and have an opportunity to crawl out.
- Allow the assay to proceed for 10-30 min for the single-directional gradient, and for 15-35 min for the bidirectional gradient, depending on the age of the larvae (Table 3).
- Remove the cardboard box and the microplate lid. Photograph the plates from above using a digital camera. Take two photographs of each assay plate so that the investigator can choose the one with better contrast and brightness for analysis.
- Remove all of the larvae from the assay plates and anywhere outside the plates by aspiration.
- Clean the assay plates, the tubes, and the cell strainer thoroughly with distilled water. Reuse the assay plates prepared that day unless the surface of the agarose is damaged.
- Calculate the percentage distribution of larvae in each zone.
- Open the photographic image of the assay results using any software that allows adding markings to the image. To indicate the assay zones, draw vertical lines every 2 cm based on the demarcations on the assay plate.
- Count the number of larvae in each zone and record the numbers. Do not count larvae in regions 0.5 cm from any of the walls. The gel is thicker near the walls, and the surface temperatures are not linear in these regions.
- For the single-directional gradient, calculate the percentage distribution in each zone as follows:
(number of larvae in a given 2-cm zone)/ (total number of larvae in 6 zones) x 100.
- For the bidirectional gradient, calculate the percentage distribution in each zone as follows:
(number of larvae in a given 2-cm zone)/ (total number of larvae in 5 zones on each side of the gradient) x 100.